Unlock Hidden Space: The Real Cost to Convert a Vaulted Ceiling
That soaring vaulted ceiling looked magnificent when you bought the house. It creates a sense of openness, drama, and light. But now, the practical needs of your household are changing, and all that vertical air space feels less like a feature and more like a missed opportunity. You need another bedroom, a home office, or a playroom, and the most logical place to expand is right above your head.
Converting that grand, empty space into a functional second floor or loft is an ingenious solution that adds valuable square footage without altering your home’s footprint. This project, however, is far more complex than a simple room renovation. It’s a major structural undertaking that requires careful planning, professional expertise, and a realistic budget. This guide will break down the true cost to convert a vaulted ceiling to a second floor, exploring every factor from engineering to finishing touches.
You'll Learn About
Why Convert Your Vaulted Ceiling? The Hidden Potential Above
The primary motivation for this conversion is almost always the need for more space. Families grow, work-from-home becomes permanent, or the desire for a dedicated hobby room intensifies. Creating a new room from the existing volume of your home is often more cost-effective than building a full-scale addition outwards, which can involve foundation work and sacrificing yard space.
Beyond the practical gain of a new room, this conversion can significantly increase your property’s value. Appraisers and buyers look at usable square footage, and transforming a 20-foot-high living room into a standard-height room with a new bedroom overhead is a substantial boost to your home’s stats. It’s an investment that pays off both in daily utility and long-term equity.
Before You Begin: Critical Factors Influencing Your Conversion Cost
The total cost of this project can vary dramatically, with national averages ranging anywhere from $13,000 to over $50,000. The final price tag depends on a multitude of interconnected factors. Understanding these variables is the first step to creating an accurate budget and avoiding costly surprises down the road.
Structural Engineering and Design: The Non-Negotiable First Step
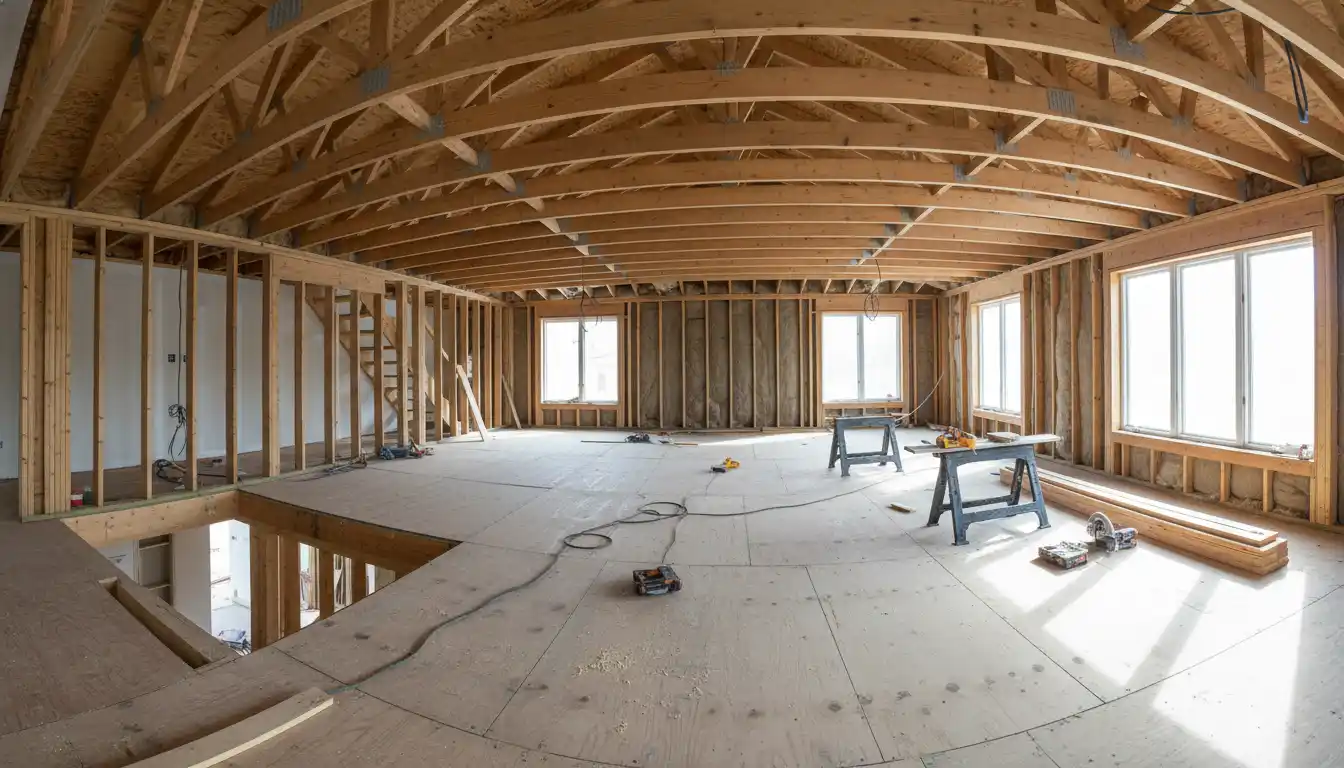
This is not a DIY-friendly project. The absolute first professional you must hire is a structural engineer. Your existing ceiling joists were only ever meant to hold up drywall, not support a living space with furniture and people. The engineer’s job is to assess your home’s foundation, load-bearing walls, and roof structure to determine if it can handle the immense weight of a new floor.
The engineer will create a detailed framing plan that specifies the size, type, and spacing of new floor joists, as well as any necessary support beams or columns. This professional’s fee is a critical investment in your home’s safety and structural integrity. Expect to pay between $500 and $3,000 for these essential plans.
Labor: Assembling Your Professional Team
Labor will be the largest portion of your budget, often accounting for 50% or more of the total cost. This is a complex job that requires a team of skilled tradespeople managed by an experienced general contractor. Your team will likely include framers, electricians, HVAC specialists, drywall installers, and painters. If a bathroom is part of the plan, you’ll also need a plumber. A good general contractor is worth their weight in gold, as they will handle permits, scheduling, and ensure the entire project adheres to building codes.
Permits and Inspections: Doing it by the Book
Because this project involves major structural changes, obtaining the proper building permits is mandatory. Your contractor will typically handle the submission process, which includes the engineer’s stamped plans. Throughout the construction, a local building inspector will visit at key stages—after framing, after electrical and plumbing rough-ins, and upon completion—to ensure all work is up to code. Skipping this step can lead to significant fines and issues when you eventually sell your home.
The Staircase: More Than Just a Way Up
You need a way to get to your new second floor, and that means installing a staircase. This is a significant expense and a major space consideration on the floor below. The cost will depend on the style (straight, L-shaped, spiral) and materials (wood, metal, carpet-grade). A staircase can easily add $2,000 to $10,000 or more to the project cost, so its design and placement must be carefully planned from the outset.
HVAC, Electrical, and Plumbing Systems
Extending your home’s vital systems up to the new level is a significant part of the job. An electrician will need to run new wiring for outlets and lighting. Your HVAC system will need new ductwork extended into the space, and you must consider whether your current unit can handle the additional square footage. If you’re adding a bathroom, a plumber will need to run new supply and drain lines, which can be one of the most complex parts of the project.
A Detailed Breakdown of Potential Costs
To help you visualize the budget, here is a table outlining the potential cost ranges for the various components of a vaulted ceiling conversion. Keep in mind that these are estimates and will vary based on your location, the scope of your project, and the quality of materials selected.
| Component or Service | Estimated Cost Range | Key Considerations |
|---|---|---|
| Structural Engineer & Architect | $1,000 – $5,000 | Essential for safety and permits. Complexity of your home’s structure will affect the price. |
| Permits and Fees | $500 – $2,000 | Varies widely by municipality. Non-negotiable. |
| Demolition & Prep | $1,000 – $3,000 | Removing the old ceiling, and any non-structural elements. |
| Framing & Structural Labor | $5,000 – $15,000+ | Includes installing new floor joists, support beams, subflooring, and wall framing. |
| Staircase Installation | $2,000 – $10,000+ | Depends heavily on materials, design complexity, and required structural modifications. |
| Electrical Work | $1,500 – $4,000 | Wiring for new outlets, switches, and lighting fixtures. Cost increases if panel upgrade is needed. |
| HVAC Extension | $1,000 – $3,500 | Running new ductwork. Cost can rise significantly if your current system is inadequate. |
| Plumbing (if adding a bathroom) | $3,000 – $10,000 | One of the most expensive additions due to the complexity of running new lines. |
| Insulation | $800 – $2,000 | Crucial for energy efficiency and soundproofing. |
| Drywall & Finishing | $2,000 – $5,000 | Includes hanging, taping, mudding, and texturing new walls and the ceiling below. |
| Flooring & Paint | $1,500 – $6,000 | Depends on material choices (carpet, LVP, hardwood). |
| Contingency Fund | 15% – 20% of Total | Crucial for covering unexpected issues that arise once walls are opened. |
The Conversion Process: A Step-by-Step Guide
Once you have your plans and have hired a contractor, the physical transformation begins. The process generally follows a predictable sequence of steps, turning that empty air into a beautiful, functional room.
First comes the design and permitting phase, followed by careful demolition of the existing ceiling. The most critical phase is next: the structural work. This is when powerful new beams and sturdy floor joists are expertly installed, forming the skeleton of your new floor. Once the subfloor is down, you can finally stand in your future room.
After the main structure is in place, tradespeople will perform the “rough-ins,” running all the necessary electrical wires, plumbing pipes, and HVAC ducts through the open walls. Following inspection, insulation is added for thermal and acoustic comfort before the walls and ceiling are closed up with drywall. The final stage involves all the finishing touches that make it a home: painting, installing flooring, and adding trim. Even small details, like well-installed molding, make a difference; if you notice issues later, learning how to fix crown molding separating from ceiling can be a useful skill.
Is It Worth It? Calculating the ROI of Your New Second Floor
This is a significant investment, so it’s natural to question the return. From a purely financial perspective, adding square footage almost always increases a home’s value. The return on investment (ROI) for this type of project can be quite favorable, often recouping a significant portion of the cost upon resale.
However, the true value isn’t just financial. It’s about enhancing your quality of life. The ability to add a much-needed bedroom, create a quiet home office, or give the kids their own play space without having to move is invaluable. This project solves a direct need and allows you to customize your home to perfectly fit your lifestyle.
Common Pitfalls and How to Avoid Them
While the rewards are great, this project has unique challenges that go beyond a typical renovation. Being aware of these potential issues ahead of time can save you from major headaches and unexpected costs.
The “Sound Tunnel” Effect
A vaulted ceiling often disperses sound throughout a large, open area. When you build a floor in that space, you can inadvertently create an acoustic drum, where every footstep, dropped toy, or conversation from the new room is amplified in the room directly below. Do not overlook soundproofing. During the construction phase is the best and cheapest time to address this. Insist on using sound-dampening insulation like Rockwool in the floor joist cavities. You can also install resilient channels on the ceiling below before the drywall goes up or use a layer of soundproofing “green glue” between two layers of drywall. These measures add modest cost but make a massive difference in day-to-day peace and quiet.
The “Dark Room” Dilemma
The room below your former vaulted ceiling likely benefited from the height and large windows to feel bright and airy. Adding a solid ceiling can make this space feel dark and cramped. Plan your lighting strategy for both levels carefully. Consider adding skylights or solar tubes through the new second floor to continue bringing natural light into the space below. For the lower room, invest in a robust lighting plan with plenty of recessed lights to ensure the space remains bright and welcoming.
HVAC Imbalance and Hot Spots
The new second-floor room will have drastically different heating and cooling needs than the rest of your home, as heat naturally rises. Simply extending a single duct into the new space is often not enough and can lead to an uncomfortable room and an overworked HVAC system. Discuss creating a separate heating and cooling “zone” for the new space with your HVAC contractor. This involves installing a dedicated thermostat for the second floor, giving you independent control and ensuring both levels of your home remain comfortable and energy-efficient.
A well-designed space is not just about structure but also about comfort and utility. For instance, if you are creating a small dining or breakfast nook in your new space, understanding what size dining table for 9×10 room is practical knowledge that ensures usability. Similarly, making the new room feel like a true part of the home involves personal touches. You might add a small kitchenette or pantry area, where knowing the right way to store staples like knowing how to nest onions ensures they last longer.
Conclusion: A Smart Investment in Your Home’s Future
Converting a vaulted ceiling into a second floor is a complex, challenging, and expensive project. It requires meticulous planning, a team of qualified professionals, and a realistic budget that includes a healthy contingency fund. However, for homeowners who need more space but love their home and neighborhood, it represents one of the smartest and most rewarding renovations possible.
By transforming unused vertical volume into valuable, functional living area, you not only solve your immediate space crunch but also make a significant investment in your property’s long-term value. With the right approach and a clear understanding of the costs involved, you can unlock the hidden potential in your home and create the space you’ve always needed.