Cost to Clean Carburetor on Snowblower: Pro vs. DIY Prices
The first heavy snow of the season is blanketing your driveway. You grab your trusty snowblower, give it a pull, and… nothing. Or worse, it sputters to life for a few seconds only to die again. This frustrating scenario almost always points to one culprit: a dirty carburetor.
Old fuel is the primary enemy of a snowblower’s engine. When gasoline sits for months, it degrades, leaving behind a sticky, varnish-like substance that clogs the tiny passages inside the carburetor. This blockage prevents the engine from getting the proper mix of air and fuel it needs to run reliably.
Understanding the cost to fix this common issue is crucial for getting your machine back in service without overspending. This guide breaks down the expenses, comparing the do-it-yourself route with professional repair, so you can make the best decision for your wallet and your winter readiness.
You'll Learn About
Decoding the Distress Signals: Symptoms of a Dirty Carburetor
Before you can fix the problem, you must be sure of the cause. A clogged carburetor sends out several clear distress signals. If your snowblower exhibits any of these behaviors, a cleaning is almost certainly in order.
The most common symptom is a complete failure to start. You can pull the cord until you’re exhausted, but the engine won’t turn over. Often, this happens after the machine has been stored for the summer with untreated fuel in the tank.
Another tell-tale sign is an engine that starts but immediately stalls. It may run for a few seconds on the fuel from the primer bulb but dies as soon as it needs to draw fuel through the clogged carburetor. You might also notice the engine surging or running rough, with its RPMs fluctuating wildly instead of holding a steady, powerful hum. This erratic performance indicates an inconsistent fuel supply.
The Root Cause: Why Carburetors Get Clogged
The carburetor’s job is to perfectly mix air and fuel into a fine mist for combustion. Inside this component are tiny channels and jets, some as fine as a needle. It doesn’t take much to block them.
Modern gasoline, especially fuel containing ethanol, is the main problem. Ethanol attracts moisture from the air, which can lead to corrosion inside the fuel system. Over time, the fuel evaporates and breaks down, creating gummy deposits and varnish that stick to every internal surface, choking off fuel flow.
The Big Decision: DIY Cleaning vs. Hiring a Professional
When faced with a clogged carburetor, you have two primary options: clean it yourself or take it to a small engine repair shop. The cost difference between these two paths is significant, but so are the requirements for time, tools, and technical skill. A detailed look at the numbers can help you choose wisely.
For many, the decision comes down to confidence. If you are comfortable with basic mechanical tasks, the DIY route offers substantial savings. However, if you’d rather have the peace of mind that the job is done right by an expert, the professional service fee is a worthwhile investment for a machine that will start on the first pull when you need it most.
Option 1: The DIY Approach Cost Breakdown
Tackling the carburetor cleaning yourself can be a rewarding and cost-effective project. The primary expenses are supplies and your own time. You can get the job done for a fraction of the cost of a shop repair.
First, you will need a can of carburetor cleaner spray, which typically costs between $5 and $15. This is essential for dissolving the varnish and grime. For a more thorough job, a set of carburetor cleaning wires and brushes can be purchased for about $10 to $20. These specialized tools help clear out the tiny jet passages that spray alone can’t reach.
It’s also highly recommended to purchase a carburetor rebuild kit. These kits, costing $15 to $30, include new gaskets, O-rings, and a new needle valve. Old gaskets can become brittle and fail to seal properly upon reassembly, leading to fuel leaks. Starting fresh is the best practice. Beyond these items, you’ll need basic hand tools like a socket set, screwdrivers, and pliers, which most homeowners already possess.
Option 2: Professional Service Costs and What’s Included
For those who lack the time or mechanical inclination, a professional repair shop is the best bet. The cost for a standalone carburetor cleaning can range from $75 to $150, largely dependent on the shop’s hourly labor rate and your location. This price typically includes removing the carburetor, disassembling it, cleaning it (often in an ultrasonic cleaner for best results), reassembling it with new gaskets, and reinstalling it on the snowblower.
Many owners opt to have the carburetor cleaned as part of a full snowblower tune-up. A comprehensive tune-up usually costs between $100 and $250. This service includes the carburetor cleaning plus an oil change, a new spark plug, inspection of belts and shear pins, lubrication of moving parts, and adjustment of cables. This bundled service ensures your entire machine is ready for winter and can prevent other potential failures.
Cost Comparison: DIY vs. Professional Carburetor Cleaning
Seeing the costs side-by-side provides a clear picture of the trade-offs. While the DIY path is significantly cheaper in terms of cash, it requires a commitment of time and a willingness to learn.
The professional route is more expensive but offers speed, convenience, and a guarantee of expert work. This table breaks down the key differences to help guide your decision.
| Feature | DIY Approach | Professional Service |
|---|---|---|
| Estimated Cost | $25 – $65 (supplies only) | $75 – $150 (labor and parts) |
| Time Commitment | 2 – 4 hours | Drop-off and pick-up time |
| Required Tools | Carb cleaner, rebuild kit, basic hand tools | None required from you |
| Skill Level | Moderate mechanical aptitude needed | None required from you |
| Guarantee | Relies on your own skill | Work is typically guaranteed by the shop |
To Clean or to Replace? That is the Question
In some cases, cleaning the carburetor may not be the most effective solution. If the carburetor is heavily corroded from moisture or if the cost of a professional cleaning is high, replacing the entire unit can be a surprisingly affordable and simple alternative.
Aftermarket replacement carburetors for many popular snowblower models, like those on a Honda HS621 Snowblower, are available online for as little as $20 to $50. These often come as a kit with new gaskets, fuel lines, and a fuel filter. For a DIYer, swapping the entire carburetor can be faster and easier than a deep cleaning, eliminating any guesswork about whether all the tiny passages are truly clear.
Even if you use a professional, you can ask them about the cost of installing a new part versus cleaning the old one. If the labor to remove and reinstall is the bulk of the charge, opting for a fresh, new carburetor might only add a small amount to the final bill while guaranteeing a perfect result. This is an especially wise choice for older machines, like a vintage TRS27 John Deere, where original parts may be worn beyond repair.
A Quick Guide to the DIY Carburetor Cleaning Process
If you’ve decided to clean the carburetor yourself, following a methodical process is key to success. This overview outlines the essential steps. Always prioritize safety by working in a well-ventilated area, disconnecting the spark plug wire, and draining the fuel tank first.
First, carefully remove the plastic engine covers to access the carburetor. Take pictures with your phone at each step to remember how everything goes back together. Disconnect the fuel line, throttle linkage, and choke linkage before unbolting the carburetor from the engine.
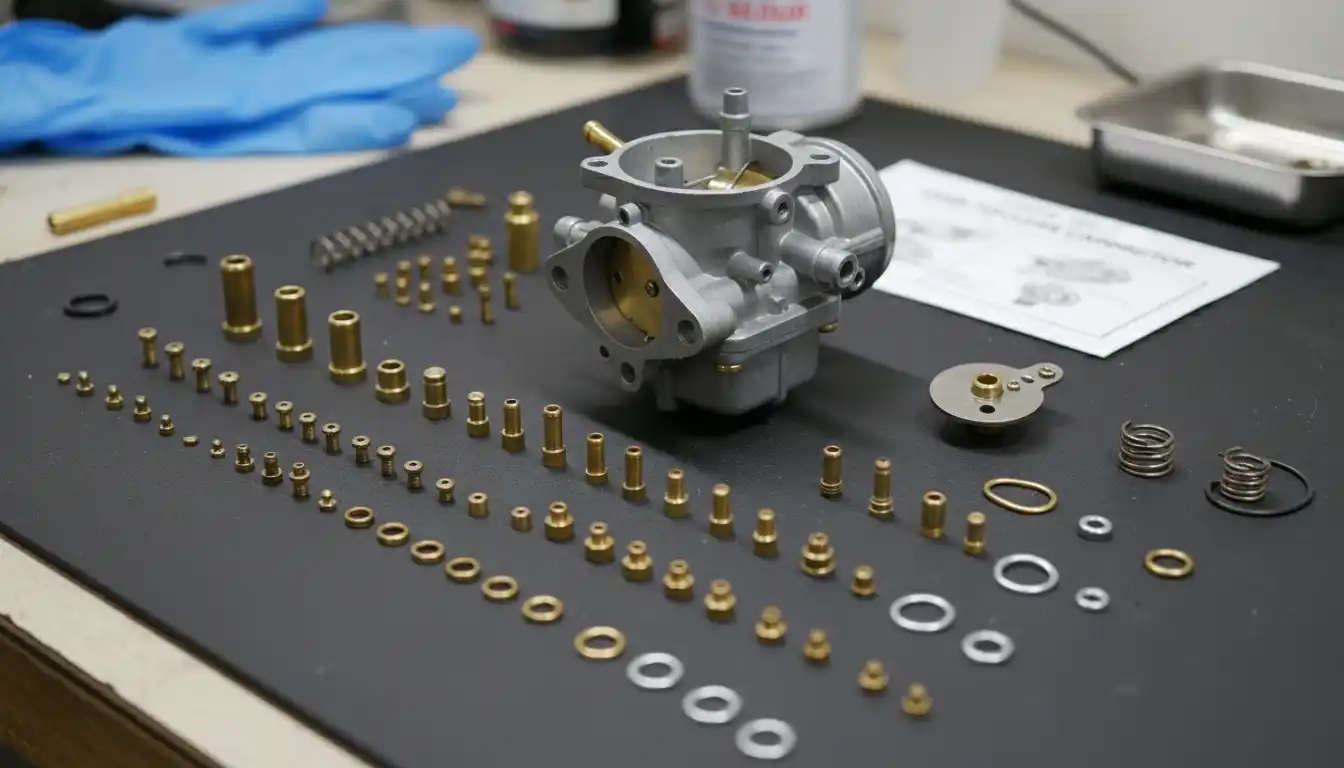
With the carburetor on a clean workbench, the next step is disassembly. Remove the fuel bowl nut and the bowl itself, which will expose the float and needle valve. Carefully remove these components, paying close attention to how they are assembled. Next, unscrew the main and pilot jets. These tiny brass parts are what get clogged.
The Cleaning and Reassembly
Now the cleaning begins. Use the straw attachment on your can of carburetor cleaner to spray through every opening and passage you can find. Wear safety glasses, as the spray can shoot back unexpectedly. Use the small wires from your cleaning kit to gently poke through the holes in the jets to clear any stubborn deposits.
Once clean, reassemble the carburetor using the new gaskets and parts from your rebuild kit. Reinstall it on the engine by reversing the steps you took for removal. Reconnect the linkages and fuel line, add fresh fuel to the tank, and your snowblower should start up and run smoothly.
Prevention: The Best Way to Avoid Future Costs
The most cost-effective solution is to prevent the carburetor from getting clogged in the first place. Proper fuel management is the secret to a reliable, easy-starting snowblower and can save you hundreds of dollars in repairs over the life of the machine.
Always use fresh gasoline—fuel that is less than 30 days old. If you buy more gas than you can use in that time, add a quality fuel stabilizer to the gas can the moment you buy it. This will prevent the fuel from breaking down and forming varnish for up to two years.
At the end of the winter season, don’t just put the snowblower away. The best practice is to run the engine until it is completely out of fuel. This ensures the carburetor bowl is dry, leaving nothing behind to gum up the works during summer storage. If you can’t run it dry, at least make sure the tank is treated with a fuel stabilizer. If all else fails and you’re in a pinch before a storm, knowing how to use starter fluid on a snowblower can be a temporary lifeline, but it’s not a long-term solution.
The Final Verdict: Is Cleaning Your Carburetor Worth It?
Ultimately, cleaning your snowblower’s carburetor is an essential piece of maintenance that is absolutely worth the cost. A machine that doesn’t start is useless, and this single component is the most common point of failure.
For a modest investment of under $50, a DIYer can restore their snowblower to perfect running condition. For those who prefer a hands-off approach, a professional service costing around $100 provides a guaranteed fix and peace of mind. Whichever path you choose, addressing a dirty carburetor is the key to reclaiming your machine’s power and reliability, ensuring you’re ready to conquer whatever winter throws your way.