Cook Top on Island: The #1 Guide to Avoid Costly Design Mistakes
Placing a cooktop on a kitchen island is the centerpiece of many dream kitchens. It promises a social, open cooking experience where you can engage with family and guests. Yet, this popular design choice is fraught with potential pitfalls that can turn your dream into a daily frustration.
The core problem isn’t just about aesthetics; it’s about balancing design with critical functionality. Homeowners often underestimate the complexities of ventilation, safety clearances, and workflow integration. The result can be a beautiful but impractical kitchen with lingering odors, inadequate space, and safety hazards that diminish the joy of cooking.
You'll Learn About
The Island Cooktop Dilemma: Ventilation, Safety, and Space
The allure of an island cooktop is undeniable. It creates a central hub for culinary activity, reminiscent of a professional cooking show. However, the reality of everyday cooking—with its grease, steam, and odors—presents a significant challenge when your cooktop is in the middle of the room, far from the convenient placement of wall-mounted ventilation.
Without proper planning, you risk creating a kitchen where cooking smells permeate your entire home. Furthermore, safety becomes a paramount concern, especially with children present. A hot surface in such an accessible location requires careful consideration of clearances and landing zones to prevent accidents.
Why Ventilation is Your Biggest Hurdle
In a traditional kitchen layout, a range hood is mounted against a wall, providing a straightforward path for venting smoke and grease outside. An island installation complicates this dramatically. Your options become more complex and often more expensive, and choosing the wrong one is a very common mistake.
The primary challenge is capturing cooking fumes effectively without a wall to contain them. Air currents in an open space can easily pull smoke and odors away from the vent before they are captured. This makes the power and design of your ventilation system absolutely critical to maintaining good air quality and preventing a greasy film from settling on your furniture and fixtures.
The Unspoken Truth About Safety and Workflow
An island cooktop introduces unique safety considerations. It becomes a potential burn hazard from all sides, unlike a range pushed against a wall. This is especially true for islands that also incorporate seating, where an unsuspecting guest or child could easily reach a hot pot or pan.
Workflow is another critical aspect often overlooked. Think about the “kitchen triangle”—the path between your refrigerator, sink, and cooktop. Placing the cooktop on the island can either streamline this workflow or disrupt it entirely. You must consider how you will move hot, heavy pots from the cooktop to the sink or counter, and where you will place your ingredients and cooking utensils while you work.
Your Blueprint for a Flawless Island Cooktop Installation
Achieving a functional and beautiful kitchen with an island cooktop is entirely possible with careful planning. The solution lies in addressing the core challenges of ventilation, safety, and layout head-on during the design phase, not as an afterthought. This involves selecting the right appliances, designing a smart layout, and adhering to building codes.
By making informed decisions, you can create a stunning centerpiece that enhances your cooking experience and the overall enjoyment of your home. Let’s break down the essential steps to get it right.
Step 1: Conquer Ventilation with the Right System
Your choice of ventilation will define the success of your island cooktop. There are three primary options, each with distinct advantages and disadvantages. Investing in a powerful and properly installed system is non-negotiable.
An overhead island range hood is often the most effective choice. These units hang from the ceiling and are designed to handle the demands of an open space. However, they can be a significant visual element, potentially obstructing views. A more discreet option might be a ceiling-mounted flush vent, which sits level with the ceiling for a minimalist look, though its performance can vary.
Downdraft ventilation is another popular alternative. These systems pop up from the countertop behind the cooktop or are integrated into the cooktop itself. While they offer a sleek, unobtrusive design, their effectiveness can be limited, especially with taller pots. They work by pulling steam and smoke downwards, which defies the natural tendency of heat and steam to rise. For those considering this sleek option, exploring a powerful electric cooktop with an integrated downdraft can be an excellent solution for maintaining open sightlines.
Step 2: Prioritize Safety with Smart Design
Safety must be at the forefront of your island design. Building codes and National Kitchen & Bath Association (NKBA) guidelines provide a solid foundation for creating a safe environment. Never compromise on required clearances.
Ensure there is a minimum of 9 inches of countertop space behind the cooktop and 12-15 inches on each side to serve as a landing zone for hot pans and to prevent items from being knocked over. If you plan to have seating at the island, it must be located away from the cooking zone. A two-tiered island design can be an excellent solution, creating a physical barrier between the hot surface and the seating area.
Consider the surface material as well. A seamless, large countertop is not just for looks; it eliminates crevices where grease and spills can accumulate. For those dreaming of a truly grand centerpiece, understanding the options for the largest kitchen island without a seam can help you choose a material that is both beautiful and easy to clean, enhancing safety and hygiene.
Step 3: Choose the Right Cooktop for Your Island
The type of cooktop you choose will significantly impact your design. The main choices are gas, electric, and induction. Each has specific requirements for installation and ventilation.
Induction cooktops are arguably the best choice for a kitchen island. They are the safest option as the surface itself does not get as hot as gas or electric cooktops, only heating the magnetic cookware. This drastically reduces the risk of burns. They are also incredibly energy-efficient and offer precise temperature control, and their sleek, flat surface makes cleanup a breeze.
Gas cooktops are beloved by many chefs for their responsive heat. However, they require a gas line to be run to the island, which can add complexity and cost to the installation. They also produce more ambient heat and combustion byproducts, making powerful ventilation even more crucial.
| Cooktop Type | Pros | Cons | Best For |
|---|---|---|---|
| Induction | Safest option (cooler surface), energy-efficient, precise control, easy to clean. | Requires magnetic cookware, can be more expensive upfront. | Families with children, modern kitchens, energy-conscious homeowners. |
| Gas | Instant heat response, visual flame control, preferred by many chefs. | Requires gas line, produces more heat and fumes, open flame can be a hazard. | Serious home chefs who prioritize traditional cooking methods. |
| Electric (Radiant) | Sleek glass surface, widely available, generally lower cost. | Slow to heat and cool, surface stays hot long after use, can be difficult to clean. | Budget-conscious renovations and those who prefer a classic electric setup. |
Advanced Considerations for the Perfect Island Hub
Once you have the fundamentals of ventilation, safety, and cooktop type sorted, you can focus on the finer details that will elevate your island from just a cooking station to the true heart of your home. This involves strategic thinking about utility placement and workflow optimization.
These elements are not just add-ons; they are integral to the functionality of your design. Proper planning here ensures that your island is not only beautiful but also supremely practical for your daily needs.
Integrating Utilities Seamlessly
An island cooktop requires more than just a space on the counter. It needs power, and in the case of a gas cooktop, a fuel line. The placement of these utilities is governed by strict building codes to ensure safety. Consult with a licensed electrician and plumber early in the process.
Running electrical wiring to a kitchen island is a common task, but it must be done correctly to avoid creating hazards. The power supply needs to be sufficient for the high demands of a cooktop and any other appliances, like a downdraft vent or outlets for small appliances. Proper planning ensures that all your needs are met without overloading circuits.
Optimizing Your Kitchen Workflow
A well-designed island cooktop should enhance your kitchen’s workflow, not hinder it. Consider its relationship to the sink and refrigerator. You should have a clear, unobstructed path for moving between these key areas.
Think about the tasks you perform most often. If you do a lot of vegetable prep, placing the cooktop near the sink and a compost bin makes sense. Ensure you have ample counter space on either side of the cooktop for prep and plating. This dedicated space is crucial for an efficient and enjoyable cooking process, preventing you from feeling cramped while you work.
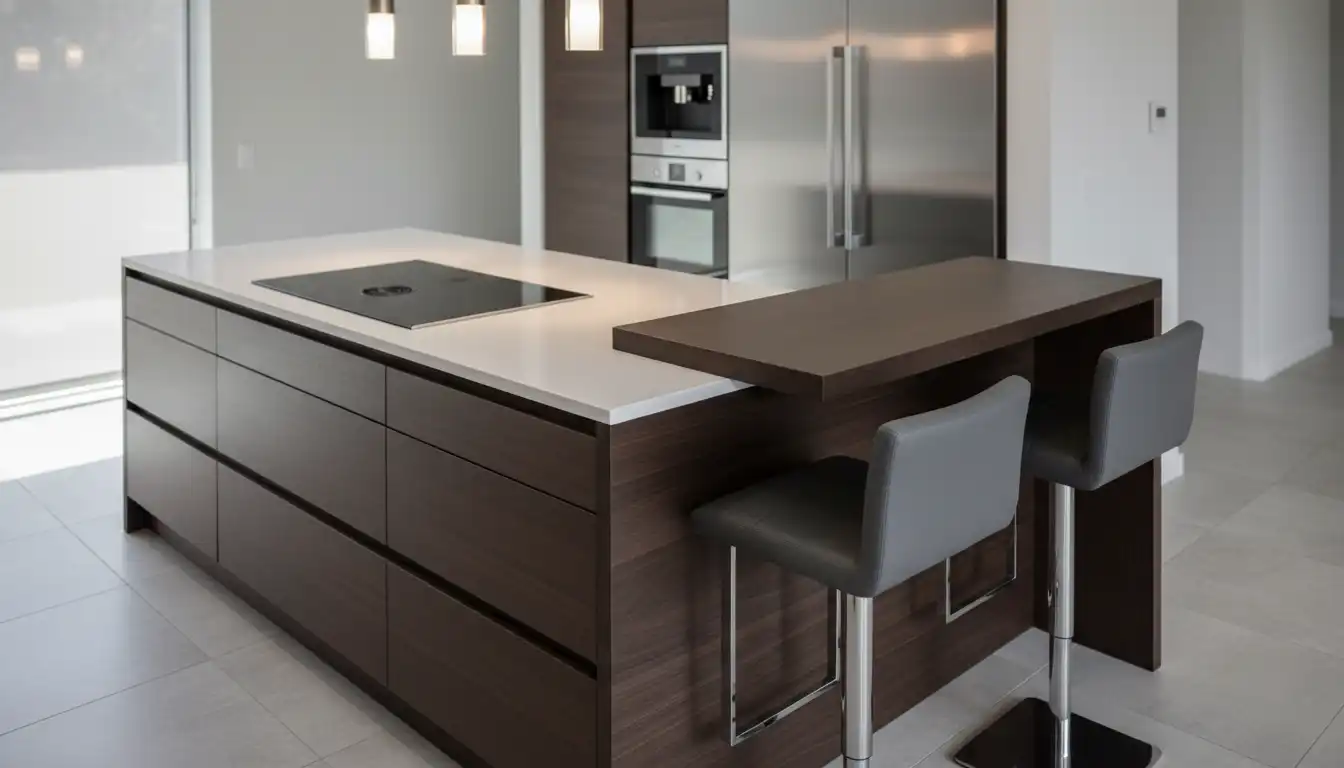
The Role of Island Seating
Integrating seating into your kitchen island is a popular way to create a social atmosphere. However, when a cooktop is involved, this requires extra careful planning. The key is to create a clear separation between the cooking zone and the seating area.
A multi-level island is an effective solution. By raising the seating area a few inches above the cooking surface, you create a backsplash that helps contain splatters and acts as a physical barrier. It’s also critical to ensure there’s enough space between seated guests and the cooktop to prevent any chance of burns or accidents. A minimum of 24 inches of depth for the seating area is recommended for comfort and safety.
Final Verdict: Is an Island Cooktop Right for You?
A cooktop on the island can be a spectacular feature that transforms how you use your kitchen. It can create a wonderfully open and interactive environment, making cooking a more social and engaging activity. However, it is a decision that demands thorough research and careful planning.
The key to success is to address the challenges of ventilation, safety, and workflow from the very beginning. By investing in a high-quality ventilation system, adhering to safety clearances, choosing the right type of cooktop, and designing a layout that works for you, you can create a stunning and functional centerpiece for your home. It’s a commitment, but one that can pay off with a truly exceptional kitchen experience.