Convert Patio Heater to Natural Gas: Your Ultimate Guide
Tired of propane tanks running out in the middle of a perfect evening? You’re not alone. The single biggest frustration for patio heater owners is the constant hassle and expense of refilling or swapping heavy propane tanks.
This common problem interrupts gatherings and adds a recurring cost to your outdoor comfort. Fortunately, there is a far more convenient and cost-effective solution: converting your patio heater to run on natural gas.
You'll Learn About
Why You Should Convert Your Patio Heater to Natural Gas
Making the switch from propane to natural gas is more than just a convenience; it’s a significant upgrade to your outdoor living space. The benefits impact your wallet, your time, and even your environmental footprint.
The Unbeatable Convenience of a Continuous Fuel Supply
Imagine never having to check a fuel gauge or lift a heavy propane tank again. When you convert your patio heater to natural gas, you tap directly into the same reliable supply that powers your home’s furnace or water heater. This means an endless, uninterrupted flow of fuel for warmth whenever you want it.
Your patio heater becomes a permanent, hassle-free fixture of your outdoor setup. Spontaneous evening get-togethers are no longer threatened by an empty propane tank.
Cost Savings That Add Up Over Time
While a propane patio heater might have a lower initial purchase price, natural gas is significantly cheaper to run in the long term. Natural gas consistently costs less per British Thermal Unit (BTU) than propane, meaning you get more heat for your money.
This operational cost-saving makes the initial investment in a conversion kit and professional installation a smart financial decision that pays for itself over time.
A Greener Choice for Your Outdoor Oasis
Both natural gas and propane are cleaner-burning fuels than many alternatives, but natural gas has the edge. It emits fewer greenhouse gases and pollutants compared to propane, making it a more environmentally responsible choice for heating your patio.
Before You Begin: Critical Safety Considerations
Embarking on this conversion requires careful planning and a deep respect for safety protocols. Working with gas lines is not a casual DIY project and demands precision and knowledge to prevent dangerous situations.
Is Your Patio Heater Even Convertible?
The first and most crucial step is to determine if your specific patio heater model is designed to be converted. Check the manufacturer’s manual or look for information directly on the unit. Many heaters are certified for use with propane only, and attempting to convert them can void the warranty and, more importantly, be incredibly dangerous.
If the manufacturer offers a specific natural gas conversion kit for your model, you can proceed with confidence. If not, you must not attempt the conversion.
Understanding the Dangers: Propane vs. Natural Gas
Propane and natural gas are not interchangeable. They operate at different pressures and have different energy densities. Propane is delivered at a higher pressure and requires a smaller orifice (the small opening that releases gas to the burner), while natural gas uses lower pressure and needs a larger orifice.
Using the wrong orifice size can lead to a dangerously large, uncontrolled flame or a weak, ineffective one that produces carbon monoxide. This is why simply connecting a natural gas line to a propane heater without changing the internal components is a recipe for disaster.
The DIY vs. Professional Installation Debate
While many conversion kits are marketed to homeowners, hiring a licensed gas fitter or plumber is the safest option. Professionals can ensure the gas line is installed correctly, all connections are leak-free, and the heater operates at the correct pressure.
An improper installation can lead to gas leaks, fire, or carbon monoxide poisoning. For peace of mind and the safety of your family, professional installation is strongly recommended.
| Feature | Propane Heaters | Natural Gas Heaters |
|---|---|---|
| Fuel Source | Portable 20 lb. Tanks | Direct Connection to Home Gas Line |
| Running Cost | Higher per BTU | Lower per BTU |
| Convenience | Requires tank refills/swaps | Continuous, uninterrupted fuel supply |
| Portability | Highly Portable | Fixed in one location |
| Initial Cost | Lower unit cost | Higher unit cost plus installation |
| Environmental Impact | Clean burning | Even cleaner, with fewer emissions |
Your Essential Toolkit: Gathering Supplies for Conversion
To successfully convert your patio heater to natural gas, you need the right parts and tools. The centerpiece of this project is the conversion kit itself.
Finding the Right Natural Gas Conversion Kit
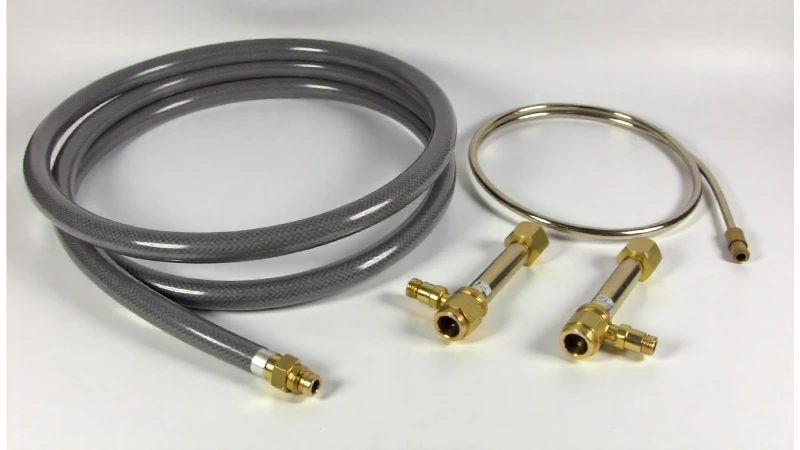
A proper conversion kit is non-negotiable. These kits are specifically designed for your heater’s BTU rating and include all the necessary components for a safe transition. A typical kit will contain a new hose with quick-disconnect fittings, a new regulator designed for natural gas, and, most importantly, the correctly sized brass orifices.
You can often purchase these kits directly from the heater manufacturer or a certified parts dealer. Ensure the kit you buy matches your heater’s model number exactly.
Tools of the Trade
Besides the kit, you will need a few basic tools to complete the job. This includes a set of open-ended wrenches or an adjustable wrench, pipe thread sealant (often called pipe dope) rated for gas, and a commercial leak detection solution. Do not rely on soapy water alone; a proper leak detector is more reliable.
Step-by-Step Guide to a Safe Patio Heater Conversion
With your manufacturer-approved kit and tools in hand, you can begin the conversion process. Follow these steps meticulously to ensure a safe and effective outcome.
Step 1: Safety First – Disconnect and Shut Off
Before you do anything else, completely disconnect the propane tank from the heater. Ensure the heater’s control knob is in the “off” position. If you are tapping into an existing gas line, shut off the gas supply at the main valve.
Step 2: Accessing the Burner Assembly
You will need to disassemble part of the heater head to access the internal components. This usually involves removing a few screws to take off the protective grille or housing. Be careful to keep track of all screws and parts as you remove them.
Step 3: Replacing the Critical Orifice
Deep inside the burner assembly, you will find a small, brass fitting with a tiny hole in it—this is the propane orifice. Using a wrench, carefully unscrew and remove it. Replace it with the new, larger natural gas orifice that came in your conversion kit, ensuring it is snug but not overtightened.
Step 4: Installing the New Natural Gas Line
Remove the old propane hose and regulator assembly. Install the new natural gas hose and regulator from your kit, applying gas-rated pipe thread sealant to all threaded connections to ensure a perfect seal. Connect the other end of the hose to your newly installed natural gas supply line, utilizing the quick-disconnect fitting for convenience.
Step 5: The All-Important Leak Test
This is the most critical safety check. With all connections tightened, turn the main gas supply back on. Apply the leak detection solution liberally to every connection and joint you worked on. Watch for bubbling, which indicates a gas leak. If you see any bubbles, immediately turn off the gas and tighten the connection until it is sealed.
Step 6: Firing It Up and Checking the Flame
Once you are certain there are no leaks, follow the manufacturer’s lighting instructions. The flame should be a steady blue with slight yellow tips. A flame that is mostly yellow, noisy, or lifting off the burner indicates a problem, such as incorrect orifice size or low gas pressure, and you should shut the heater down immediately.
Troubleshooting Common Conversion Problems
Even with careful work, you might encounter issues. Knowing how to identify and solve them is key to a successful conversion.
Problem: The Flame is Too Low or Mostly Yellow
A weak or yellow flame is a common issue and often points to a problem with gas flow or the air mixture. Double-check that you installed the correct orifice for your heater’s BTU rating. Also, ensure your home’s natural gas line provides adequate pressure for the appliance.
Problem: I Smell Gas! Now What?
If you smell gas at any point, immediately shut off the gas supply valve. Do not operate any electrical switches or create any sparks. The smell of rotten eggs is from an additive called mercaptan, which is designed to alert you to a leak. Re-perform the leak test on all connections until you find and fix the source.
Managing gas appliances requires a different level of care than other home maintenance. It’s not like trying to figure out how do i stop my roof from popping, where the risks are primarily structural; with gas, safety is paramount.
Optimizing Your Outdoor Living Space
Your newly converted patio heater is a cornerstone of a great outdoor space. Ensuring all your outdoor equipment is in top shape is key to enjoyment. This includes routine checks, much like you would investigate garage refrigerator problems_bai to keep it running smoothly.
Choosing the right tools and equipment is also essential for any home project. Whether it’s a gas conversion or a painting job where you might compare a graco 210es vs 390, having the correct gear makes all the difference.
Frequently Asked Questions (FAQ)
Can I convert any propane patio heater to natural gas?
No. You can only convert heaters that the manufacturer has explicitly stated are convertible and for which they provide a certified conversion kit. Attempting to convert an unapproved model is extremely dangerous.
How much does it cost to convert a patio heater?
The cost typically includes the price of the conversion kit (which can range from $50 to $150) and the cost of having a professional run a natural gas line to your patio, which can vary significantly based on the complexity of the job.
Will converting my patio heater void the warranty?
If you use a manufacturer-approved conversion kit and follow the instructions (or have it professionally installed), it generally will not void the warranty. However, using third-party parts or performing an improper DIY conversion will almost certainly void it.