Convert Bathroom to Walk-in Closet: Unlock Hidden Storage
Converting an underutilized or redundant bathroom into a dedicated walk-in closet is an increasingly popular and highly effective home renovation strategy. This transformation allows homeowners to unlock significant hidden storage potential, repurposing plumbing-intensive square footage into a purely functional, personalized space for organization. By removing fixtures and optimizing the existing footprint, a cluttered bathroom can be reimagined as a luxurious, accessible storage haven that significantly enhances the home’s value and utility.
You'll Learn About
Is Your Extra Bathroom Just Wasted Space?
Many homes have that one extra bathroom that rarely gets used. It might be a small powder room in an awkward location or a full bath that has become redundant over time. This underutilized space often becomes a catch-all for clutter, serving little practical purpose.
The core problem is a mismatch between your home’s layout and your lifestyle needs. While an extra bathroom seems like a selling point, a lack of practical, organized storage is a daily frustration. This is where a strategic home conversion can dramatically improve your quality of life.
The Ultimate Solution: A Luxury Walk-in Closet Conversion
Transforming that neglected bathroom into a custom walk-in closet is a brilliant solution. It directly addresses the need for more storage while converting unused square footage into a highly functional and luxurious space. This project reclaims your home’s potential, turning a forgotten room into a valuable asset.
This conversion is more than just adding shelves; it’s about creating an organized sanctuary for your wardrobe. It can streamline your daily routine, protect your clothing investment, and even increase your home’s appeal and value. This guide will walk you through every critical step of the process.
Before You Begin: Is This Conversion Right for You?
Jumping into a renovation without proper planning is a common pitfall. Before you pick up a sledgehammer, it’s crucial to assess whether this project aligns with your home’s value and your long-term goals. A well-planned conversion can be a masterpiece, while an ill-considered one can cause future headaches.
Consider the financial investment, the impact on your home’s resale value, and the specific needs of your family. This is a significant undertaking, similar in scale to other major home transformations like repurposing a carport into a living area.
Analyzing Your Home’s Layout and Resale Value
The golden rule of bathroom conversions is simple: do not eliminate the only full bathroom on a floor. Removing the primary bathroom for a bedroom level, for example, can negatively impact your home’s marketability. The ideal candidate is a secondary or en-suite bathroom that is superfluous.
However, converting an extra bathroom to create a master suite with a large walk-in closet can significantly boost luxury appeal. Buyers in many markets prioritize homes with large, organized closets, and this feature can be a major selling point. It’s about trading a low-use feature for a high-demand one.
Budgeting for the Transformation: DIY vs. Professional Costs
The cost to convert a bathroom into a walk-in closet varies widely based on labor, materials, and the complexity of the plumbing and electrical work. A DIY approach can save on labor, but hiring licensed professionals for plumbing and electrical work is non-negotiable for safety and code compliance.
Below is a general cost breakdown to help you budget. Keep in mind that these are estimates, and you should always get multiple quotes from contractors in your area. This financial planning is as important as the physical construction itself.
| Expense Category | Typical DIY Cost Range | Typical Professional Cost Range | Key Considerations |
|---|---|---|---|
| Demolition & Debris Removal | $100 – $300 | $400 – $1,000 | Cost of dumpster rental, tools, and disposal fees. |
| Plumbing (Capping Lines) | $50 – $150 (Materials) | $500 – $1,500 | Always hire a licensed plumber. This is critical for preventing leaks. |
| Electrical Work | $100 – $250 (Materials) | $400 – $1,200 | Includes new lighting, moving outlets, and ensuring code compliance. |
| Drywall & Flooring | $300 – $800 | $1,000 – $3,000 | Depends heavily on materials chosen (e.g., LVP vs. carpet). |
| Paint & Primer | $100 – $250 | $300 – $700 | Using a quality paint is essential for a durable, high-end finish. |
| Closet System & Installation | $500 – $2,500+ | $2,000 – $8,000+ | The largest variable; ranges from wire shelving to custom cabinetry. |
| Permits | $50 – $300 | $50 – $300 | Required in many municipalities for plumbing and electrical changes. |
| Total Estimated Cost | $1,200 – $4,550+ | $4,650 – $15,700+ | Prices can fluctuate based on location and material quality. |
Phase 1: Planning and Strategic Demolition
With your budget in mind, the next step is to move into the design and deconstruction phase. This is where your vision for the perfect closet begins to take shape. Careful planning here will prevent costly changes and ensure the final result is both beautiful and highly functional.
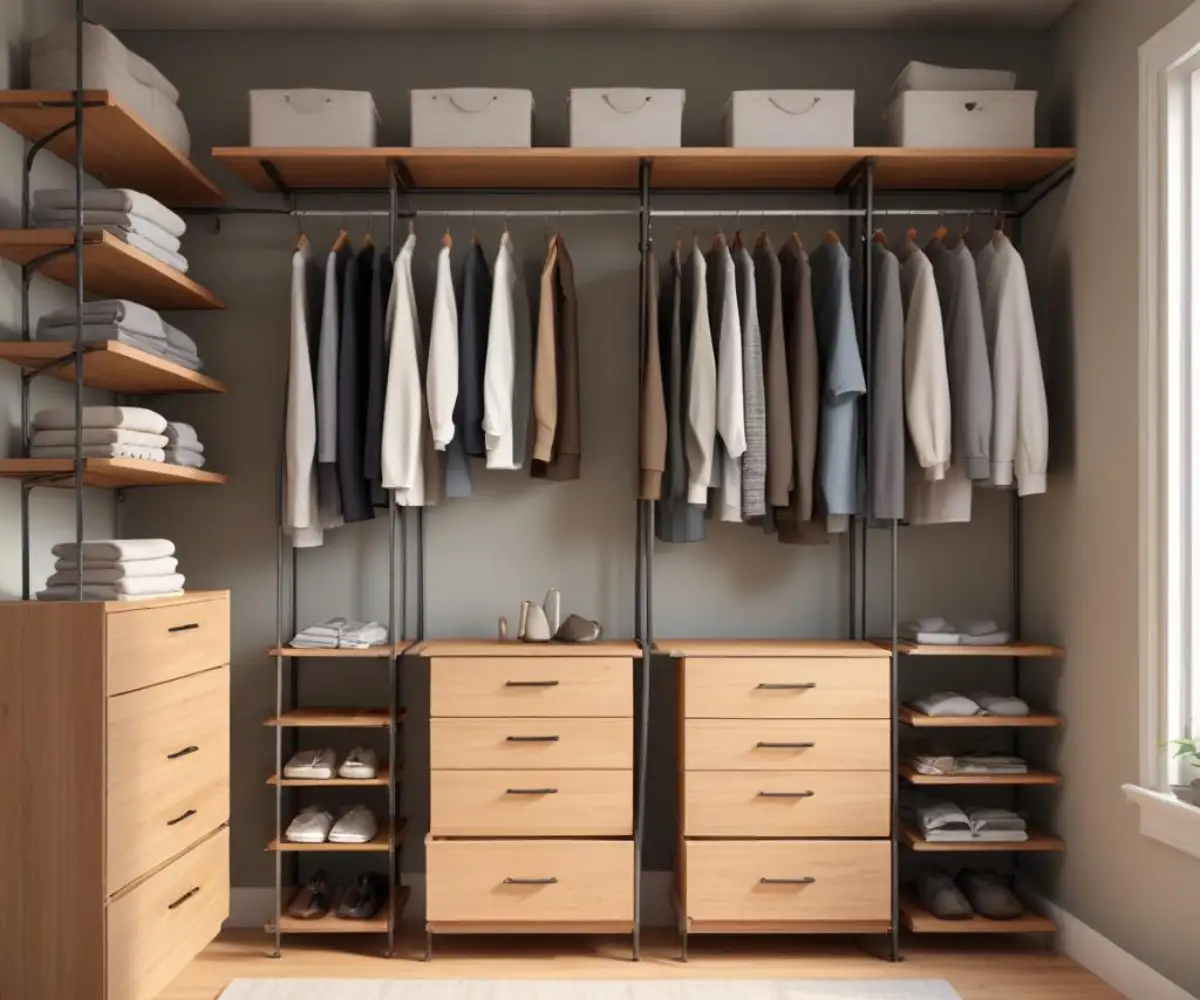
Designing Your Dream Closet Layout
Start by measuring the room’s exact dimensions. Sketch out a floor plan and consider how you want to use the space. Do you need more hanging space for dresses and suits, or do you have a large collection of shoes that requires dedicated shelving?
Think vertically to maximize storage. Plan for double-hung rods, high shelves for seasonal items, and drawers for folded clothes. Consider a mix of open and closed storage to keep the space feeling tidy and organized. Custom closet systems offer immense flexibility, while modular options from retailers are a budget-friendly alternative.
The Deconstruction Process: A Careful Teardown
Demolition is more than just smashing things; it requires a methodical approach. First and foremost, shut off the water and electricity to the bathroom at the source. Turn off the circuit breaker and the main water valve connected to the bathroom fixtures.
Carefully remove the toilet, vanity, and any mirrors or medicine cabinets. If the fixtures are in good condition, consider selling them or donating them to a habitat for humanity restore. Next, remove the shower or tub, which may require cutting it into smaller pieces. Finally, cap the drains temporarily to prevent sewer gases from entering your home.
Phase 2: The Critical Mid-Project Infrastructure Work
Once the room is a blank slate, the most important technical work begins. This phase involves making the space safe and ready for its new life as a closet. Rushing these steps can lead to catastrophic failures like leaks and mold down the road, so precision is key.
Tackling the Plumbing: The Point of No Return
This is the most crucial part of the conversion. Improperly capped plumbing can lead to thousands of dollars in water damage. Hire a licensed plumber to permanently cap the water supply lines and the main drain lines for the toilet, sink, and shower.
The plumber will need to cut the pipes behind the wall or below the floor and solder permanent caps on them. This ensures a watertight seal that will last for decades. This is not a DIY task for the inexperienced; the peace of mind that comes with professional work is invaluable.
Electrical and Ventilation Adjustments
A walk-in closet requires different lighting than a bathroom. You’ll want bright, clear light to see your clothes accurately. Consider installing recessed LED lights, track lighting, or even a statement chandelier for a touch of glamour.
Ventilation is also surprisingly important. While you no longer need a powerful exhaust fan for steam, you do need air circulation to prevent clothes from smelling musty. A small, quiet exhaust fan connected to a timer or a passive air vent can ensure the space stays fresh.
Eradicating Hidden Moisture: The Ghost of the Bathroom
Bathrooms are inherently wet environments, and moisture can hide within the walls and subfloor long after the fixtures are gone. Before you close up the walls, you must ensure the entire space is completely dry. Use a moisture meter to check the wood studs and subfloor.
If you find any damp spots or signs of old water damage, address them immediately. Treat the entire room with a high-quality, mold-resistant primer. This creates a barrier that prevents any residual spores from growing and protects your clothing and health in the long run.
Phase 3: Bringing Your Vision to Life
With the infrastructure properly handled, it’s time for the cosmetic transformation. This is the exciting phase where the space starts to look less like a construction zone and more like the luxury closet you envisioned. Every choice you make here contributes to the final look and feel.
Walls, Flooring, and a Fresh Coat of Paint
Patch any holes in the drywall left from removing fixtures and plumbing. Once the surface is smooth, you can move on to flooring. Popular choices include plush carpeting for a soft feel underfoot or luxury vinyl plank (LVP) for durability and a clean look.
A fresh coat of paint will instantly transform the space. Lighter colors like white, beige, or light gray can make the closet feel larger and brighter, helping you see your clothes more clearly. When selecting a finish, it’s worth comparing your options, as the choice between products like different paint grades can affect durability and appearance.
Installing Your Custom Closet System
This is where your design plan becomes a reality. Whether you’re using a modular system or custom-built components, follow the manufacturer’s instructions carefully. Start by installing the main structural elements, like vertical panels and mounting tracks, ensuring they are level and securely anchored to the wall studs.
Next, add shelves, rods, and drawers. A common mistake is placing hanging rods too close together or too close to the wall. Ensure there’s enough room for clothes to hang freely without being crushed. Taking your time here will result in a sturdy, professional-looking installation.
Finishing Touches That Define Luxury
The final details are what elevate a closet from a storage space to a personal retreat. A full-length mirror is a must-have. Consider adding a small bench or ottoman if you have the space, creating a comfortable spot to put on shoes.
Upgrade the hardware on any drawers or cabinets to match your home’s aesthetic. High-quality lighting, such as LED strips along the shelves, not only looks fantastic but also makes it easier to find what you’re looking for. These small touches add a significant “wow” factor.
Long-Term Benefits and Project Perspective
Completing this project provides an immediate lifestyle upgrade. It eliminates a major source of frustration—lack of storage—and replaces it with a system of order and efficiency. The daily pleasure of having a well-organized space cannot be overstated.
From a home management perspective, you have successfully reclaimed and repurposed square footage, making your home work better for you. This is a common goal in homeownership, whether you are adding new space or, in some cases, undertaking a project like a garage reclamation to restore its original function.
Frequently Asked Questions
Even with a detailed guide, specific questions are bound to arise. Here are answers to some of the most common queries about converting a bathroom into a walk-in closet.
How much does it really cost to convert a bathroom to a walk-in closet?
The cost typically ranges from $2,500 to over $15,000. A DIY conversion using budget-friendly materials will be on the lower end, while a project involving professional contractors, custom cabinetry, and high-end finishes will be at the higher end. The biggest factors are labor costs and the price of the closet system itself.
Do I need a permit for this conversion?
Most likely, yes. Because you are altering plumbing and electrical systems, most municipalities will require you to pull a permit. This ensures the work is inspected and meets local building and safety codes. Failing to get a permit can cause problems when you eventually sell your home.
Can I realistically do this conversion myself?
You can perform many parts of this project yourself, such as demolition, painting, flooring, and installing a modular closet system. However, for your safety and to prevent costly damage, you should always hire a licensed plumber and electrician for their respective tasks. It is the smartest investment you can make in this project.
Final Thoughts on Your Home Transformation
Converting a bathroom to a walk-in closet is a powerful way to enhance your home and your daily life. It is a project that trades a redundant feature for one that offers immense practical and aesthetic value. By planning carefully, prioritizing safety, and investing in quality work, you can create a beautiful, organized space that you will enjoy for years to come.