Connect Garden Hose to Sprinkler System? This Genius Hack Saves Your Lawn (And Wallet)
An in-ground sprinkler system is a fantastic asset for any homeowner, but what happens when it’s not working, or you need water in a pinch? You might find yourself staring at a sprinkler head and a garden hose, wondering if the two can work together. The good news is, they absolutely can.
Connecting a garden hose to your sprinkler system is a versatile solution for a surprising number of landscaping problems. Whether you’re trying to establish new grass seed, test a faulty zone, or even blow out your system for the winter, this connection can be a lifesaver. This guide breaks down exactly why, when, and how to do it safely and effectively.
You'll Learn About
Why Connect a Garden Hose to a Sprinkler System?
At first, it might seem counterintuitive to connect a portable hose to a permanent irrigation system. However, this simple hack provides practical solutions for several common homeowner challenges, saving both time and money on professional service calls.
Targeted Watering for New Seed or Sod
New grass seed or freshly laid sod requires consistent, light watering multiple times a day to germinate and establish strong roots. Running a full sprinkler zone can be wasteful, especially if you only need to water a small, patched area. Connecting a hose allows you to run a single sprinkler head or a small group of them, providing precise moisture exactly where it’s needed without over-saturating the rest of your lawn.
Diagnosing and Testing Sprinkler Zones
When a sprinkler zone isn’t working correctly, the problem could be the valve, the controller, or the wiring. By isolating the zone and supplying water directly from a garden hose, you can quickly determine if the issue is with the water supply or the electrical components. If the sprinklers work with the hose, you know the pipes and heads are clear, pointing to a problem with the valve or controller.
Winterization and System Blowouts
One of the most critical uses for this connection is for winterizing your sprinkler system. Before freezing temperatures arrive, all water must be removed from the pipes to prevent cracking. Connecting an air compressor to the system via a hose adapter is the standard method for blowing out the lines, ensuring your investment is protected through the winter.
Understanding the Key Challenge: Thread Types
The primary obstacle you’ll face is that garden hoses and sprinkler system components use different types of threads. It’s a common point of frustration, but easy to solve once you understand the difference. Knowing this distinction is crucial for getting the right parts the first time.
Garden Hose Thread (GHT) is the standard for all garden hoses and outdoor spigots in the United States. It’s a straight, coarse thread that relies on a rubber washer inside the female fitting to create a watertight seal.
National Pipe Thread (NPT) is the standard used for plumbing pipes and sprinkler components. These threads are tapered; as you tighten the fittings, the tapered design creates the seal. Teflon tape is often used with NPT connections to ensure a leak-proof fit.
Crucially, GHT and NPT threads are not compatible. You cannot screw a garden hose directly onto a sprinkler riser. You will always need an adapter to bridge the gap between these two different thread types.
Three Methods to Connect Your Hose and Sprinkler System
There are three primary access points for connecting a garden hose: directly at a sprinkler head, at the valve manifold, or through a dedicated blowout port. Each method has its own use case and requires slightly different equipment.
Method 1: Connecting at the Sprinkler Head Riser
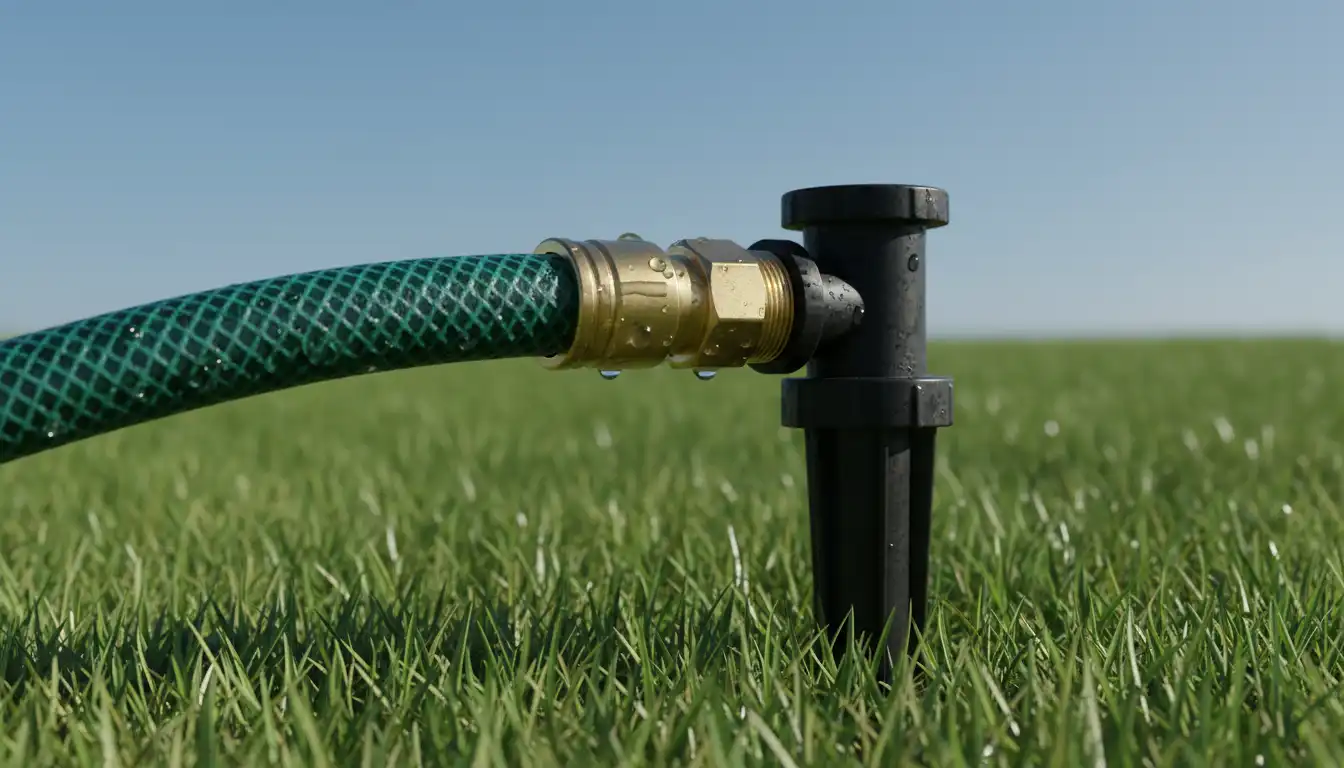
This is the most common and direct method for watering a specific area or testing a few heads on a zone. It involves removing a sprinkler head and attaching an adapter to the riser pipe that comes up from the ground.
Best For: Targeted watering of new seed/sod, testing individual sprinkler heads.
Step-by-Step Instructions:
-
Turn Off the Zone: Ensure the sprinkler zone you are working on is turned off at the controller.
-
Expose the Sprinkler Head: Carefully dig away the grass and soil around the sprinkler head you wish to remove. Be gentle to avoid damaging the underground pipe.
-
Unscrew the Sprinkler Head: Grip the sprinkler body and turn it counter-clockwise to unscrew it from the riser fitting below. Once removed, clean any dirt from the exposed riser threads.
-
Attach the Adapter: The most common riser size is 1/2-inch or 3/4-inch NPT. You will need an adapter that converts this size to a standard 3/4-inch GHT male connection. A common adapter is a 1/2-inch female NPT x 3/4-inch male GHT fitting. Screw the adapter onto the sprinkler riser until it is snug.
-
Connect the Hose: Screw your garden hose onto the male GHT end of the adapter. Turn on the water at the spigot slowly to check for leaks before increasing to full pressure.
Method 2: Connecting at the Valve Manifold or Blowout Port
This method allows you to supply water or air to an entire zone at once. Many systems have a dedicated spigot or quick-connect port installed near the valve box specifically for this purpose. This is the preferred method for winterization.
Best For: Winterizing the system, testing an entire zone, or running a temporary irrigation setup when the main water line is off.
Step-by-Step Instructions:
-
Shut Off the Main Water Supply: Before connecting anything, turn off the main water supply to the entire sprinkler system. This is critical to prevent water from flowing back into your home’s plumbing.
-
Locate the Connection Point: Find the blowout port. This is often a tee fitting with a cap or a hose bib (spigot) located on the mainline pipe after the backflow preventer. If connecting an air compressor, this is the correct attachment point.
-
Prepare the Connection: If it’s a simple capped pipe, you may need to install a GHT adapter. If it’s already a hose bib, you can connect your hose directly. For air compressors, you will need a specific quick-connect adapter that fits your compressor hose and screws onto the hose bib threads.
-
Open the Zone Valve: Go to your sprinkler controller and manually open the valve for the specific zone you want to power. This is essential, as the water or air needs a path to flow through.
-
Connect and Pressurize: Connect your garden hose (for water) or air compressor hose (for air). Turn on the water or air compressor slowly. You should see the sprinklers in that zone pop up and begin to operate.
Method 3: Using a Quick-Coupler Valve
Some professionally installed systems include quick-coupler valves. These are special access points, often housed in a small, round valve box, that allow you to tap into the pressurized mainline for hose access anywhere in the yard. They require a special “key” that inserts into the valve to start the water flow.
Best For: Systems already equipped with these valves for easy water access without using a spigot.
Step-by-Step Instructions:
-
Obtain the Key and Hose Swivel: You need a quick-coupler key and a hose swivel adapter that screws onto the key. These are specific to the brand of valve installed.
-
Connect the Hose: Screw your garden hose onto the swivel adapter attached to the key.
-
Insert and Turn: Open the lid of the quick-coupler valve box. Insert the key into the valve and push down firmly while turning it about a quarter-turn. This will lock it in place and release the water flow through your hose.
Essential Adapters and Tools
Having the right fittings is non-negotiable for this project. Confusion between thread types is the number one reason for leaks and frustration. The table below outlines the essential components you’ll likely need.
| Tool/Adapter | Purpose | Common Sizes/Types |
|---|---|---|
| NPT to GHT Adapter | The most critical part. Connects the sprinkler pipe to the garden hose. | 1/2″ FPT x 3/4″ MHT, 3/4″ FPT x 3/4″ MHT |
| Teflon Tape (Plumber’s Tape) | Ensures a watertight seal on NPT (pipe) threads. | Standard 1/2″ width |
| Channel-lock Pliers | For gripping and turning fittings and pipes. | Adjustable, 10-12 inches |
| Hose Bib Vacuum Breaker | A critical safety device that prevents water from siphoning back into your home’s water supply. | Standard 3/4″ GHT |
| Air Compressor Adapter | Connects an air compressor hose to a GHT spigot for blowouts. | Typically 1/4″ NPT quick-connect to 3/4″ GHT |
Water Pressure and Flow: A Critical Consideration
A standard home’s outdoor spigot, connected to a 5/8″ or 3/4″ garden hose, delivers significantly less water volume (gallons per minute, or GPM) than a dedicated sprinkler mainline, which is typically 1″ or larger. This difference has important implications.
You likely cannot run an entire sprinkler zone at full capacity from a garden hose. Attempting to do so may result in heads that don’t pop up fully, poor spray patterns, and inadequate water coverage. When using a hose, it’s best to power only a few sprinkler heads at a time for effective performance. If testing a full zone, the goal is simply to confirm functionality, not to achieve perfect irrigation.
For those interested in more robust watering solutions that don’t require tapping into the main plumbing, a fence mounted sprinkler system can be an excellent DIY project. These setups often use hoses or poly tubing and can be customized to your yard’s specific needs, providing a more permanent alternative to constantly moving a hose-end sprinkler. Some homeowners even find that a simple fence mounted sprinkler can cover hard-to-reach areas more effectively than an in-ground system.
The Importance of Backflow Prevention
Whenever you create a direct connection between your irrigation system and your home’s potable water supply via a hose, you must consider backflow. Backflow is the undesirable reversal of water flow, which could potentially siphon contaminated water from your lawn (carrying fertilizers, pesticides, and bacteria) back into your drinking water. This poses a significant health risk.
Always use a hose bib vacuum breaker. This is a simple, inexpensive brass fitting that screws onto your outdoor spigot before you attach the hose. It allows air to enter the line if pressure drops, breaking the siphon effect and preventing backflow. This is a non-negotiable safety measure required by plumbing codes in most areas.
Complex irrigation setups, such as those that might make you wonder about running Rainbird two zones at once, have sophisticated backflow preventers built-in. When you bypass the system’s main connection, you are also bypassing this protection, which is why a hose bib vacuum breaker is so important.
Final Thoughts
Learning how to connect a garden hose to your sprinkler system is a valuable skill for any homeowner. It provides a flexible, cost-effective way to handle temporary watering needs, diagnose system problems, and perform essential maintenance like winterization. By understanding the difference between thread types, gathering the correct adapters, and prioritizing safety with a backflow preventer, you can confidently tackle these tasks and keep your lawn healthy and your irrigation system in top condition.