Brown Drywall Stains? Uncover the Hidden Cause & Restore Your Walls
There are few home maintenance issues more alarming than the sudden appearance of a brown stain on your pristine drywall. It’s an unsightly blemish that immediately draws the eye and suggests a deeper, more troubling problem lurking behind the surface. Whether it’s a small, faint spot or a large, dark patch, brown drywall is a clear signal that something is wrong.
Ignoring these stains is never a good idea. They are often the visible symptom of an underlying issue that can lead to significant damage if left unaddressed. This comprehensive guide will help you diagnose the true cause of your brown drywall, provide step-by-step instructions to clean and repair the damage, and explain when it’s time to call in a professional for help.
You'll Learn About
Why Is My Drywall Turning Brown? Unmasking the Culprits
Understanding the source of the discoloration is the critical first step toward a permanent solution. Brown stains on drywall can be caused by several different issues, each with its own unique characteristics and repair method. Pinpointing the correct cause will save you time, effort, and prevent the stain from returning.
The Most Common Culprit: Water Damage
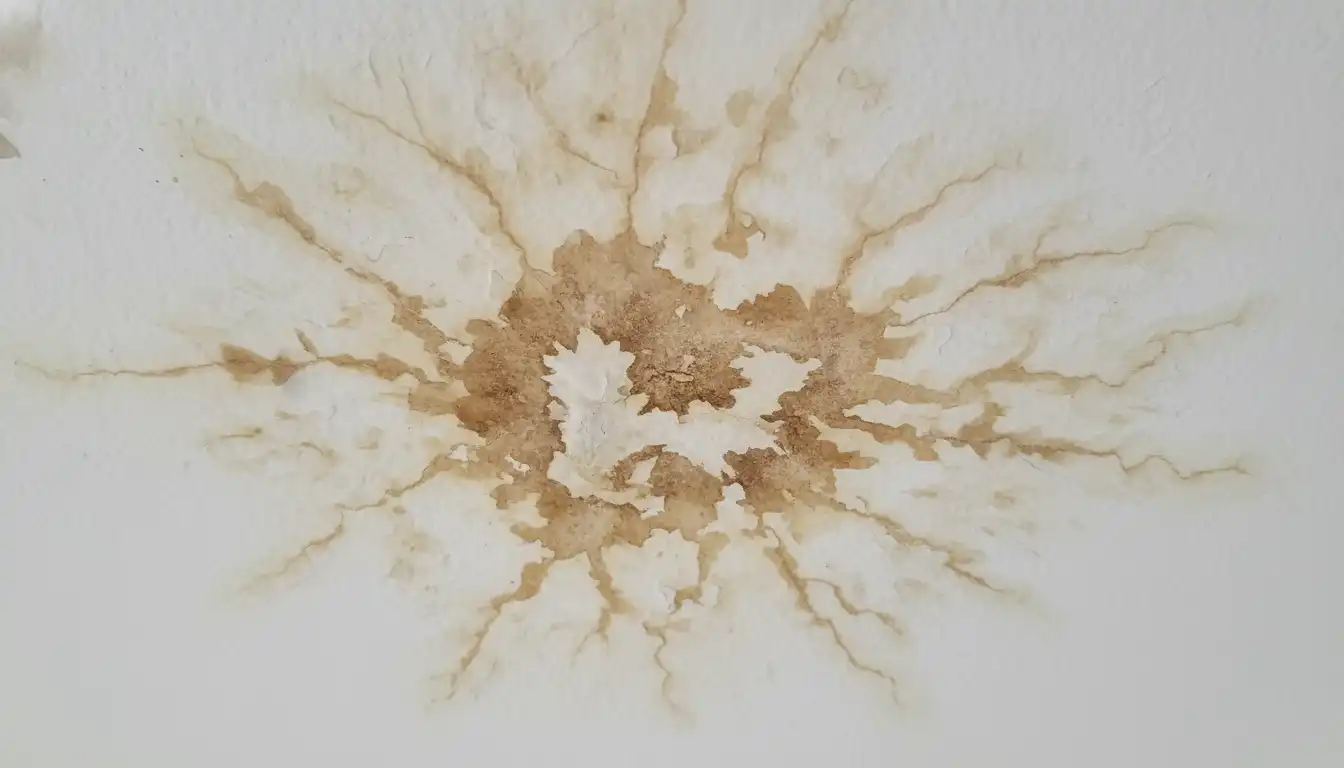
By far, the most frequent cause of brown drywall is water. A leak from a roof, a plumbing pipe, or a faulty appliance can allow moisture to seep into your wall or ceiling cavity. As the water travels through building materials like wood studs and insulation, it picks up tannins and minerals, which are then deposited on the drywall, leaving a tell-tale brown stain.
These stains often have distinct, map-like edges and can range in color from a light tan to a deep, dark brown. If you notice a brown water leaking from ceiling, it’s a clear sign of an active or recent leak that needs immediate attention. The location of the stain can often provide clues to the source of the water.
The Stealthy Intruder: Mold and Mildew
Where there is persistent moisture, mold and mildew are sure to follow. Brown stains, especially those with a fuzzy or splotchy appearance, can indicate mold growth within the drywall or on its surface. Mold is not just a cosmetic issue; it poses significant health risks, particularly for individuals with allergies or respiratory conditions.
A musty odor is another strong indicator of mold. If you suspect mold, it is crucial to address it safely and thoroughly, as simply painting over it will not solve the problem. The underlying moisture source must be eliminated to prevent its return.
The Sticky Situation: Surfactant Leaching
In high-humidity areas like bathrooms and kitchens, you might notice oily, sticky, or soapy-looking brown streaks running down your walls. This phenomenon is known as surfactant leaching. Surfactants are water-soluble ingredients in latex paint that can migrate to the surface when the paint is exposed to moisture before it has fully cured.
While alarming in appearance, surfactant leaching is primarily an aesthetic concern and does not typically harm the paint or the drywall itself. These brown drips on bathroom walls can usually be cleaned, but proper ventilation is key to preventing them from recurring.
The Lingering Legacy: Smoke and Nicotine Stains
In homes where people smoke tobacco products, a sticky, yellowish-brown film of tar and nicotine can build up on walls and ceilings over time. This can cause a uniform discoloration across large areas of drywall. Soot from improperly ventilated fireplaces, furnaces, or even excessive candle burning can also lead to similar dark staining.
These types of stains are notoriously difficult to remove and will almost always bleed through fresh coats of standard paint. They require specific cleaning methods and specialized primers to properly seal the stain before repainting.
Kitchen Calamities: Grease and Oil Splatter
The walls in your kitchen, especially near the stove, are prime targets for brown spots caused by grease and oil splatter from cooking. These spots are often sticky to the touch and can attract dust and grime, making them appear darker over time. While typically less severe than water or nicotine stains, they still require thorough cleaning before any touch-up painting is attempted.
Your Step-by-Step Guide to Fixing Brown Drywall Stains
Once you have identified the likely culprit, you can begin the process of restoring your wall. Simply covering up the stain is a temporary fix at best; a proper repair involves addressing the root cause, cleaning the area, and then refinishing the surface for a flawless look.
Step 1: Identify and Stop the Source
This is the most important step. No amount of cleaning or painting will permanently fix the stain if the source of the problem is not resolved. Before you do anything else, you must stop what is causing the discoloration.
For water damage, this means finding and repairing the leak. For mold, it means controlling the moisture and humidity. For surfactant leaching, improving ventilation with an exhaust fan is critical. Once the source is controlled, you can proceed with the cosmetic repair.
Step 2: Assess the Damage – Is It Just a Stain?
Next, you need to determine the extent of the damage to the drywall itself. Gently press on the stained area. If the drywall feels soft, spongy, or crumbles under pressure, the structural integrity has been compromised. In this case, the damaged section will need to be cut out and replaced.
A surface-level stain on solid, firm drywall can usually be cleaned and sealed. However, if you find the drywall crumbles when you drill into it, it’s a sure sign that replacement is necessary. Don’t try to repair drywall that is no longer structurally sound.
Step 3: Cleaning Surface-Level Stains
For stains that have not damaged the drywall’s structure, a thorough cleaning is the next step. The appropriate cleaning method will depend on the type of stain you are dealing with. Always wear protective gear like gloves and safety glasses when working with cleaning solutions.
Proper ventilation is also essential, so open a window or use a fan. The goal is to remove as much of the discoloration as possible before moving on to the priming stage.
| Stain Type | Cleaning Agent | Instructions | Safety Precautions |
|---|---|---|---|
| Mild Water Stain | Bleach Solution (1 part bleach to 3 parts water) | Apply with a sponge, let sit for 5-10 minutes, rinse with a damp cloth, and allow to dry completely. | Ensure good ventilation; wear gloves and eye protection. Do not mix bleach with ammonia. |
| Surfactant Leaching | Mild Soap and Water or TSP Solution | Gently wash the walls with a soft sponge. Rinse thoroughly with clean water to remove all residue. | TSP is a strong cleaner; follow product instructions carefully and wear gloves. |
| Mold/Mildew | Vinegar or a commercial mold remover | Spray vinegar directly on the mold, let it sit for an hour, then scrub and wipe clean. Allow to dry fully. | Wear an N95 mask to avoid inhaling spores. Isolate the area if mold is extensive. |
| Nicotine/Smoke | TSP (Trisodium Phosphate) or Ammonia Solution | Mix TSP with warm water according to package directions. Vigorously scrub the walls, then rinse with clean water. | Wear heavy-duty gloves and eye protection. Ensure maximum ventilation. |
| Grease/Oil | Degreasing dish soap and hot water | Create a soapy solution and use a sponge to scrub away the grease. Rinse with a clean, damp cloth. | Basic cleaning precautions are sufficient. |
Step 4: The Secret Weapon for Stubborn Stains: Stain-Blocking Primer
After cleaning and thoroughly drying the area, it is crucial to apply a stain-blocking primer. Do not skip this step. Regular latex primer or paint will not be enough to cover a water, nicotine, or other persistent stain. The discoloration will eventually bleed through, and your hard work will be wasted.
Choose a high-quality oil-based or shellac-based primer specifically designed for blocking stains. These primers create an impermeable barrier that seals the stain and prevents it from showing through the final coat of paint. Using a product like Kilz is an excellent choice for this task, as explored in guides on torn drywall paper repair.
Step 5: The Finishing Touches – Painting for a Flawless Finish
Once the stain-blocking primer is completely dry, you are ready for the final step: painting. Apply a topcoat of paint that matches the rest of your wall or ceiling. For best results, you may need to apply two coats to ensure the repaired area blends in seamlessly.
Use a roller to feather the edges of the new paint into the surrounding area to avoid creating obvious lines. With the source fixed, the stain cleaned, and the area properly sealed and painted, your drywall should look as good as new.
Beyond the Stain: When Is Brown Drywall a Sign of a Bigger Problem?
A brown spot is more than a cosmetic flaw; it is physical evidence of a hidden problem. The true danger often lies not in the visible stain but in the unseen consequences of the moisture that caused it. Chronic, slow leaks can have serious, long-term effects on your home’s health and structural integrity.
Persistent moisture behind a wall can saturate your insulation, drastically reducing its R-value and making your home less energy-efficient. Furthermore, that same moisture can slowly degrade the wooden studs and ceiling joists that form your home’s skeleton, potentially compromising the entire structure over time. If water is near electrical wiring or outlets, it creates a significant risk of short circuits and fire.
Prevention Is the Best Medicine: How to Keep Your Drywall Pristine
The best way to deal with brown drywall stains is to prevent them from happening in the first place. Proactive maintenance can save you from costly and time-consuming repairs down the road.
Conduct regular inspections of your roof, plumbing, and appliances to catch potential leaks early. Ensure that high-humidity areas like bathrooms and kitchens are properly ventilated by consistently using exhaust fans. Keeping your home dry and well-maintained is the most effective strategy for keeping your drywall clean and stain-free.