Bloodgood Japanese Maple in Container: The Ultimate Success Guide
The allure of a Bloodgood Japanese maple is undeniable. Its deep, wine-red leaves bring a touch of elegance and four-season interest to any landscape. But what if you lack the sprawling garden space for this iconic tree? The solution seems simple: grow it in a container. Yet, this is where many well-intentioned gardeners face a frustrating battle, watching their vibrant tree become a shadow of its potential.
Many find their container-grown Bloodgood suffering from scorched leaves, stunted growth, or worse, complete failure after a single harsh winter. The dream of a stunning patio centerpiece quickly turns into a disappointing and expensive experiment. The problem isn’t the tree; it’s a fundamental misunderstanding of its needs when confined to a pot.
This comprehensive guide will illuminate the path to success. We will deconstruct the common failures and provide you with an actionable, expert-backed framework to grow a thriving, breathtaking Bloodgood Japanese maple in a container. This is not just about keeping your tree alive; it’s about helping it flourish for years to come.
You'll Learn About
Why Your Potted Bloodgood Maple Is Struggling (And How to Fix It)
Success with a containerized Bloodgood hinges on understanding that you are creating a complete, isolated ecosystem. Unlike a tree in the ground, its roots have no escape from the conditions you provide. Getting the foundational elements right from the start is non-negotiable, and it’s where most problems originate.
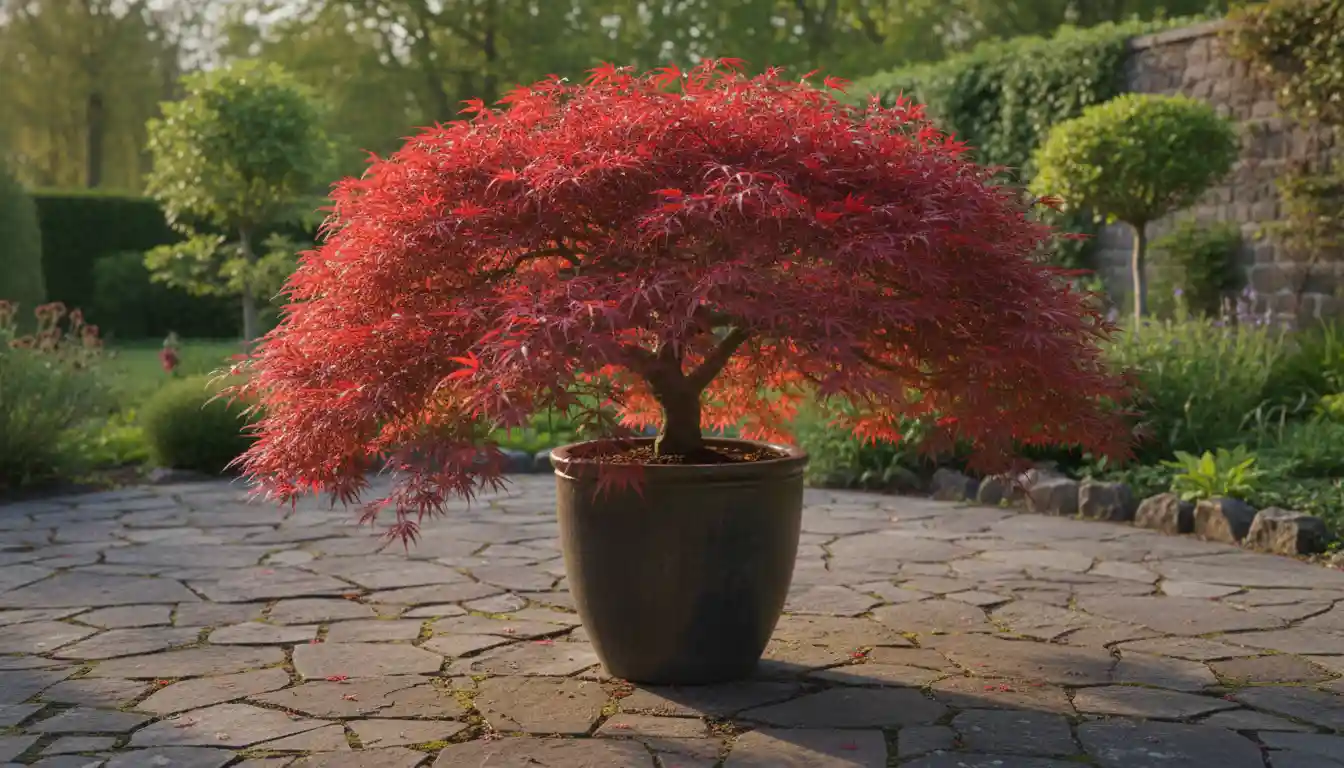
The Silent Killer: Choosing the Wrong Container
The single most common mistake is selecting an inappropriate container. A pot is not just a holder for soil; it’s your tree’s entire world, regulating moisture, temperature, and root health. Using a pot that is too large, too small, or lacks proper drainage is a recipe for disaster.
A pot that’s excessively large holds too much soil moisture, which can suffocate the fine, sensitive roots and lead to fatal root rot. Conversely, a pot that is too small restricts root growth, causing the tree to become root-bound, stressed, and unable to absorb the water and nutrients it needs. Proper drainage is the most critical factor. Without multiple, large drainage holes, water will stagnate at the bottom, creating an anaerobic environment that will kill your maple.
Your solution is to choose a container that is only 2-4 inches wider in diameter than the nursery pot it came in. This provides enough room for growth without overwhelming the root system with excess wet soil. Ensure it has several large drainage holes. For materials, glazed ceramic and high-quality resin offer a great balance of moisture retention and insulation, while terracotta is excellent but dries out very quickly in summer. Choosing the right container is as foundational as deciding between major suppliers for a home project, such as when you’re comparing Home Depot vs. Lowe’s for carpet installation; the initial choice dictates the long-term outcome.
Soil S.O.S.: The Cardinal Sin of Using Garden Soil
Never use soil from your garden in a container. This is a rule that cannot be broken. Garden soil is heavy and dense, composed of clay, sand, and silt. In the open ground, this structure works within a larger ecosystem of worms and microorganisms. In a pot, it compacts with each watering, squeezing out air pockets and becoming a dense, brick-like mass that suffocates roots.
Compacted soil prevents water from penetrating effectively and, more importantly, from draining away. This leads directly to root rot, the number one killer of container-grown Japanese maples. Your tree will appear to be wilting from lack of water, tricking you into watering it more and exacerbating the deadly problem below the surface.
The key is to create a custom soil blend that is light, airy, and exceptionally well-draining. Your goal is a soil structure that retains some moisture but allows excess water to escape freely. A perfect, easy-to-create mix is one part high-quality potting soil, one part compost or soil conditioner, and one part perlite or small pine bark fines. This combination provides structure, nutrients, and the essential aeration and drainage that Japanese maple roots crave.
The Watering Tightrope: Escaping the Over/Underwatering Cycle
Watering is the most frequent task you’ll perform, and it’s also the easiest to get wrong. The confined nature of a pot means the soil can go from drenched to bone-dry with alarming speed, especially on hot or windy days. There is no magic schedule like “water every three days”; you must learn to respond to the tree’s actual needs.
Overwatering is the more dangerous of the two evils. Constant sogginess invites fungal diseases and root rot, from which a tree may never recover. Underwatering, on the other hand, causes stress, leading to crispy, brown leaf edges (leaf scorch) and branch dieback. Inconsistent watering, where the tree experiences cycles of drought and flood, is incredibly stressful and weakens its overall health.
The solution is to adopt the “finger test” method. Before you even think about watering, insert your finger two inches into the soil. If it feels moist, wait. If it feels dry at that depth, it’s time to water. When you do water, do so thoroughly. Pour water slowly and evenly over the entire soil surface until you see it running freely from the drainage holes at the bottom. This ensures the entire root ball is hydrated and flushes out any salt buildup from fertilizers.
Sunburn or Starvation? The Light and Food Dilemma
The magnificent deep red color of a Bloodgood is a direct response to sunlight. However, its leaves are also thin and delicate. While the tree needs sun to develop its signature color, the intense, direct afternoon sun can be brutal, especially when the roots are in a container that can heat up like a small oven. This is the central conflict of placing a potted Bloodgood.
Too much shade will cause the leaves to revert to a greenish-bronze color as they produce more chlorophyll to compensate for the lack of light. Too much direct sun, particularly in hot climates, will literally scorch the leaves, leaving them crispy and brown. Furthermore, the nutrients in a pot are finite. After a few months, the tree has consumed what’s available and will begin to starve without supplemental feeding.
The ideal location for your potted Bloodgood is one that receives gentle morning sun and is protected from the harsh, direct sun of the afternoon. An east-facing patio or a spot under the dappled shade of a larger tree is perfect. For feeding, use a slow-release, balanced granular fertilizer formulated for acid-loving plants in the early spring, just as new growth appears. Avoid the temptation to over-fertilize, as this can burn the sensitive roots and do more harm than good.
Your Year-Round Bloodgood Care Calendar
A proactive approach to seasonal care will prevent most problems before they start. Understanding the tree’s annual cycle allows you to provide the right support at the right time, ensuring it remains healthy and resilient. This structured approach removes the guesswork and builds a rhythm of proper care.
The needs of your Bloodgood will change dramatically from the flush of spring growth to the dormancy of winter. Anticipating these shifts is the hallmark of an expert container gardener. The following table breaks down the essential tasks for each season, providing a clear and easy-to-follow schedule for optimal health.
| Season | Key Tasks | Pro-Tips |
|---|---|---|
| Spring | Repot if necessary. Apply slow-release fertilizer. Monitor for pests like aphids on new growth. | This is the best time to prune any dead or crossing branches before the leaves fully emerge. Do not overwater as the tree is just beginning its growth cycle. |
| Summer | Provide consistent and deep watering. Protect from scorching afternoon sun. Monitor soil moisture daily. | Check for leaf scorch, a sign of underwatering or too much sun. A layer of mulch on top of the soil can help retain moisture and keep roots cool. |
| Autumn | Gradually reduce watering frequency as the weather cools. Enjoy the brilliant crimson fall color. | Do not fertilize in the fall. You want the tree to slow down and prepare for dormancy, not push out new, tender growth that will be damaged by frost. |
| Winter | Protect the container and roots from freezing. Water sparingly only when the soil is dry. | Move the pot to a sheltered location like an unheated garage or against a house wall. Wrap the pot in burlap or bubble wrap for extra insulation against freeze-thaw cycles. |
Advanced Techniques for a Show-Stopping Potted Maple
Once you have mastered the fundamentals of soil, water, and light, you can move on to more advanced techniques. These practices will elevate your tree from merely surviving to truly thriving, transforming it into a stunning, long-term specimen that becomes a focal point of your garden or patio. A beautiful tree can be as defining for an outdoor space as fine details are for an interior, much like how one might thoughtfully consider a guide on crown molding for cabinets that don’t go to the ceiling to finish a room.
The Art of Pruning: Shaping for Health and Beauty
Many gardeners are terrified of pruning, fearing they will harm their precious tree. In reality, thoughtful, strategic pruning is essential for maintaining the health, vigor, and aesthetic appeal of a container-grown Japanese maple. The goal is not to force an unnatural shape, but to enhance its natural form and improve its structure.
The primary reason to prune is to remove any dead, damaged, or diseased wood. The secondary reason is to improve air circulation and light penetration throughout the canopy by removing branches that are crossing or rubbing against each other. This helps prevent fungal issues and ensures all parts of the tree get adequate light.
The best time to perform this type of pruning is in late winter or very early spring, while the tree is still dormant and its branch structure is clearly visible. Use sharp, clean bypass pruners or a small pruning saw for any cuts. Make your cuts just outside the branch collar (the slightly swollen area where a branch joins a larger one), which allows the tree to heal the wound properly. Avoid drastic pruning; never remove more than one-quarter of the tree’s mass in a single year.
The Dreaded Repotting: A Step-by-Step Guide
Every two to four years, your Bloodgood will need to be repotted. This process is vital for its long-term health. It replenishes the soil, which becomes depleted and compacted over time, and allows you to inspect and manage the root system to prevent the tree from becoming root-bound and choked.
Signs that it’s time to repot include water running straight through the pot without soaking in, roots growing out of the drainage holes, and a noticeable slowdown in growth. The best time for this task is in late winter or early spring, just before the buds begin to swell. Choose a new pot that is only 2-3 inches wider in diameter than the current one.
To repot, gently slide the tree out of its current container. Carefully loosen the circling roots on the outside of the root ball with your fingers or a small tool. You can even trim off up to an inch of the dense, fibrous roots around the bottom and sides to encourage new growth. Place a layer of your fresh, well-draining soil mix in the new pot, set the tree in at the same depth it was before, and fill in around the sides with more soil, gently firming it to remove air pockets. Water it thoroughly afterward.
Winter’s Fury: The Unspoken Threat to Container Maples
While a Bloodgood maple is cold-hardy when planted in the ground, its roots are dangerously exposed when in a container. The ground provides immense insulation, keeping root temperatures stable. A pot, however, is exposed to ambient air on all sides, allowing the soil to freeze solid much faster and deeper. This freeze-thaw cycle is the single greatest threat to your potted maple’s survival.
When the soil freezes, the roots cannot take up any moisture. If a sunny or windy winter day comes along, moisture will be pulled from the leaves and branches (a process called transpiration), but the frozen roots cannot replace it. This desiccation is what causes winter dieback or kills the tree entirely.
The solution is to protect the roots, not the branches. Your goal is to insulate the pot and keep the soil temperature more stable. The most effective method is to move the pot into an unheated, protected space like a garage, shed, or basement for the coldest part of winter. If this isn’t possible, group it with other pots against a sheltered wall of your home and wrap the container (not the tree itself) in layers of burlap or bubble wrap. You can also “heel it in” by digging a temporary hole in a vegetable garden and sinking the entire pot into the ground for the winter, providing natural insulation.
Troubleshooting Common Bloodgood Ailments
Even with the best care, you may occasionally encounter issues. Learning to read the signs your tree is giving you allows for quick intervention. Understanding the durability of your chosen pot material is also key, just as one would investigate product resilience for other home items, like asking if black stainless steel sinks scratch before committing to a kitchen design.
Why Are My Maple’s Leaves Curling and Crispy?
This is classic leaf scorch. The edges of the leaves turn brown and brittle, looking as if they’ve been touched by a flame. This is almost always a water-related issue. It’s caused by the leaves losing moisture faster than the roots can absorb it.
The most common culprits are underwatering, exposure to harsh afternoon sun, or excessive wind. Check your soil moisture immediately. If it’s dry, give the tree a thorough, deep watering. If the soil is moist, the issue is likely environmental. Move the pot to a location that is shielded from the hot afternoon sun and drying winds.
Why Are the Leaves Green Instead of Red?
A Bloodgood that isn’t producing its signature deep red foliage is almost certainly not receiving enough direct sunlight. While you must protect it from harsh afternoon sun, it still needs several hours of morning or late-day sun to develop its best color.
The leaves are reverting to green because they are producing more chlorophyll to maximize photosynthesis in lower light conditions. The solution is to gradually acclimate the tree to a sunnier position. Move it to a spot that gets an additional hour or two of morning sun and observe how it responds over the next couple of weeks.
What Are These Tiny Bugs on the New Leaves?
If you see clusters of tiny, pear-shaped insects on the tender new growth, you are likely dealing with aphids. These common pests suck the sap from the most delicate parts of the tree, which can cause leaves to curl and become distorted. They also excrete a sticky substance called honeydew.
Fortunately, aphids are relatively easy to control on a small tree. Often, a strong blast of water from a hose is enough to dislodge them. For more persistent infestations, a spray bottle filled with water and a few drops of dish soap or a commercial insecticidal soap will effectively manage the problem without harming the tree.
A Thriving Patio Masterpiece Awaits
Growing a Bloodgood Japanese maple in a container is a journey that rewards diligence and understanding. It is not a “set it and forget it” plant. By moving beyond the common pitfalls and embracing a proactive approach, you can successfully cultivate a stunning specimen that brings unparalleled beauty and structure to your patio, balcony, or entryway.
The key to success lies not in complex secrets, but in the consistent application of the fundamentals: a well-draining pot and soil, mindful watering, correct placement for light, and crucial protection from winter’s harshest elements. With this knowledge, you are now equipped to provide the perfect environment for your Bloodgood to thrive, ensuring it remains a source of pride and joy for many years.