Choosing the Right Brush for Painting Cedar Shakes
There’s nothing quite like the rustic, timeless beauty of a home with cedar shake siding. It provides a warm, natural aesthetic that can last for decades, but only with proper care. The moment you decide to refresh that look with a new coat of paint or stain, you’re faced with a critical choice that can mean the difference between a stunning, professional-grade finish and a blotchy, frustrating mess.
The core problem isn’t the paint or the painter; it’s the tool. Using the wrong paintbrush on the highly textured, uneven, and porous surface of cedar shakes is a recipe for disaster. It leads to wasted time, uneven coverage, and a finish that fails to protect the wood, ultimately costing you more in the long run.
You'll Learn About
Why Your Brush Choice Is Mission-Critical for Cedar Siding
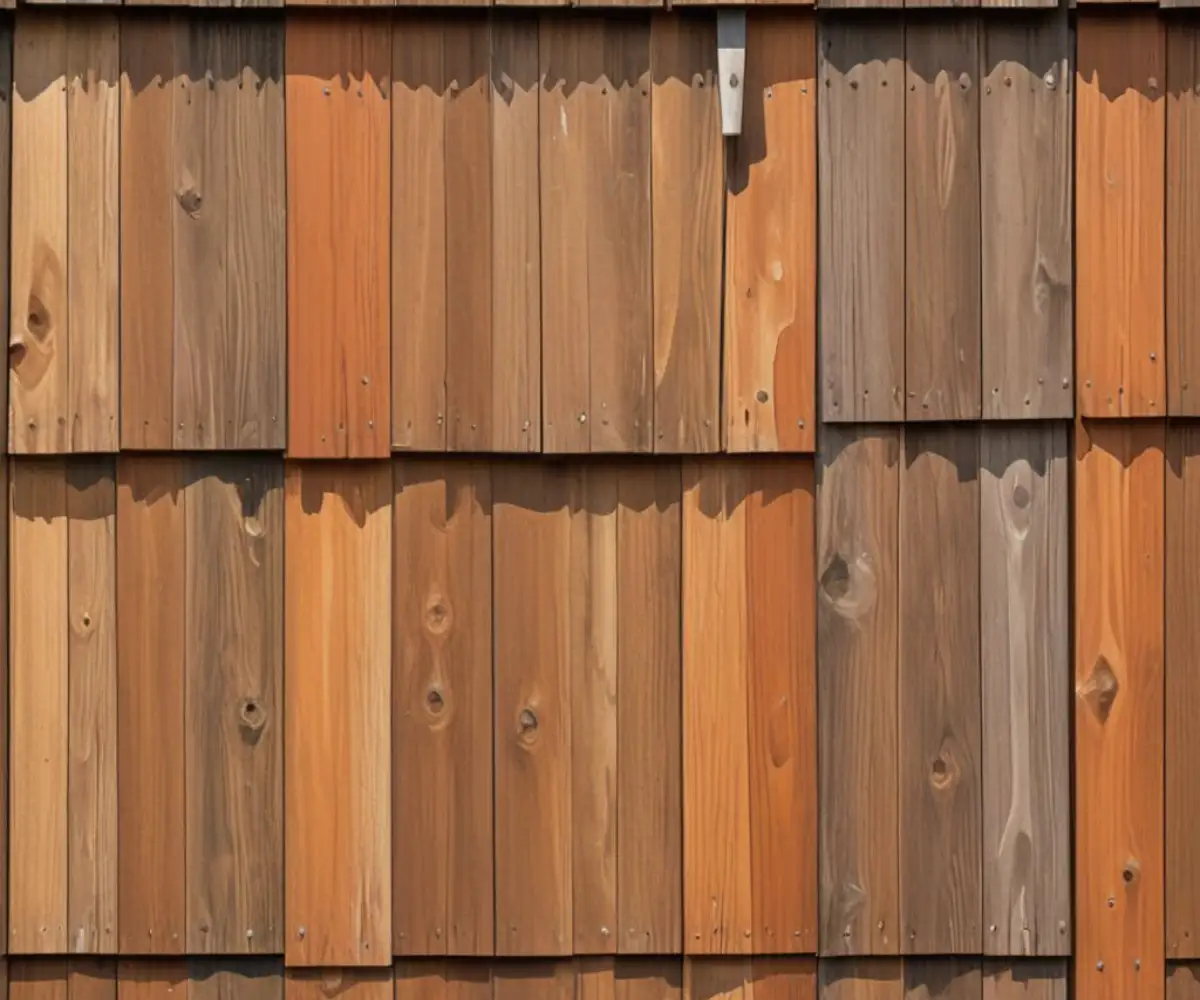
Painting cedar shakes is not like painting a smooth interior wall. The surface is uniquely challenging. Each shake has a rough, split-face texture with deep grooves and grain. This texture is what gives cedar its character, but it’s also what mercilessly chews up inferior brushes.
When you use a cheap or incorrect brush, you’ll immediately notice the paint isn’t applying smoothly. The brush will seem to “skip” over the rough patches, leaving tiny unpainted spots known as “holidays.” Furthermore, the stiff wood fibers can catch and pull out bristles, leaving them permanently embedded in your beautiful new paint job.
An inadequate brush also fails to hold and release paint efficiently. This means you’re constantly dipping your brush, slowing down your progress immensely and increasing the risk of drips and runs. It turns a rewarding home improvement project into a grueling, exhausting chore.
The Unique Challenges of Cedar Shakes
To pick the right tool, you must first respect the opponent. Cedar shakes present several distinct obstacles. The overlapping installation creates thousands of tight edges and corners that are impossible to reach with a standard brush or roller.
The wood itself is also incredibly porous, meaning it soaks up paint like a sponge. You need a brush that can carry a significant amount of paint and has the backbone to work that paint deep into the wood grain for a protective, even coat. This is where the battle is won or lost.
Natural vs. Synthetic Bristles: The Great Debate for Cedar
The first major decision you’ll make is the type of bristle. This choice is dictated almost entirely by the type of paint or stain you are using. Making the wrong choice here can ruin both your brush and your paint job.
The Old-School Charm of Natural Bristles
Natural bristle brushes, often made from China bristle or ox hair, are superb for oil-based paints, stains, and varnishes. The natural “flagging” (split ends) on the bristles creates a very fine, smooth finish and allows them to hold a lot of product.
However, they have a critical weakness: water. Never use a natural bristle brush with water-based latex or acrylic paints. The bristles will absorb the water, become limp and floppy, and lose all their stiffness, making them utterly useless for working paint into rough cedar.
The Modern Power of Synthetic Bristles
For the vast majority of exterior home painting projects today, you’ll be using a water-based latex or acrylic paint. For these, a synthetic brush is your only real option. These are typically made from a blend of nylon and polyester.
Nylon provides durability and wear resistance, while polyester helps the brush maintain its stiffness and shape, even when wet. This combination is the perfect weapon for tackling cedar shakes. A high-quality Nylon/Polyester blend offers the stiffness needed to push paint into the texture and the durability to survive the job.
Key Features in the Best Brush for Painting Cedar Shakes
Once you’ve settled on a synthetic brush, you need to look at its specific features. Not all synthetic brushes are created equal. The difference between a premium brush and a bargain-bin tool is stark.
Brush Size and Shape Matters
For the large, flat faces of the siding, you need a wide brush to cover the area efficiently. A 4-inch to 5-inch flat “siding” brush is the ideal workhorse. These brushes are thick and designed to hold a massive amount of paint, reducing your trips to the paint can.
For the detailed work—cutting in around windows, trim, and the bottom edges of each shake—you need precision. A 2.5-inch to 3-inch angle sash brush is essential. Its angled bristles give you superior control for creating clean, sharp lines.
Bristle Quality and Construction
Look closely at the bristles themselves. Premium brushes have more bristles packed densely into the ferrule (the metal band). They will also have “flagged” tips, where the ends are split to carry more paint and produce a smoother finish with fewer brush marks.
The ferrule should be made of stainless steel to prevent rusting, and it should be securely attached to a comfortable, ergonomic wooden handle. A comfortable handle is not a luxury; it’s a necessity that will prevent hand cramps and fatigue during a long day of painting.
Our Top Recommended Brush Types for Painting Cedar Shakes
To make the selection process easier, we’ve broken down the best tools for the job. Having at least one of each of the primary brushes will equip you for a successful project. Here is a table outlining the best options.
| Brush Type | Bristle Material | Best For | Key Feature |
|---|---|---|---|
| Wide Siding Brush | Nylon/Polyester Blend | Main body of the shakes, large flat areas | 4-5 inch width, high paint capacity, stiff bristles |
| Angle Sash Brush | Nylon/Polyester Blend | Cutting in, trim, corners, and edges | 2.5-3 inch angled head for precision control |
| Block or “Stain” Brush | Nylon/Polyester Blend | Applying stain or paint to large rough areas quickly | Very thick and dense, holds a massive amount of product |
| Natural China Bristle Brush | Natural Bristle | Oil-based primers, paints, and stains ONLY | Excellent smoothness with oil-based products |
Pro Tips for Prepping and Painting Your Cedar Shakes
The best brush in the world won’t save you if your prep work is sloppy. A professional finish is the result of a methodical process. Following these steps will ensure your hard work lasts for years.
The Crucial Prep Work You Can’t Skip
First, inspect the siding thoroughly. Look for any soft spots, mildew, or damaged shakes that need to be replaced. Careful inspection of the whole structure is important, as problems in one area can hint at others. For instance, ensuring the posts supporting a nearby porch are sound is just as important as the siding itself, and you may need to learn how to straighten a bowed 4×4 post before you can safely work in an area.
Next, you must clean the surface. Use a pressure washer on a low-pressure setting or a garden hose and a stiff-bristled scrub brush to remove all dirt, chalking, and mildew. Let the wood dry completely for at least two sunny days.
Finally, and most importantly, you must prime. Cedar is rich in natural oils called tannins. If you apply latex paint directly to raw cedar, these tannins will bleed through and cause ugly brown or yellow stains. You must use a high-quality, stain-blocking primer—preferably an oil-based one for the best results—to seal the wood before your top coat.
Mastering Your Brush Technique
With your premium brush in hand, it’s time to paint. Don’t overload the brush; dip only the first third of the bristles into the paint and tap off the excess. Always work from the top of the house down to catch any drips.
Use your angle sash brush to “cut in” the edges and undersides of a small section of shakes first. Then, use your larger siding brush to fill in the main faces, always brushing in the direction of the wood grain. Aim for two thin, even coats rather than trying to apply one thick, heavy coat, which can lead to drips and an uneven finish.
Common Mistakes to Avoid at All Costs
Many well-intentioned homeowners make simple mistakes that compromise their entire project. Be aware of these common pitfalls. The most frequent error is skipping the stain-blocking primer, leading to inevitable tannin bleed.
Another mistake is painting in direct, hot sunlight. This causes the paint to dry too quickly, creating visible brush strokes and preventing it from adhering properly to the surface. It’s also critical not to skimp on your tools. A cheap brush will shed bristles and give you a poor finish, wasting all your meticulous prep work.
A final part of preparation is ensuring the entire work area is sound. While you’re focused on the siding, a quick check of surrounding fixtures can prevent future headaches. You wouldn’t want to finish painting only to find a minor issue nearby has become a major one. A well-maintained exterior is the first line of defense for your entire home, protecting everything down to the utilities in your basement. It’s a reminder of just how fragile are water heaters when small exterior leaks go unnoticed over time.
Caring for Your Brushes to Make Them Last
A high-quality brush is an investment. With proper care, it can last for many projects. As soon as you are finished painting, you must clean your brushes thoroughly. For latex paint, use warm water and dish soap, using a painter’s comb to get all the paint out from near the ferrule.
For oil-based paints and primers, you will need to use mineral spirits. Once clean, reshape the bristles by hand, and hang the brush to dry. Storing it in the original cardboard keeper it came in will help it maintain its shape for the next time you need it.
Conclusion: Your Brush Is Your Most Important Tool
Painting cedar shakes is a challenging but incredibly rewarding project. The key to success lies not in rushing the job, but in using the right methods and, most importantly, the right tools. Choosing a premium-quality, synthetic blend brush in the appropriate size is the single most important decision you will make.
By investing in a great brush, diligently preparing the surface, and using the proper technique, you can achieve a durable, professional-looking finish. Your home’s cedar shakes will not only look fantastic but will also be well-protected from the elements for years to come.