Stop Unwanted Guests? A Bathroom Exhaust Fan Bug Screen Guide
There’s a hidden entryway into your home that you might overlook, but insects and other pests have certainly found it. The bathroom exhaust fan, designed to vent moisture, often serves as an open invitation for spiders, wasps, stink bugs, and even small rodents. This seemingly small oversight can lead to a constant battle against unwelcome intruders in one of the most private spaces in your home.
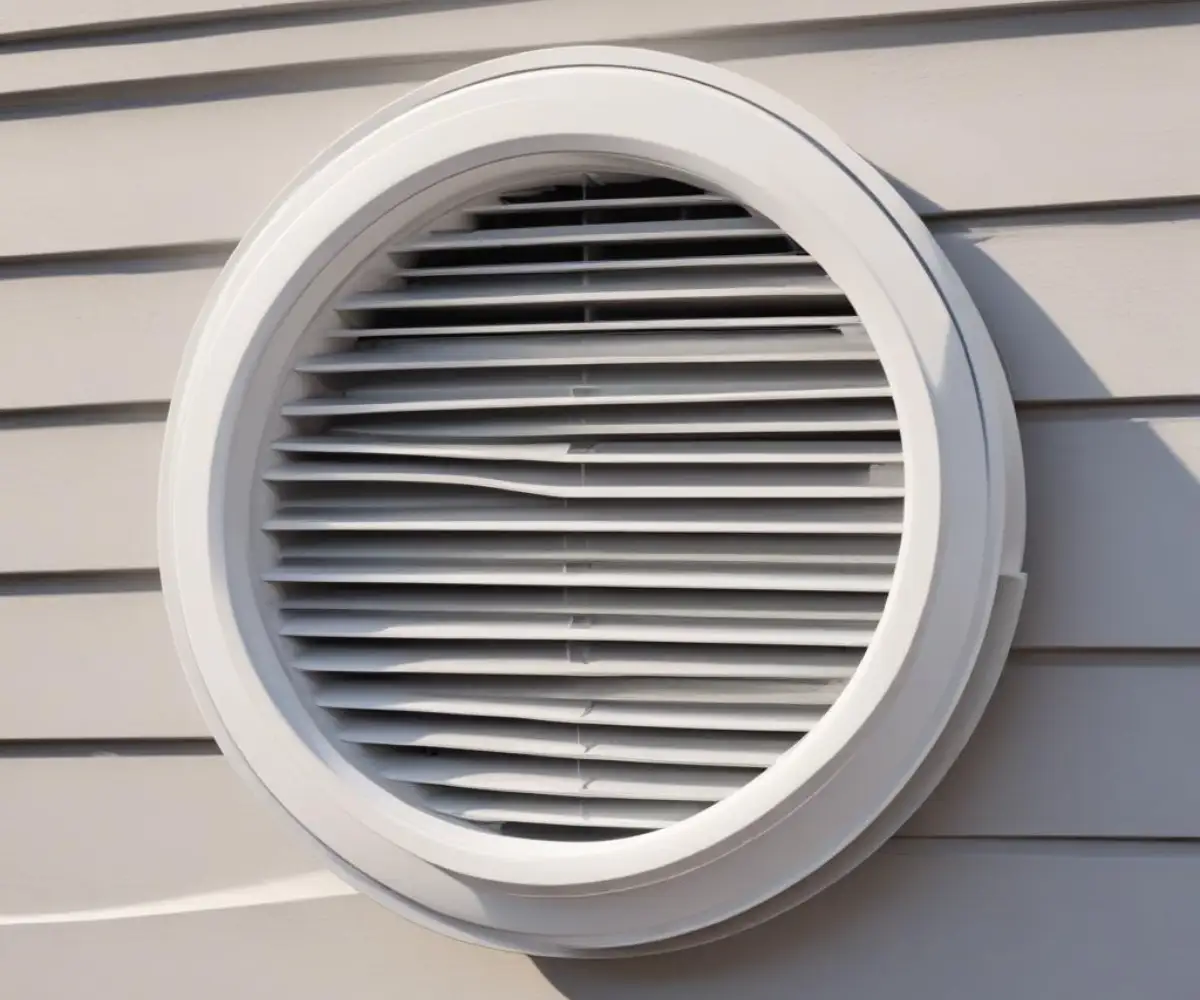
The problem often starts with the exterior vent cover. Standard vent covers use a simple flap or damper system that is supposed to close when the fan is off. However, these dampers can wear out, get stuck open, or simply leave small gaps, creating a perfect pathway for pests to crawl through the ductwork and into your bathroom.
You'll Learn About
Why Your Fan Vent is a Gateway for Pests
Most homeowners don’t realize their bathroom ventilation system is a direct line to the outdoors. The ductwork acts like a highway for critters, leading them straight into your home. The standard backdraft dampers are often flimsy and prone to failure, offering little resistance to a determined insect or rodent.
Once inside the duct, these pests are protected from the elements, making it an ideal place to nest. This not only leads to bugs appearing in your bathroom but can also result in blocked ducts, reducing your fan’s effectiveness. A properly sealed home is crucial, and overlooking this small detail can compromise your entire pest control strategy. For more ideas on securing your home’s envelope, exploring options like those in these solar industries windows reviews can provide a broader perspective on home sealing.
The Simple, Powerful Solution: An Exhaust Fan Bug Screen
The most effective way to fortify this entry point is by installing a bathroom exhaust fan bug screen on the exterior vent. This simple addition creates a physical barrier that stops pests before they can even enter the ductwork. It’s a non-invasive, chemical-free solution that provides a permanent fix to a persistent problem.
Choosing the Right Bug Screen for Your Vent
When selecting a bug screen, you have a few key factors to consider: material, mesh size, and type of installation. The right choice will depend on your specific needs and the type of pests common in your area. Making an informed decision ensures long-term protection and optimal performance of your exhaust fan.
Materials like galvanized steel or durable plastic offer longevity and resistance to weather. The mesh size is a critical balance; it must be fine enough to block small insects but open enough to allow proper airflow. A screen that is too dense can quickly become clogged with lint and dust, leading to other problems.
Material and Mesh: Finding the Perfect Balance
The material of your bug screen is crucial for durability. Metal screens, such as stainless or galvanized steel, offer excellent strength and resistance to chewing by rodents. Plastic and fiberglass screens are rust-proof and can be a cost-effective option, but may not be as durable against determined pests or harsh weather conditions.
The mesh size determines what gets blocked. A standard window screen mesh is often sufficient for larger insects like wasps and flies. However, if you’re dealing with smaller pests like gnats, a finer mesh may be necessary. Always prioritize airflow; a blocked vent is an ineffective one.
Types of Bug Screens: Replacements vs. Add-Ons
There are two primary styles of bug screens for exhaust vents. The first is a complete replacement vent cover that has a screen pre-installed. These are great if your existing vent cover is old, damaged, or aesthetically unpleasing. They provide a clean, integrated look and are designed to work together seamlessly.
The second option is an add-on screen that you install over or behind your existing vent cover. These are often made of flexible mesh that can be cut to size. This is a versatile and budget-friendly solution, especially if your current vent cover is still in good condition.
| Screen Type | Material | Pros | Cons |
|---|---|---|---|
| Replacement Vent Cover | Plastic, Galvanized Steel | Integrated design, durable, easy to install as one unit. | More expensive, may require removing old sealant. |
| Add-On Mesh Screen | Fiberglass, Aluminum | Inexpensive, versatile, can be cut to fit any vent. | May be less durable, installation can be more intricate. |
| Heavy-Duty Pest Guard | Stainless Steel | Extremely durable, resistant to rodents and birds. | Can restrict airflow if not cleaned, higher cost. |
DIY Installation: A Step-by-Step Guide
Installing a bathroom exhaust fan bug screen is a straightforward DIY project that most homeowners can complete in under an hour. Before you begin, ensure you can safely access the exterior vent. If the vent is located high on a wall, proper ladder safety is paramount. If you’re unsure about getting your equipment to the site, you might find some useful tips on how to transport a ladder without a roof rack.
Gather your tools before you start. You will typically need a screwdriver or drill, exterior-grade caulk, a utility knife, and, of course, your new screen or vent cover. Working safely and methodically will ensure a secure and effective installation.
Step 1: Remove and Clean the Existing Vent Cover
Start by removing the screws that hold the current vent cover in place. Carefully pry the cover away from the siding. There will likely be old caulk or sealant that needs to be scraped off; use a utility knife or putty knife to create a clean surface for the new installation.
Once the cover is off, clean the area around the duct opening. Remove any dirt, cobwebs, or old nests from the duct pipe. This is also a good time to inspect the damper to see if it is functioning correctly or if it was the source of the pest intrusion.
Step 2: Install the New Screen or Cover
If you are using an add-on screen, you may be able to place it inside the duct opening or attach it to the back of the existing cover before reinstalling it. For a full replacement cover, simply position it over the opening. Ensure it sits flush against the wall.
Secure the new cover with the provided screws. Be careful not to overtighten, as this could crack the plastic. The fit should be snug and secure against the siding.
Step 3: Seal the Edges for a Watertight Finish
The final and most crucial step is to apply a bead of exterior-grade silicone caulk around the perimeter of the vent cover. This creates a weatherproof seal that prevents water from getting behind the siding. It also blocks any tiny gaps that insects could potentially exploit.
Smooth the caulk with your finger or a caulking tool for a clean, professional finish. Allow the caulk to cure completely according to the manufacturer’s instructions. A proper seal not only keeps out pests but also improves your home’s energy efficiency.
The Unseen Risk: Airflow Restriction and Fan Health
While a bug screen solves the pest problem, it introduces a new, critical maintenance task: preventing clogs from lint and dust. Over time, the screen will catch airborne particles exhausted by the fan. If left unchecked, this buildup can severely restrict airflow, forcing the fan’s motor to work harder.
This increased strain can lead to premature motor burnout and costly repairs. Furthermore, reduced airflow means the fan cannot effectively remove moisture from the bathroom, defeating its primary purpose and potentially contributing to mold and mildew growth. This can become especially problematic in homes where attic temperatures soar, as poor ventilation can compound moisture issues. Understanding how hot is an attic on a 80 degree day highlights the importance of every component in your home’s ventilation system working correctly.
Your Essential Cleaning and Maintenance Routine
To prevent these issues, you must clean the bug screen regularly. For most households, inspecting and cleaning the screen every three to six months is sufficient. This simple task preserves airflow, protects the fan motor, and ensures your bathroom remains free of moisture and pests.
Cleaning is simple. Carefully remove the exterior vent cover and use a soft brush or a vacuum with a brush attachment to gently remove the accumulated lint and debris from the mesh. After cleaning, reinstall the cover, ensuring it is properly sealed.
Beyond Bugs: Other Benefits of a Vent Screen
Installing a screen on your exhaust vent does more than just stop insects. It also acts as a barrier against other outdoor elements. This small upgrade can enhance your home’s comfort and protection in several ways.
From reducing cold drafts in the winter to keeping nesting materials out of your ductwork, a vent screen is a multi-purpose home improvement solution. It’s a simple investment that pays dividends in comfort, cleanliness, and peace of mind.
Stopping Drafts and Debris
A fine mesh screen can help to reduce cold air from blowing back down the ductwork when the fan is not in use. While the damper is the primary defense against drafts, a screen adds an extra layer of protection, particularly on windy days. This can contribute to a more comfortable bathroom and slightly lower energy bills.
The screen also prevents leaves, twigs, and other windblown debris from entering the vent pipe. This keeps the ductwork clear and prevents the buildup of flammable materials or blockages that could impede airflow and become a fire hazard.
When a Professional Is the Right Call
While installing a bug screen is a manageable DIY project for many, there are situations where calling a professional is the safer and more effective choice. If your vent is located on a steep roof or a high, difficult-to-reach wall, a handyman or roofing professional has the proper safety equipment and experience to do the job safely.
Additionally, if you discover that the ductwork itself is damaged or disconnected in the attic, or if you suspect a larger pest infestation within the walls, it is best to consult with a specialist. They can address the underlying issues to ensure a comprehensive and lasting solution.