Stop Fearing Your Corners: Install Baseboards Without 45-Degree Angles
There’s a moment in almost every DIY baseboard project that separates the confident from the concerned: the corner. Achieving a perfect 45-degree miter cut that results in a seamless, gap-free corner is the goal, but the reality is often frustratingly different. One small error in measurement or a wall that isn’t perfectly square can lead to wasted material and a finished look that screams “amateur.”
This common struggle leads many to believe that professional-looking trim is out of their reach without expensive tools and years of experience. But what if the secret wasn’t in perfecting the 45-degree cut, but in avoiding it altogether? There are simpler, more forgiving, and often more stylish methods to handle baseboard corners that can elevate your project from frustrating to flawless.
You'll Learn About
The Frustration with Mitered Corners
The core problem with miter cuts is that they demand perfection in an imperfect world. Walls are rarely a perfect 90 degrees, a fact many homeowners discover mid-project. Drywall mud buildup in corners, house settling, and framing irregularities mean that cutting two pieces of trim at exactly 45 degrees often results in a gap at the front or the back of the joint.
Attempting to fix these gaps often involves a frustrating cycle of re-cutting, sanding, and still relying on a heavy dose of caulk to hide the imperfections. This not only consumes time and material but can also diminish the satisfaction of a job well done. The need for a precision miter saw adds another barrier, as not every DIYer has access to this specialized tool.
Smarter Alternatives to the 45-Degree Cut
Forget the frustration. It’s time to embrace methods that work with the realities of your home, not against them. These techniques range from incredibly simple to elegantly decorative, offering a solution for every skill level and aesthetic preference.
Method 1: Corner Blocks for Style and Simplicity
Perhaps the most elegant and foolproof solution is the use of decorative corner blocks. These small, pre-made blocks of wood or MDF are designed to sit at the inside or outside corners of your walls. Instead of trying to join two angled pieces of baseboard, you simply make a straight, 90-degree cut on your baseboard and butt it directly into the side of the corner block.
This method completely eliminates the need for miter cuts at corners. It is incredibly forgiving; if your measurement is slightly off, the block can help mask minor imperfections. Corner blocks come in various styles, from simple squares to ornate rosettes, allowing you to add a distinct architectural element to your room. They are particularly effective in older homes where corners are almost guaranteed to be out-of-square.
Installation is straightforward. You first secure the corner block in place, then measure and cut your baseboard pieces to fit between the blocks or between a block and a door casing. The result is a clean, classic, and gap-free finish that looks intentional and professional.
Method 2: The Butt Joint – Basic but Effective
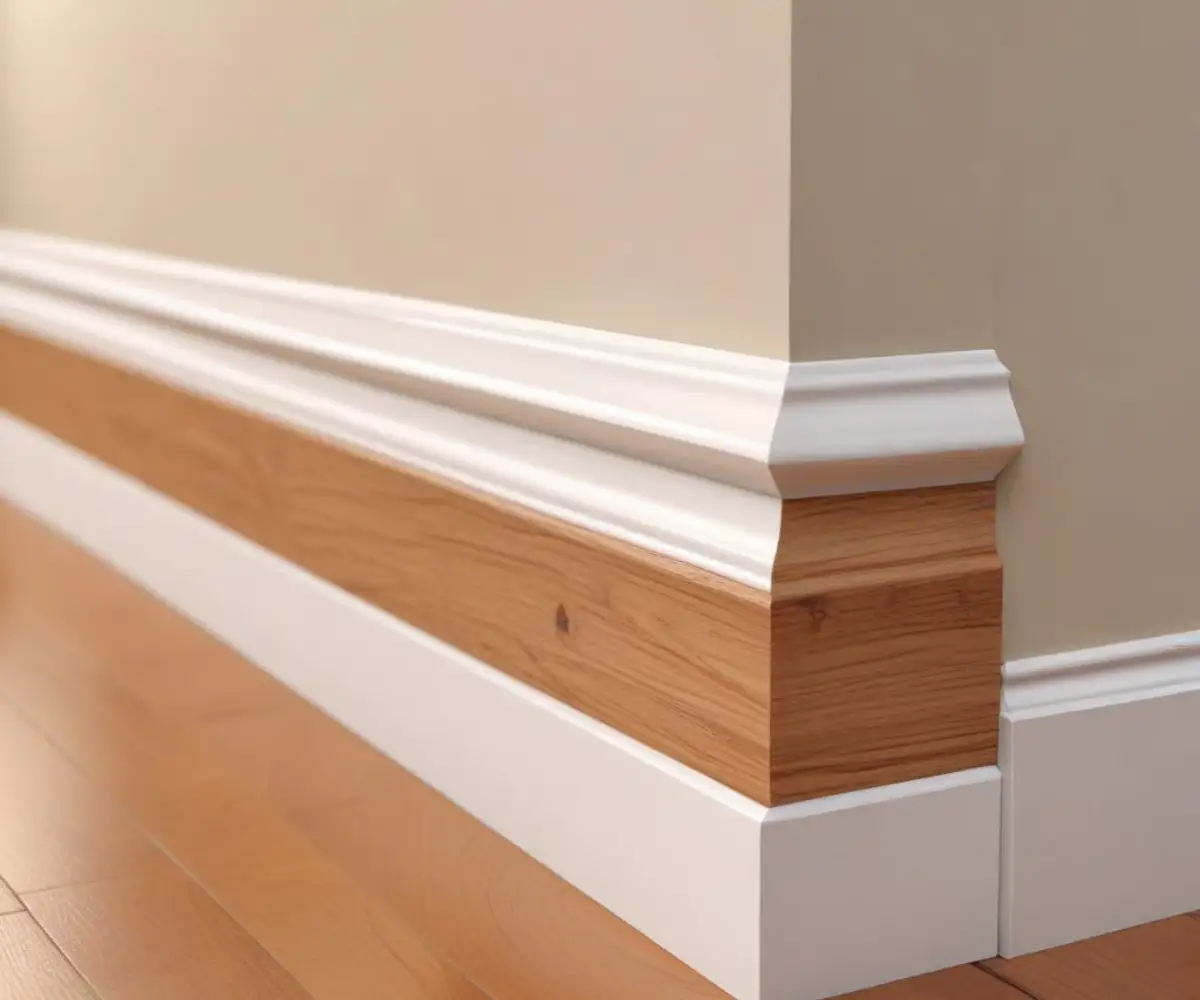
The butt joint is the essence of simplicity. For an inside corner, one piece of baseboard is run all the way into the corner with a square end. The second piece is then measured, cut with a square end, and “butted” up against the face of the first piece. It’s a simple, right-angle connection that requires no angled cuts at all.
While this method is fast and requires only a basic saw, its aesthetic appeal can be debated. On simple, flat-profile baseboards, it can look clean and minimalist. However, with more detailed or curved baseboard profiles, the abrupt stop of one profile against the flat face of another can be jarring. A thin bead of caulk along the vertical seam is essential to create a smooth, finished look.
Method 3: The Coped Joint – A Professional Technique
For inside corners, many professionals prefer a coped joint over a miter. While it does involve some cutting, it’s a superior technique for handling out-of-square corners. A coped joint starts like a butt joint: one piece of baseboard is installed with a square end running all the way into the corner.
The second piece is where the technique comes in. You first cut it at a 45-degree angle, as if for a miter. Then, using a coping saw, you carefully cut along the exposed profile of that 45-degree cut, effectively carving out the shape of the molding. When finished, this “coped” end fits perfectly over the face of the first baseboard, creating an incredibly tight, almost invisible seam that can flex and adapt to imperfect wall angles.
Step-by-Step Guide: Installing Baseboards with Corner Blocks
Using corner blocks is the recommended method for beginners seeking a high-quality, stress-free finish. This guide will walk you through the process from start to finish.
Tools and Materials Needed:
- Tape Measure
- Pencil
- Saw (a miter saw for straight cuts is fast, but a hand saw and miter box works too)
- Nail Gun (Brad Nailer) or Hammer and Finishing Nails
- Baseboard Material
- Inside and/or Outside Corner Blocks
- Caulk and Caulk Gun
- Wood Filler or Spackle
- Level
Step 1: Prepare the Area
Start by removing any old baseboards. Use a utility knife to score the top edge where the trim meets the wall to prevent paint from peeling or drywall paper from tearing. Gently pry the old baseboards away from the wall.
Next, clean the wall area. Scrape away any old caulk or drywall compound buildup in the corners to ensure your new blocks and baseboards sit flush. It’s also a good time to locate and mark the wall studs. Knowing how to find studs behind wood paneling or drywall is crucial for a secure installation.
Step 2: Install the Corner Blocks
Begin by placing your corner blocks. For an inside corner, simply push the block snugly into the corner. For an outside corner, the block will wrap around the wall’s edge. Use a level to ensure the block is perfectly vertical (plumb).
Secure the block to the wall with a few finishing nails. Drive nails into the studs whenever possible for the strongest hold. Don’t worry about the nail holes; you will fill them later.
Step 3: Measure and Cut the Baseboards
With the blocks in place, measuring becomes simple. Measure the distance from the inside edge of one corner block to the inside edge of the next block or door casing. Double-check your measurement before cutting.
Set your saw to make a clean, 90-degree straight cut. Cut the baseboard to your measured length. Test fit the piece to ensure it’s snug; it’s always better to cut a piece slightly too long and trim it than to cut it too short.
Step 4: Secure the Baseboards
Position the cut baseboard between the two corner blocks. Press it firmly against the wall and down against the floor. Secure the baseboard by driving finishing nails through the trim and into the wall studs you marked earlier.
Place one nail near the top of the baseboard and another near the bottom at each stud location. This prevents the board from cupping or pulling away from the wall over time.
Step 5: Finishing Touches for a Pro Look
The final steps are what truly elevate the project. Use wood filler or spackle to fill all the nail holes on the blocks and baseboards. Once dry, lightly sand the filler smooth.
Apply a thin, continuous bead of paintable caulk along the top edge of the baseboard where it meets the wall, and in the vertical joints where the baseboard meets the corner blocks and door casings. Use a wet finger or a damp cloth to smooth the caulk line for a seamless transition. Once the caulk is dry, you can touch up the paint for a pristine, professional finish.
Comparing Corner Methods: Which Is Best for You?
Choosing the right method depends on your tools, skill level, and desired aesthetic. This table breaks down the key differences to help you decide.
| Method | Skill Level | Tools Required | Aesthetic | Best For |
|---|---|---|---|---|
| Corner Blocks | Beginner | Basic Saw, Nailer/Hammer | Decorative, Traditional, Craftsman | Older homes with out-of-square corners, adding a design element, ensuring a gap-free finish with minimal effort. |
| Butt Joint | Beginner | Basic Saw, Nailer/Hammer | Simple, Minimalist | Flat-profile baseboards, projects on a tight budget or timeline, temporary installations. |
| Coped Joint | Intermediate | Saw, Coping Saw, Nailer/Hammer | Seamless, Professional | Achieving the tightest possible inside corners, handling highly irregular wall angles, projects with stained wood trim. |
| Miter Joint | Intermediate/Advanced | Precision Miter Saw, Angle Finder | Clean, Modern | Perfectly square walls (new construction), experienced DIYers with precision tools. |
Pro Tips for a Flawless Finish
Beyond the basic installation, a few advanced techniques can help you tackle common challenges and achieve a truly professional result. Many of these details are what separate an average job from a great one.
Tackling Uneven Floors
One of the most common issues is a gap between the bottom of the baseboard and an uneven floor. Do not simply force the baseboard down, as this can create a visible wave in the trim. The professional solution is called “scribing.”
To scribe, rest the baseboard in place against the wall. Take a small compass or a block of wood with a pencil, keep it level with the highest point of the floor gap, and run it along the floor, drawing a line on the face of the baseboard. This line perfectly mimics the floor’s contour. You can then carefully cut along this line with a jigsaw or sand it down with a belt sander, allowing the baseboard to sit perfectly flush with the floor.
The Power of “Pre-Assembling” Outside Corners
When dealing with outside corners, especially when using miter joints on walls that are slightly off, it can be beneficial to glue and join the two corner pieces *before* nailing them to the wall. Apply a bit of wood glue to the mitered edges and use painter’s tape to hold them together tightly while the glue dries.
This creates a single, strong corner piece. You can then install this piece as one unit, which often makes it easier to manage small gaps and achieve a perfect alignment. This also prevents the corner from separating over time due to wood movement.
Safety First: Power Tool Precautions
When using power tools like miter saws and nail guns, safety is paramount. Always wear safety glasses. Be mindful of your power sources and avoid creating trip hazards. Using a permanent extension cord improperly can be a fire risk, so ensure you are using heavy-duty cords appropriate for your tools and not overloading circuits.
Conclusion: Trim Without the Terror
Installing baseboards doesn’t have to be a battle against the 45-degree angle. By embracing simpler and more forgiving techniques like corner blocks or butt joints, any DIYer can achieve a clean, professional, and gap-free finish. These methods not only save time and reduce frustration but also open up new aesthetic possibilities for your home’s trim.
The next time you approach a corner, don’t see it as an obstacle. See it as an opportunity to apply a smarter technique that guarantees a beautiful result, proving that the best solution isn’t always the most complicated one.