Are Bathtub Drains Universal? The #1 Myth Costing Homeowners
You turn the knob, expecting a relaxing bath, but the water stubbornly refuses to stay. Or maybe the opposite is true—a slow-draining tub has turned your pristine sanctuary into a murky pond. The culprit is often a worn-out, corroded, or broken bathtub drain. You head to the hardware store, grab a “universal” replacement kit, and spend your Saturday afternoon wrestling with it, only to find it doesn’t fit. This is the moment you discover the painful truth: the idea that bathtub drains are universal is one of the most persistent and costly myths in home improvement.
This common misconception leads to wasted time, multiple frustrating trips to the store, and worst of all, improper installations that cause slow leaks. A seemingly minor leak from a poorly fitted drain can silently seep into your subfloor, causing thousands of dollars in water damage, mold growth, and structural rot. Understanding that drains are not one-size-fits-all is the first and most critical step in avoiding a DIY disaster and ensuring your repair is done right the first time.
You'll Learn About
Why “Universal” is a Dangerous Word in Plumbing
The term “universal” is often used in marketing to imply a product will fit any situation, but in the world of plumbing, it’s rarely accurate. While there are common standards, decades of different manufacturing processes, evolving building codes, and various tub designs mean you’ll encounter critical differences from one drain to another. Ignoring these differences is a recipe for failure.
The most significant variations lie in two key areas: diameter and threading. A drain that’s even a fraction of an inch too small or large won’t create a watertight seal. More subtly, the threading on the drain body might not match the threading on your tub’s drain shoe (the pipe fitting underneath). This hidden mismatch is a primary cause of leaks that go unnoticed until a water stain appears on the ceiling below.
The Anatomy of a Bathtub Drain: More Than Just a Hole
To successfully replace your drain, you first need to understand its components. A bathtub drain isn’t a single part but a system of interconnected pieces called the waste and overflow assembly. Each part has a specific job, and they must all work together perfectly.
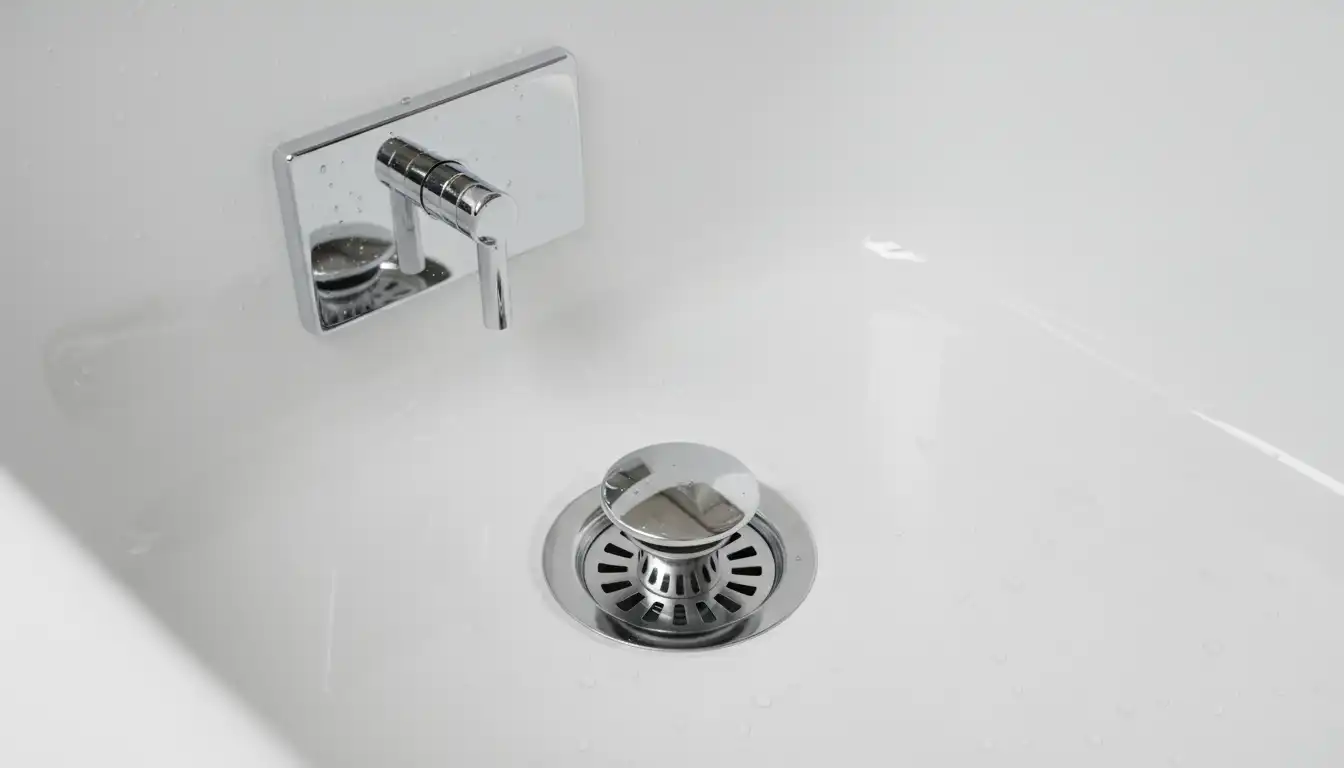
The Drain Flange and Stopper
This is the visible part of the drain in the bottom of your tub. The flange (or strainer body) is the threaded piece that screws into the drain shoe. The stopper is the mechanism that opens and closes to control water flow. These are the parts most likely to wear out or break from daily use.
The Drain Shoe
Hidden beneath the tub, the drain shoe is an elbow-shaped fitting that connects the drain flange to the rest of the plumbing. This is where the critical threaded connection happens. The shoe must be perfectly aligned with the flange to create a leak-proof seal, which is sealed by a rubber gasket.
The Waste and Overflow Assembly
This system includes the overflow plate on the front wall of the tub and the piping that connects it to the drain shoe. Its job is to prevent the tub from overflowing if the water is left running. While the plumbing materials for this can vary, it’s crucial that they are installed correctly, as a failure here can be just as damaging as a leak at the main drain. Some wonder about alternative materials, such as asking, can you use flexible PVC for a shower drain, and while that’s a different application, it highlights the importance of choosing the right materials for each part of your drainage system.
Sizing Showdown: The Critical Measurements You Must Know
Since drains are not universal, you must become a detective and gather precise measurements before buying a replacement. Taking a few minutes to measure will save you hours of frustration. You’ll need a tape measure or, for better accuracy, a set of digital calipers.
Diameter: The First Measurement to Get Right
The most common nominal drain size for modern residential bathtubs is 1.5 inches. This refers to the diameter of the drain pipe itself. However, you’ll also find 2-inch drains, typically in larger, high-capacity tubs like whirlpools or soaking tubs that need to drain a greater volume of water more quickly. Antique or custom tubs can have non-standard sizes, sometimes as small as 1 3/8 inches. Measure the diameter of your drain opening at the bottom of the tub to determine which size you have.
Threading: The Hidden Detail That Causes Leaks
This is where many DIY projects go wrong. The threads on the drain flange must match the threads on the drain shoe. There are two primary types you’ll encounter: coarse thread and fine thread. Coarse-threaded drains have 11.5 threads per inch (TPI) and are the most common in modern installations. Fine-threaded drains are typically found in older homes and have a different TPI count. It’s almost impossible to tell the difference just by looking.
If you try to force a coarse-threaded drain into a fine-threaded shoe, you’ll strip the threads and ruin the connection, guaranteeing a leak. The best way to be sure is to take your old drain flange with you to the hardware store to compare it side-by-side with the new one. If you can’t, some replacement kits come with a bushing adapter that can convert between thread types, offering a more flexible solution.
A Gallery of Tub Drain Stoppers: Which One Do You Have?
The stopper is the part you interact with every day, and several different mechanisms exist. Identifying your stopper type is crucial because replacement kits are often sold based on this mechanism. Each has its own method of installation and common points of failure.
Lift-and-Turn (Twist-and-Close)
This popular style has a small knob on top of the cap. To close it, you push it down and turn the knob to lock it in place. To open it, you lift and turn it in the opposite direction. They are simple to install but can become loose over time.
Push-and-Pull (Plunger Style)
Similar to the lift-and-turn, this stopper has a knob on top. You simply push it down to close and pull it up to open. Its simplicity is its strength, but the repetitive motion can eventually wear out the seal.
Toe-Touch (Foot Actuated)
A convenient, hands-free option, the toe-touch stopper is spring-loaded. You push it down with your toe to close it, and push it again to have it pop open. The internal spring is the most common failure point and can wear out after several years of use.
Trip Lever
This type features a lever on the overflow plate. Flipping the lever up and down moves an internal plunger or pop-up stopper to open or close the drain. These are more complex to repair as the linkage mechanism is hidden behind the tub wall.
Choosing Your Replacement: Material Matters
When you’re shopping for a new drain assembly, you’ll primarily see two material options for the pipes and fittings: brass and plastic (PVC or ABS). The visible flange and stopper will almost always be metal with a decorative finish, but the underlying plumbing is where you have a choice.
Brass drains are considered the premium option. They are extremely durable, resist corrosion well, and are less likely to crack under stress during installation. However, they are more expensive and can be heavier to work with. For a second-floor bathroom where a leak would be catastrophic, many plumbers recommend the peace of mind that comes with a brass assembly.
Plastic drains (PVC/ABS) are more budget-friendly and lightweight, making them easier for a DIYer to handle. They are completely corrosion-proof. The main drawback is the risk of cross-threading the plastic components during installation, which can easily damage the threads and lead to a bad seal. You must be extra careful not to overtighten them.
The Step-by-Step Guide to a Perfect Drain Replacement
Once you’ve identified your drain type, taken your measurements, and purchased the correct replacement kit, you’re ready for the installation. Follow these steps carefully to ensure a leak-free result.
Step 1: Remove the Old Stopper and Flange
First, remove the old stopper. The method will depend on the type you have. Lift-and-turn or push-and-pull stoppers often have a small set screw under the cap that needs to be loosened. Once the stopper is off, you’ll see the crossbars of the drain flange. You’ll need a special tool called a drain wrench or “dumbbell” to remove the flange. Insert the tool into the crossbars and turn it counter-clockwise with a wrench or screwdriver for leverage. This can be difficult if the old drain is corroded.
Step 2: Clean the Surfaces Thoroughly
With the old flange removed, you will see a lot of old, hardened plumber’s putty and grime. It is absolutely essential to clean this area completely. Use a plastic putty knife to scrape away all the old putty from the tub surface and the threads of the drain shoe below. Any remaining debris can prevent the new drain from sealing correctly.
Step 3: Apply New Plumber’s Putty
Take a generous amount of fresh plumber’s putty and knead it until it’s soft and pliable. Roll it into a rope about the thickness of a pencil and wrap it around the underside of the new drain flange. This putty will create the primary watertight seal between the flange and the surface of the bathtub.
Step 4: Install the New Drain Flange
Carefully thread the new flange into the drain shoe by hand, turning it clockwise. Be very careful not to cross-thread it. Once it’s hand-tight, use your drain wrench to give it a final quarter-turn to snug it up. As you tighten, you should see the excess plumber’s putty squeeze out from under the flange. Do not overtighten, as this can crack the tub or the drain shoe.
Step 5: Install the New Stopper and Test for Leaks
Wipe away the excess putty and install your new stopper according to the manufacturer’s instructions. Finally, it’s time for the moment of truth. Close the drain, fill the tub with a few inches of water, and let it sit for at least 10-15 minutes. Check carefully around the drain for any drips. If you have access from below, use a flashlight to inspect the drain shoe and surrounding pipes for any sign of moisture. If it’s bone dry, you’ve successfully completed the job.
Table of Common Drain Stopper Types
Use this table to quickly identify your drain stopper and understand its common characteristics. This will help you communicate with hardware store staff and find the right replacement parts.
| Stopper Type | How It Works | Pros | Cons |
|---|---|---|---|
| Lift-and-Turn | A small knob on the cap is lifted and twisted to lock and unlock. | Simple mechanism, easy to install and clean. | The knob can loosen over time; can be hard to turn with wet hands. |
| Push-and-Pull | A knob is pulled up to open and pushed down to close. | Very intuitive and easy to use. | Can be stiff to operate; seal wears out with repeated use. |
| Toe-Touch | A spring-loaded cap is pushed with a toe to open and close. | Convenient, hands-free operation. | Internal spring mechanism can fail or jam with hair and debris. |
| Trip Lever | A lever on the overflow plate controls a hidden plunger. | Clean look with no visible stopper in the drain itself. | Difficult to access and repair the linkage; prone to hair clogs. |
| Pop-Up | Also uses a trip lever, but it connects to a pop-up stopper in the drain. | Reliable and provides a good seal when adjusted correctly. | The linkage can come out of alignment, requiring adjustment. |
When to Call a Professional
While replacing a tub drain is a manageable DIY project for many, there are situations where calling a licensed plumber is the smartest choice. If your drain is severely corroded and won’t budge, or if you discover the drain shoe underneath is cracked or damaged, it’s time to stop. Forcing the issue can turn a small repair into a major plumbing project.
Similarly, if you live in an older home with non-standard plumbing, a professional will have the experience and access to parts needed to do the job correctly. The cost of a plumber is a small price to pay for the assurance that your tub won’t be silently destroying your home’s structure with a slow, hidden leak.