Are Blind Brackets Universal? The Frasting Truth & Easy Fix
It’s a scenario familiar to many homeowners: you hear a sudden crash, and you walk into a room to find your window blind has collapsed. A small, seemingly insignificant piece of plastic or metal—the mounting bracket—has failed. Your first thought is likely a hopeful one: “I’ll just run to the hardware store and grab a universal replacement.”
But before you grab your keys, it’s important to face a frustrating but crucial fact. Blind brackets are not universal. While it would make life much easier if a single bracket could fit any blind, the reality is that the world of window treatments is incredibly diverse and specialized.
This lack of standardization isn’t a conspiracy to make your life difficult. It stems from the vast differences in blind design, weight, and operating mechanisms. This guide will walk you through the reasons why universality is a myth in the world of blind hardware and provide a clear, step-by-step solution to help you find the exact part you need to get your blinds back up and looking great.
You'll Learn About
Why the Dream of a Universal Bracket Doesn’t Exist
The hope for a one-size-fits-all solution is understandable, but it’s essential to grasp why it’s not feasible. Several key factors contribute to the specialized nature of blind brackets, each playing a critical role in the function and safety of your window treatments.
It’s a Brand Thing: The Manufacturer’s Lock-In
First and foremost, blind manufacturers design their products as a complete system. The headrail (the top bar that houses the controls) and the brackets are engineered to work together like a lock and key. Major brands such as Levolor, Hunter Douglas, and Bali create brackets with unique shapes and dimensions that precisely match the profile of their headrails. This ensures a secure, snug fit that can support the blind’s weight and withstand the stress of daily operation.
This proprietary approach means that a bracket from one brand is highly unlikely to fit a blind from another. Even cordless blinds have different internal mechanisms that require a specifically shaped headrail and, consequently, a specific bracket. For example, the brackets for older, corded mini blinds are not compatible with newer cordless models due to changes in the headrail design.
Blind Type Matters: From Rollers to Venetians
The type of blind you have is one of the biggest determinants of the bracket style. Each design requires a unique mounting method to accommodate its form and function. There is no single bracket that can adapt to all these different systems.
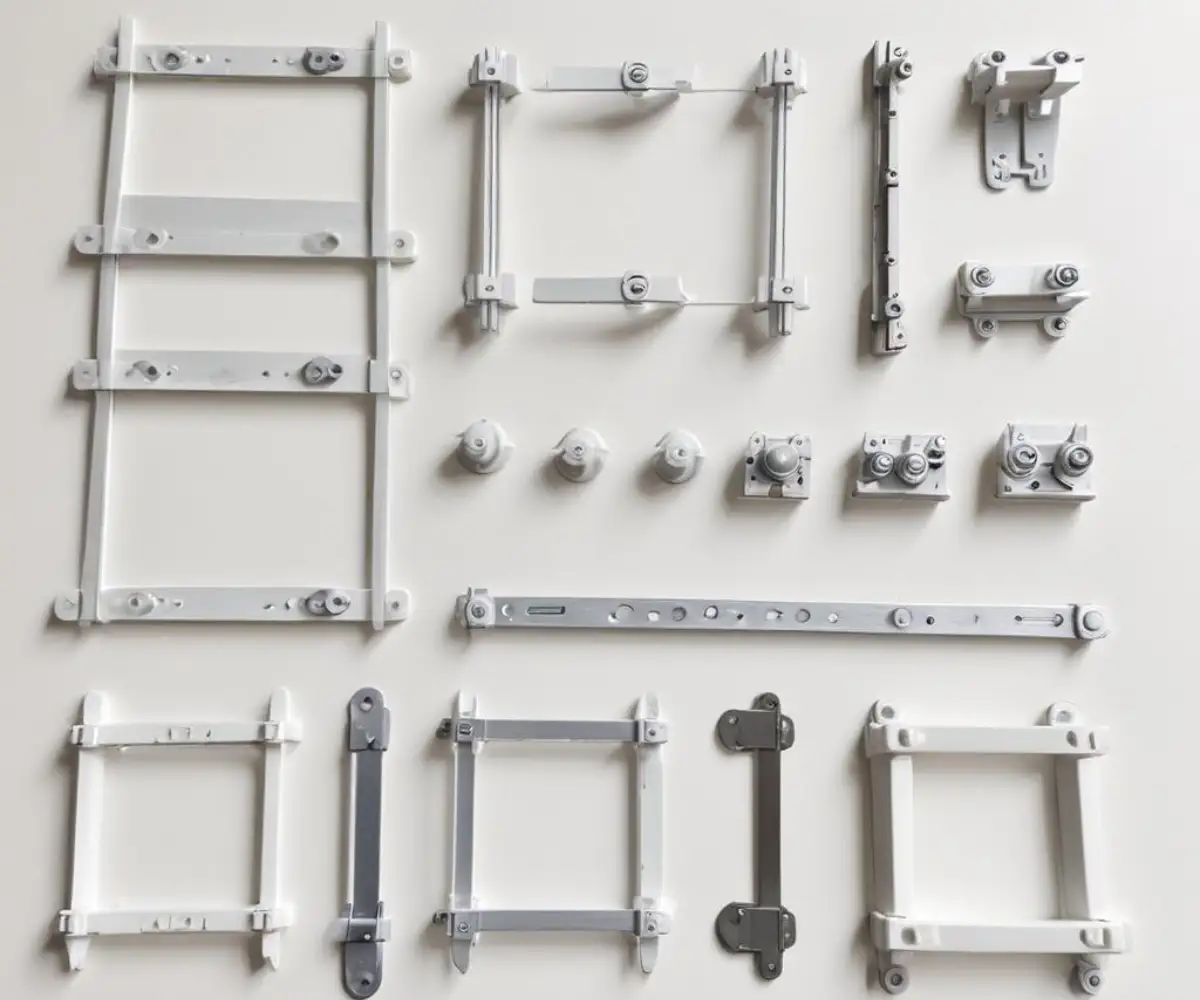
Here’s a breakdown of common blind types and their specific brackets:
- Venetian (Horizontal) Blinds: These typically use “box brackets,” which are square-shaped metal enclosures. The headrail slides into these brackets, and a hinged gate swings shut and locks it into place.
- Roller Shades: These require brackets that can hold the pin on one side and the spring-loaded or clutch mechanism on the other. They often look like open-ended C-shaped or circular holders.
- Vertical Blinds: These use a clip-style bracket that grips the top of the wide, slender headrail.
- Cellular or Honeycomb Shades: These lightweight shades often use small, low-profile brackets that the headrail snaps into, sometimes using a spring-loaded mechanism.
- Roman Shades: The brackets for Roman shades must match the specific profile of the headrail, which can vary significantly by brand.
Inside vs. Outside Mount: A Tale of Two Installations
The way you hang your blinds also dictates the type of hardware you’ll need. Blinds can be mounted either inside the window frame (inside mount) for a clean, built-in look or on the wall or trim outside the frame (outside mount) to cover the entire window opening.
While many modern brackets are designed to accommodate both inside and outside mounting, their shapes are distinct. Top-fix brackets are for attaching to the “ceiling” of a window recess, while face-fix brackets are for mounting onto a vertical surface like a wall. An outside mount might also require extension brackets to project the blind further from the wall to clear decorative molding or window cranks.
The Ultimate Guide to Finding the Right Replacement Bracket
Now that you understand why your old bracket isn’t easily replaced with a generic part, you can focus on the solution. Finding the right replacement requires a bit of detective work, but it’s a straightforward process if you follow these steps.
Step 1: Play Detective – Identify Your Blinds
The first and most crucial step is to identify the blind’s manufacturer and model. The more information you can gather, the easier your search will be.
Start by carefully examining the blind for any identifying marks. Look for a brand name, logo, or sticker on the top of the headrail or along the bottom rail. Sometimes, this information is hidden inside the headrail itself. If you find a brand, you’re already halfway there, as many manufacturers sell replacement parts directly on their websites.
If there’s no brand name, your next step is to take clear photos. Remove any remaining intact brackets and photograph them from multiple angles. Also, take pictures of the end of the headrail, showing its shape and profile. These images will be invaluable for visual matching on websites that sell blind parts.
Step 2: Measure Twice, Buy Once – The Critical Dimensions
Accurate measurements are non-negotiable. Using a steel tape measure, record the key dimensions of both the headrail and the old bracket. Even a small miscalculation can result in an ill-fitting part. Don’t assume anything; measure everything precisely to the nearest 1/8 inch.
To help you, here is a table of the most important measurements to take:
| Measurement | What to Measure | Why It’s Important |
|---|---|---|
| Headrail Height | Measure the vertical height of the headrail’s front face. | The bracket must be tall enough to accommodate and secure the headrail. |
| Headrail Depth | Measure the distance from the front of the headrail to the back. | The bracket must be deep enough for the headrail to sit inside it properly. |
| Bracket Interior Width | Measure the inside width of the old bracket where the headrail sits. | This ensures the new bracket is wide enough for the headrail to slide in. |
| Mounting Hole Spacing | Measure the distance between the screw holes on the old bracket. | Matching this allows you to reuse existing holes, simplifying installation. |
Step 3: The Hunt for a Match – Where to Buy Replacement Brackets
Armed with your brand information, photos, and measurements, it’s time to start your search. Here are the best places to look:
- The Manufacturer’s Website: This should be your first stop. Companies like Graber and Levolor often have dedicated “replacement parts” sections on their websites.
- Specialty Online Parts Stores: Websites like FixMyBlinds.com and BlindParts.com are excellent resources. They have extensive inventories and allow you to filter by blind type and visually match your old parts to their product photos.
- Big Box Stores (with a warning): Retailers like Lowe’s and Home Depot carry replacement hardware, but it’s often for their own store brands or offered in “universal” kits. These kits contain a variety of common bracket types, but they are not truly universal and may not include the specific one you need.
What If You Can’t Find an Exact Match? Creative Solutions
In some cases, especially with older or discontinued blinds, finding an exact match can be challenging. Before you give up and buy entirely new blinds, consider these alternative solutions.
The “Universal” Replacement Kit: A Gamble?
So-called universal bracket kits are tempting due to their availability and low cost. These kits typically include a few of the most common styles of brackets, such as standard box brackets for horizontal blinds. If you have a very common type of blind, you might get lucky. However, for most people, these kits result in frustration when none of the included parts fit. It’s a gamble that may or may not pay off.
DIY Modifications: For the Brave and Handy
If you find a bracket that is very close in size and shape, you might be able to modify it. This could involve drilling a new screw hole or slightly bending a piece of metal. However, proceed with extreme caution. An improper modification can compromise the bracket’s integrity, leading to a safety risk. This should only be attempted if you are confident in your DIY skills and understand the potential risks. Just as a home’s foundation can impact window frames, sometimes you have to look at the bigger picture; it might be helpful to learn how to fix an uneven second floor if you notice recurring structural issues.
When to Call It Quits: Is It Time for New Blinds?
There comes a point where the time, effort, and money spent searching for a rare part outweigh the benefits. If your blinds are old, have yellowed with sun exposure, or have other failing components like frayed cords, it may be more practical to invest in a new set. A new blind will come with all the correct, perfectly matched hardware, ensuring a safe and reliable installation from the start.
Installation 101: Installing Your New Brackets Like a Pro
Once you’ve successfully found the correct replacement brackets, installing them is usually a simple task. Proper installation is key to ensuring your blinds function smoothly and safely for years to come. Poorly aligned or loose brackets can cause the blinds to hang crooked or even fall.
Tools You’ll Need
Gathering your tools beforehand will make the process much smoother. You will likely need:
- A power drill with appropriate bits
- A Phillips head screwdriver
- A pencil for marking
- A steel tape measure
- A level
Step-by-Step Installation
- Remove the Old Blind: First, carefully take down the blind from the old brackets. Then, unscrew and remove the old, broken bracket. If the other brackets are still in place, it’s a good idea to replace them all at the same time to ensure they wear evenly.
- Mark the New Bracket Locations: If you can, use the same screw holes. If not, hold the new bracket in place and use a pencil to mark where the new holes need to be drilled. Use a level to ensure the bracket positions are perfectly horizontal.
- Drill Pilot Holes: For wood frames or walls, drilling small pilot holes will make it easier to drive the screws in and prevent the wood from splitting.
- Secure the New Brackets: Screw the new brackets firmly into place. Give them a gentle tug to ensure they are secure and don’t wobble.
- Install the Headrail: Finally, slide or snap the blind’s headrail into the newly installed brackets according to the manufacturer’s design. Test the blind’s operation, raising and lowering it a few times to ensure it moves smoothly.
Understanding the components of home fixtures is always valuable. Knowing how to perform these small repairs yourself, much like knowing how fragile water heaters are, can save you from much larger headaches down the road. Both require attention to detail and proper installation to function safely. Furthermore, precision in measurements is a universal skill in home improvement, whether you’re installing blinds or determining the correct shower curb height and width for a bathroom renovation.
Frequently Asked Questions (FAQ)
Are Levolor blind brackets universal?
No, Levolor designs brackets that are specific to their various product lines. A bracket for a Levolor faux wood blind will not be the same as one for their cellular shades. You must find the bracket designed for your specific model.
Can I use different brand brackets for my blinds?
It is extremely unlikely that brackets from a different brand will fit your blinds. Headrail profiles are proprietary, and attempting to force a mismatch can result in an unsecure fit, damage to the blind, and a potential safety hazard.
What are hold down brackets?
Hold down brackets are different from mounting brackets. They are small L-shaped or pin-style brackets used to secure the bottom rail of a blind, typically on a door, to prevent it from swinging or banging when the door is opened or closed.
How much does a replacement blind bracket cost?
Replacement brackets are generally inexpensive. You can often find a pair for just a few dollars. More specialized or heavy-duty brackets might cost between $10 and $20 for a set.
Final Thoughts
While the initial discovery that blind brackets aren’t universal can be disheartening, it’s a problem with a clear solution. By methodically identifying your blind’s brand and type, taking precise measurements, and searching in the right places, you can find the exact part you need. This small but essential piece of hardware is the key to a secure and perfectly functioning window treatment, and with a little diligence, you can tackle this common home repair with confidence.