Aquaglass Tub Repair: From Cracks to Pristine in a Flash
There’s nothing quite like the sinking feeling of discovering a crack, chip, or hole in your Aquaglass tub. It’s not just an eyesore; it’s a potential gateway to leaks and more significant water damage. You might immediately think about the high cost and hassle of a full replacement, but there’s good news. Most damage to Aquaglass tubs can be expertly repaired, restoring your bathroom’s centerpiece to its former glory without breaking the bank.
Whether you’re a seasoned DIY enthusiast or someone who prefers to leave it to the professionals, this guide will walk you through everything you need to know about Aquaglass tub repair. We’ll explore the causes of damage, how to assess the problem, and provide a detailed, step-by-step solution to make your tub look brand new again. Fixing that damage is not only possible but also surprisingly straightforward with the right tools and knowledge.
You'll Learn About
Understanding Your Aquaglass Tub and Its Vulnerabilities
Before diving into the repair, it’s essential to understand what an Aquaglass tub is made of. “Aquaglass” is a brand name for tubs typically constructed from a composite material, most often fiberglass-reinforced plastic with a gelcoat or acrylic finish. This construction makes them lightweight, affordable, and available in various shapes and sizes. However, this material also has its weaknesses.
Damage often occurs from a few common culprits. Heavy impacts, like dropping a heavy shampoo bottle or a tool, are a primary cause of chips and cracks. Another significant issue is a lack of proper support during installation; if the tub base isn’t adequately supported, it can flex under weight, leading to stress cracks over time. Lastly, using harsh, abrasive cleaners can wear down the protective finish, making the surface more susceptible to scratches and damage.
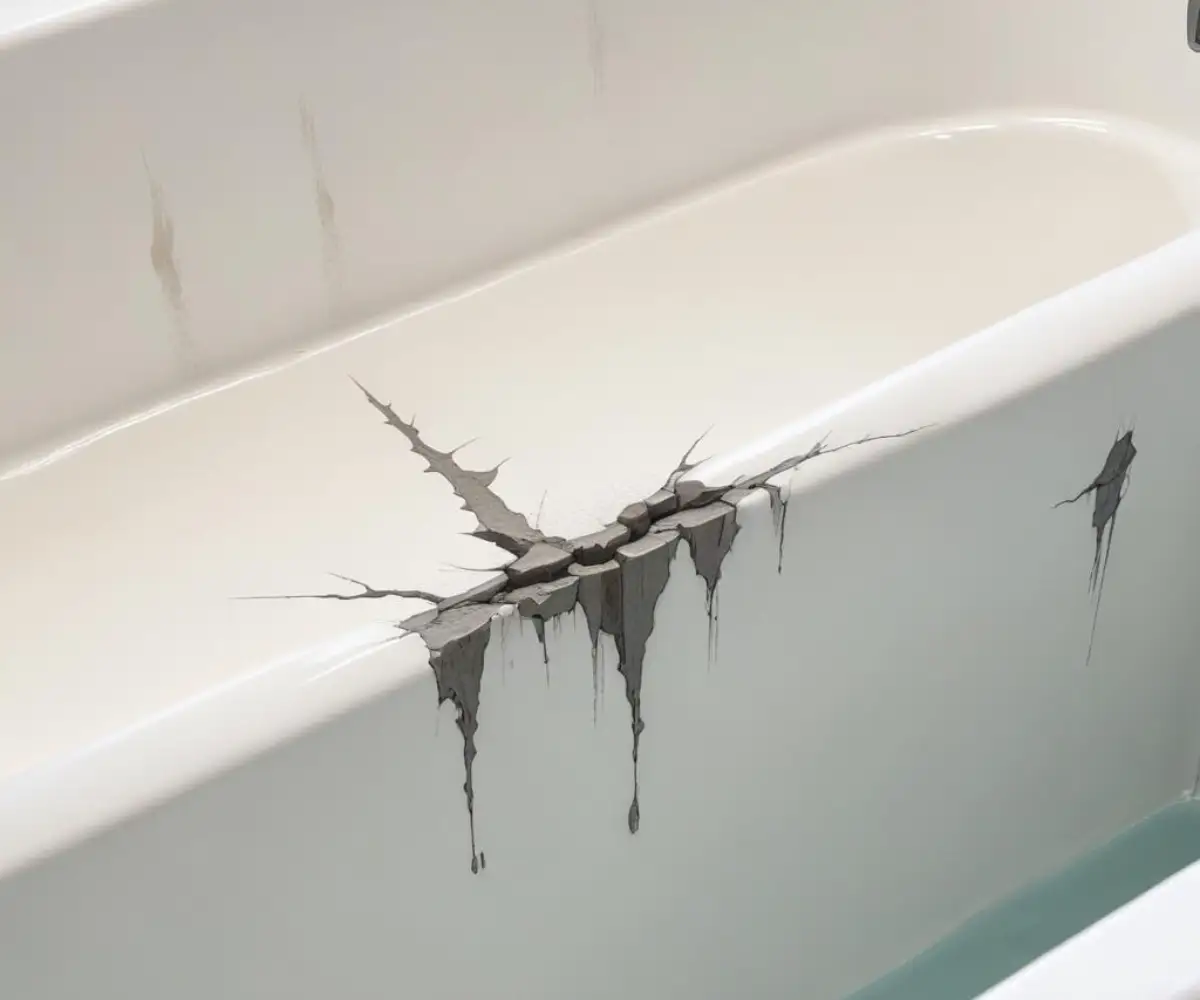
Assessing the Damage: Should You DIY or Call a Pro?
The first step in any repair is a thorough assessment of the damage. The size and type of imperfection will determine whether a DIY repair kit is sufficient or if you need to call in a professional. Small chips, hairline cracks, and minor scratches are often perfect candidates for a do-it-yourself repair. These issues are typically cosmetic and can be fixed with widely available kits.
However, large, deep cracks (especially those that go all the way through the material), significant holes, or a soft, spongy feeling tub bottom indicate a more severe problem. These often point to structural issues or a lack of support that must be addressed to prevent recurrence and potential water damage. In these cases, professional intervention is highly recommended. The table below outlines the key differences between a DIY approach and hiring a professional to help you decide.
| Feature | DIY Repair | Professional Repair |
|---|---|---|
| Best For | Small chips, hairline cracks, minor scratches. | Large cracks, holes, structural issues, spongy bottom. |
| Average Cost | $30 – $150 (for a quality kit and supplies). | $300 – $650+ (depending on damage severity). |
| Skill Level Required | Basic to intermediate. Requires patience and attention to detail. | Expertise of a trained technician. |
| Time Commitment | 2-5 hours of active work, plus 24-72 hours for curing. | Usually completed within 3-5 hours, ready for use in 24 hours. |
| Durability & Longevity | Can last for years if done correctly, but may not be as durable as a professional job. | High-quality materials and techniques result in a long-lasting, often warrantied, repair. |
| Color Matching | Can be challenging; kits come in standard colors that may not be a perfect match. | Professionals can precisely tint finishes for a seamless, invisible repair. |
Your Complete Step-by-Step Guide to DIY Aquaglass Tub Repair
If you’ve determined your tub’s damage is suitable for a DIY fix, you’re in the right place. With the right preparation and a methodical approach, you can achieve a professional-looking result. This process primarily involves using a two-part epoxy or polyester resin filler, which is standard in most fiberglass and acrylic tub repair kits.
Following these steps carefully will ensure a strong, durable, and aesthetically pleasing repair. Don’t rush the process; allowing adequate time for each stage, especially curing, is critical for success.
Essential Tools and Materials
Before you begin, gather all your necessary supplies. Most of these items are included in comprehensive tub repair kits, but it’s always good to have extras on hand. You will need:
- Fiberglass/Acrylic Tub Repair Kit: Choose a quality kit that includes a two-part filler/resin, hardener, and colorant.
- Personal Protective Equipment (PPE): Safety glasses, gloves, and a respirator mask are non-negotiable.
- Cleaning Supplies: A non-abrasive cleaner, acetone or rubbing alcohol, and clean cloths or paper towels.
- Sandpaper: Various grits, from coarse (around 120-grit) to very fine (600-grit or higher) for wet sanding.
- Putty Knife or Applicator Stick: For mixing and applying the filler.
- Small Drill Bit (1/8 or 1/4 inch): Only for stopping the spread of cracks.
- Painter’s Tape: To protect the area around the repair.
- Polishing Compound: Automotive or marine-grade polishing compound to restore the shine.
Step 1: Safety and Ventilation First!
The chemicals in tub repair kits release strong fumes known as Volatile Organic Compounds (VOCs). Proper ventilation is crucial. Open any windows in the bathroom, turn on the exhaust fan, and consider placing a box fan in the doorway facing out to pull fumes from the room. Always wear your gloves, safety glasses, and a respirator throughout the process.
Ensuring a safe work environment is paramount for any home project. Just as you’d take care with chemicals here, you should always be mindful of electrical safety, like when you need to figure out how to secure an extension cord to an outside wall for an outdoor task.
Step 2: Clean and Prepare the Damaged Area
A successful repair starts with a perfectly clean surface. Thoroughly clean the chip or crack and the surrounding area with a non-abrasive cleaner to remove all soap scum, grime, and body oils. Rinse well and let it dry completely. Then, wipe the immediate repair area with acetone or rubbing alcohol on a clean cloth to remove any final residue.
For cracks, you must stop them from spreading. Use a small drill bit to drill a tiny, shallow hole at each end of the crack. This is called “stop-drilling” and it relieves the stress at the tip of the crack, preventing it from growing longer. Next, use a utility knife or a Dremel tool to carefully bevel the edges of the crack or chip into a “V” shape. This roughs up the surface and creates more area for the filler to adhere to, creating a much stronger bond.
Step 3: Mix and Apply the Repair Compound
Now it’s time to prepare the filler. Follow the manufacturer’s instructions on your repair kit precisely. Typically, you’ll mix a specific amount of the resin filler with a few drops of a hardener catalyst on a disposable surface like a piece of cardboard. Mix only what you can use within 10-15 minutes, as it will begin to harden quickly.
Using your putty knife or applicator, apply the mixed compound to the damaged area. Slightly overfill the crack or chip, as the material may shrink a bit as it cures and you will be sanding it down. Work the filler into the prepared grooves, ensuring there are no air bubbles. Smooth the surface as much as possible, but don’t worry about making it perfect at this stage.
Step 4: Curing and Sanding the Patch
Patience is key in this step. Allow the filler to cure completely according to the kit’s instructions, which can take anywhere from 2 to 24 hours. The patch must be rock-hard before you proceed. Once cured, it’s time to sand the repair flush with the tub’s surface.
Start with a coarser grit sandpaper (e.g., 220-grit) to knock down the excess filler. Then, move to a finer grit (400-grit) and finally to a very fine grit (600-grit or higher) for the final smoothing. To achieve the smoothest possible finish, wet sand the area by dipping the fine-grit sandpaper in water. This prevents scratching and helps blend the patch seamlessly. Continue sanding until the repair feels completely smooth and level with the surrounding surface.
Step 5: Polishing and Finishing Touches
After sanding, the repaired area will look dull and hazy. To restore its shine, apply a small amount of automotive or fiberglass polishing compound to a clean, soft cloth. Rub the compound over the repaired area in a circular motion, applying firm pressure.
Wipe away the residue and check your work. You may need to repeat the polishing process a few times to achieve a high-gloss shine that matches the rest of your tub. Once you are satisfied, clean the entire tub to remove any dust and debris from the repair process.
When a Professional Touch is the Right Choice
While DIY repairs are great for minor issues, some problems demand professional expertise. If your tub has large holes, extensive spiderweb cracking, or the floor feels spongy and flexes under your weight, it’s time to call a professional refinisher. A spongy bottom is a sign of improper installation and a lack of support, which a simple patch can’t fix. A pro may need to inject high-density foam under the tub to stabilize it before making the repair.
Making a major repair decision for a bathtub can feel similar to other significant home maintenance choices, such as debating if you should replace a 30-year-old water heater. In both cases, assessing the extent of the problem and the potential for future issues is key to making a cost-effective decision. Professionals have access to industrial-grade materials and specialized equipment to ensure a durable, color-matched, and often-warrantied repair that a DIY kit simply cannot replicate for severe damage.
Maintaining Your Repaired Aquaglass Tub
After you’ve successfully repaired your tub, you’ll want to keep it looking great for years to come. Proper maintenance is simple but effective. Avoid abrasive cleaners at all costs. Products like scouring powders or steel wool will scratch and dull the finish of your tub and the repaired area. Instead, opt for gentle, non-abrasive cleaners or simple solutions like vinegar and water.
Be mindful of dropping heavy or sharp objects in the tub. Regular cleaning will prevent soap scum and grime buildup, preserving the glossy finish. Taking good care of your tub’s surface is just as important as choosing the right materials for other parts of your home, where you might compare options like Malibu Wide Plank vs. Lifeproof flooring for durability and appearance. A little care goes a long way in preserving the life and look of your bathtub.
Conclusion: A Flawless Tub is Within Reach
A damaged Aquaglass tub doesn’t have to be a bathroom catastrophe. For minor chips and cracks, a DIY repair kit and a careful, patient approach can yield fantastic, near-invisible results, saving you hundreds of dollars. For more substantial damage, investing in a professional repair will ensure the structural integrity and aesthetic beauty of your tub for years to come.
By correctly identifying the problem, using the proper techniques, and committing to gentle maintenance, you can easily overcome this common household issue. You can now confidently tackle that unsightly crack or chip and restore the relaxing, pristine oasis your bathroom was meant to be.