AquaDefense on Durock: Your Fail-Proof Waterproofing Guide
A beautiful new tile shower is a source of pride for any homeowner. Yet, beneath that pristine surface lurks a hidden threat: water. The number one enemy of any home, water penetration can lead to catastrophic damage, from black mold growth to complete structural rot.
Many homeowners believe that cement backer boards like Durock are all they need. This is a critical and costly misunderstanding. This guide provides the definitive process for creating a truly waterproof assembly using AquaDefense on Durock, ensuring your investment lasts a lifetime.
You'll Learn About
Why Your Shower Is a Ticking Time Bomb Without Proper Waterproofing
The core of the problem lies in a common misconception. While Durock cement board is an excellent, durable substrate for tile—it won’t swell or degrade like drywall—it is not waterproof. It is merely water-resistant. Water and, more importantly, water vapor can pass directly through it.
Over time, this moisture seeps into your wall cavities and subfloor. The results are disastrous and often hidden until the damage is severe. The consequences are similar to what happens when a dishwasher starts leaking into the subfloor, causing slow, silent destruction that compromises your home’s integrity.
The Myth of “Waterproof” Grout and Tile
Another frequent mistake is relying on tile and grout to form a waterproof barrier. Cementitious grout is inherently porous and will absorb water, no matter how well it is sealed. Sealers wear off, and microscopic cracks can develop, creating easy pathways for water.
To prevent leaks, you must create a continuous, monolithic waterproof membrane directly behind the tile, and that is where the partnership between Durock and a liquid-applied membrane like AquaDefense becomes essential.
The Unbeatable Synergy of AquaDefense and Durock
Pairing AquaDefense with Durock creates a formidable barrier against water intrusion. AquaDefense is a liquid-applied, fast-drying waterproofing and crack-isolation membrane. When applied over the stable, cementitious surface of Durock, it creates a seamless, flexible, and completely impervious shield.
The advanced polymer formulation in AquaDefense creates both a mechanical and chemical bond with the Durock surface. It doesn’t just sit on top; it integrates with the substrate, forming a single, unified layer that is exceptionally resistant to hydrostatic pressure and moisture vapor transmission.
Pre-Installation Mastery: Where Waterproofing Jobs Are Won or Lost
The vast majority of waterproofing failures can be traced back to one single cause: improper surface preparation. The performance of AquaDefense is 100% dependent on the quality of the substrate it is applied to. Rushing these initial steps will guarantee a failed installation.
The Critical First Step: A Pristine Surface
Durock panels, by their nature, create a significant amount of silica dust during cutting and installation. This fine layer of dust is the ultimate bond-breaker. Before you even think about opening the AquaDefense bucket, the entire surface must be meticulously cleaned.
Wipe every square inch of the board with a damp sponge, rinsing the sponge frequently in clean water. Follow up with a dry tack cloth or a vacuum with a brush attachment. The surface must be completely free of dust, debris, and oils for the membrane to achieve a proper bond.
Seams and Joints: Fortifying the Weak Points
The seams between Durock boards and any changes of plane (like corners) are the most vulnerable areas. These must be reinforced before the liquid membrane is applied. You will need alkali-resistant fiberglass mesh tape and a polymer-modified thin-set mortar.
First, use a putty knife to press a thin layer of thin-set mortar into the joint, completely filling the gap. Immediately embed the mesh tape into the fresh mortar, and then use the flat side of the knife to smooth another thin layer over the tape, pressing it firmly. The goal is a flat, smooth transition with no high spots.
Securing Fasteners and Penetrations
Every single screw head holding the Durock to the studs is a potential point of water ingress. Use the same thin-set mortar to apply a dab over each fastener, flattening it out smoothly. This ensures a uniform surface for the AquaDefense application.
The Art of Application: A Flawless Step-by-Step Guide
With your surface perfectly prepared, you can now move on to applying the membrane. Work methodically and do not rush. The goal is to achieve a continuous membrane of a specific, uniform thickness.
Gathering Your Tools
For a professional result, you need the right tools. You will need a high-quality 3/8-inch nap paint roller, a 3-4 inch synthetic bristle brush for cutting in, a paint tray, and, most importantly, a wet film thickness (WFT) gauge. This inexpensive tool is non-negotiable for verifying you have applied enough product.
Applying the Foundational First Coat
Start by using your brush to pre-coat all seams, corners, and fastener locations that you previously covered with thin-set. This ensures these critical areas get a robust layer of waterproofing. This initial detail work is often called “striping.”
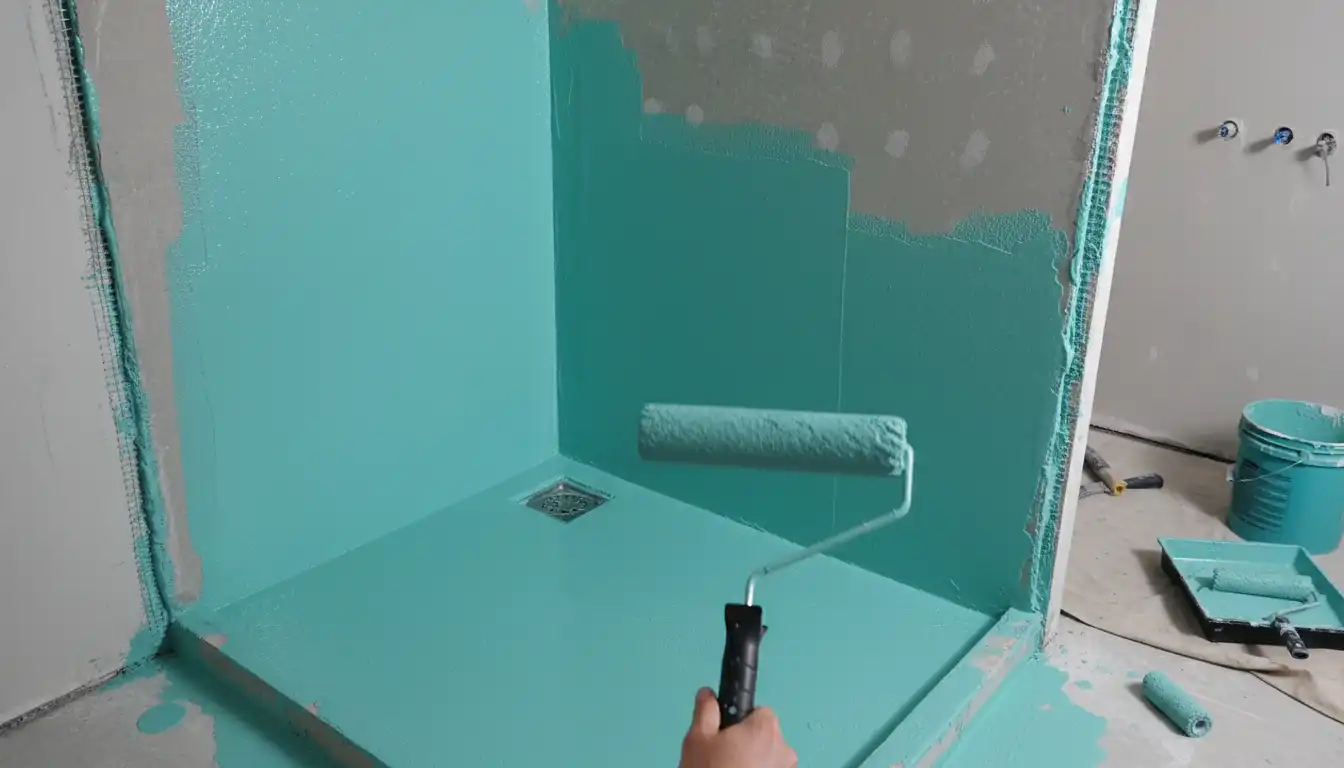
Once the details are coated, pour the AquaDefense into your paint tray and use the roller to apply a thin, even coat to the main flat areas of the Durock. Roll in one consistent direction, for example, vertically. Do not over-apply or try to achieve full coverage in one pass; a thin, even layer is key.
The Second Coat: Building the Barrier
AquaDefense changes color as it dries, shifting from a light mint green to a dark olive green. Once the first coat is dry to the touch and has fully changed color (typically in 30-60 minutes), you are ready for the second coat. This time, apply the product in a perpendicular direction to the first coat (e.g., horizontally).
This cross-hatch pattern ensures complete coverage and helps eliminate pinholes. This is the coat where you will use your WFT gauge. Periodically press the gauge into the wet film to ensure you are meeting the manufacturer’s required thickness. Aim for a total dry film thickness of 20-30 mils.
Curing Times and Conditions: The Science of Drying
Patience is a virtue in waterproofing. Applying tile before the membrane is fully cured can trap moisture and compromise the bond, leading to failure. Curing times are heavily influenced by ambient conditions.
Understanding these variables is crucial, just as knowing the right materials is for other home projects, like deciding between OSB or plywood for an attic floor. Environmental factors always play a role. Increased humidity will significantly extend drying times, while warmth and good air circulation will speed them up. Use a fan (not pointed directly at the surface) to keep air moving in the space.
| Condition | Time to Recoat | Time to Flood Test | Time to Install Tile |
|---|---|---|---|
| 70°F (21°C) / 50% RH | 30-90 Minutes | 4 Hours | 4-6 Hours |
| 50°F (10°C) / 70% RH | 2-3 Hours | 24 Hours | 24-48 Hours |
| 90°F (32°C) / 40% RH | 15-30 Minutes | 2-3 Hours | 3-4 Hours |
Troubleshooting the Most Common Application Errors
Even with careful work, issues can arise. Knowing how to identify and fix them is the mark of a true professional.
Blisters, Bubbles, and Peeling
If you see bubbles or areas where the membrane is peeling, it is almost always a sign of a contaminated substrate. This means dust, oil, or moisture was present on the Durock before application. The only solution is to cut away the affected area, thoroughly clean the exposed Durock, and re-apply the membrane, overlapping onto the well-bonded areas.
Pinholes and Voids
Pinholes are tiny gaps in the membrane that are difficult to see. To find them, shine a bright light at a low angle across the surface after the final coat is dry. The light will catch the edges of any tiny voids. Simply dab a small amount of AquaDefense onto the pinhole with a small artist’s brush to seal it.
Expanding Your Horizons: Beyond the Shower Stall
The robust waterproofing created by AquaDefense and Durock is not limited to showers. This system is an excellent choice for any area that is subject to high moisture levels. Consider it for bathroom floors, laundry room walls, and even as a backsplash substrate behind sinks.
Protecting the interior of your home from moisture allows peace of mind to focus on other areas. It’s akin to addressing transplant shock in your garden phlox; solving foundational issues allows everything else to thrive. By creating a waterproof envelope, you are safeguarding your home’s entire structure.
The Final Verdict: A System Built on Preparation
Using AquaDefense on Durock is one of the most reliable and effective methods for waterproofing a wet area. However, the products themselves are only half of the equation. The ultimate success of your project hinges on meticulous, uncompromising preparation and a detail-oriented application.
By cleaning the substrate properly, reinforcing all seams and penetrations, and applying two complete coats to the correct thickness, you create a seamless, monolithic barrier. This system provides the ultimate defense against water intrusion, ensuring your tile installation will remain beautiful, functional, and leak-free for decades to come.