Stop Ruining Curved Drawers: The Pro Secret to Perfect Hardware Installation
There’s a unique frustration that comes from drilling into a beautiful, curved drawer front only to find the new handle sits awkwardly, leaving an unsightly gap. It’s a common problem that can make a high-end piece of furniture look amateurish. This single misstep can ruin the seamless, flowing line that makes curved drawers so appealing.
Unlike flat surfaces, the geometry of a curve introduces complexities that standard installation techniques simply can’t address. The result is often crooked hardware, stressed wood, and a project that falls short of expectations. Understanding the unique challenge of these surfaces is the first step toward achieving a flawless, professional finish.
You'll Learn About
The Hidden Challenge: Why Curved Drawers Defy Standard Hardware Rules
Applying hardware to a curved drawer front is more than a simple measurement and drilling task; it’s an exercise in geometry. The core issue lies in the mismatch between a flat-backed piece of hardware and a convex or concave wood surface. This fundamental conflict is the source of nearly every potential problem.
When you attempt to force a flat handle base onto a curved front, immense stress is placed on both the hardware and the wood at the points of contact. This can lead to a host of issues that compromise both aesthetics and durability.
The Physics of the Gap: Understanding Torque and Tension
The gap you see between a handle and a curved drawer is a visible sign of torque. As you tighten the screws from behind, the hardware pulls inward, but the curve of the drawer resists. This creates tension on the screw and pulls the edges of the hardware’s base away from the wood, resulting in a gap.
Over-tightening in an attempt to close this gap often makes the problem worse. It can bend the hardware, strip the screw threads, or even crack the drawer front itself. The key is not to fight the curve but to work with it.
Common Mistakes That Lead to Crooked Handles and Damaged Wood
One of the most frequent errors is inaccurate measurement. A standard ruler can’t properly measure the arc of the drawer, leading to off-center placement. Another critical mistake is drilling at the wrong angle, which prevents the screw from seating properly and exacerbates alignment issues.
Many people also choose hardware that is poorly suited for a curved application. A pull with a large, rigid base is almost guaranteed to cause problems. These common pitfalls are easy to avoid with the right knowledge and approach.
Choosing the Right Hardware: Your First Step to Success
Before you even think about drilling, the selection of your hardware is paramount. The right knob or pull can make the installation process dramatically easier and ensure a more professional result. The design of the hardware’s base is the most critical factor to consider.
Thoughtful hardware selection not only enhances the beauty of your furniture but also respects its unique form. Making a smart choice at this stage will save you considerable time and frustration later.
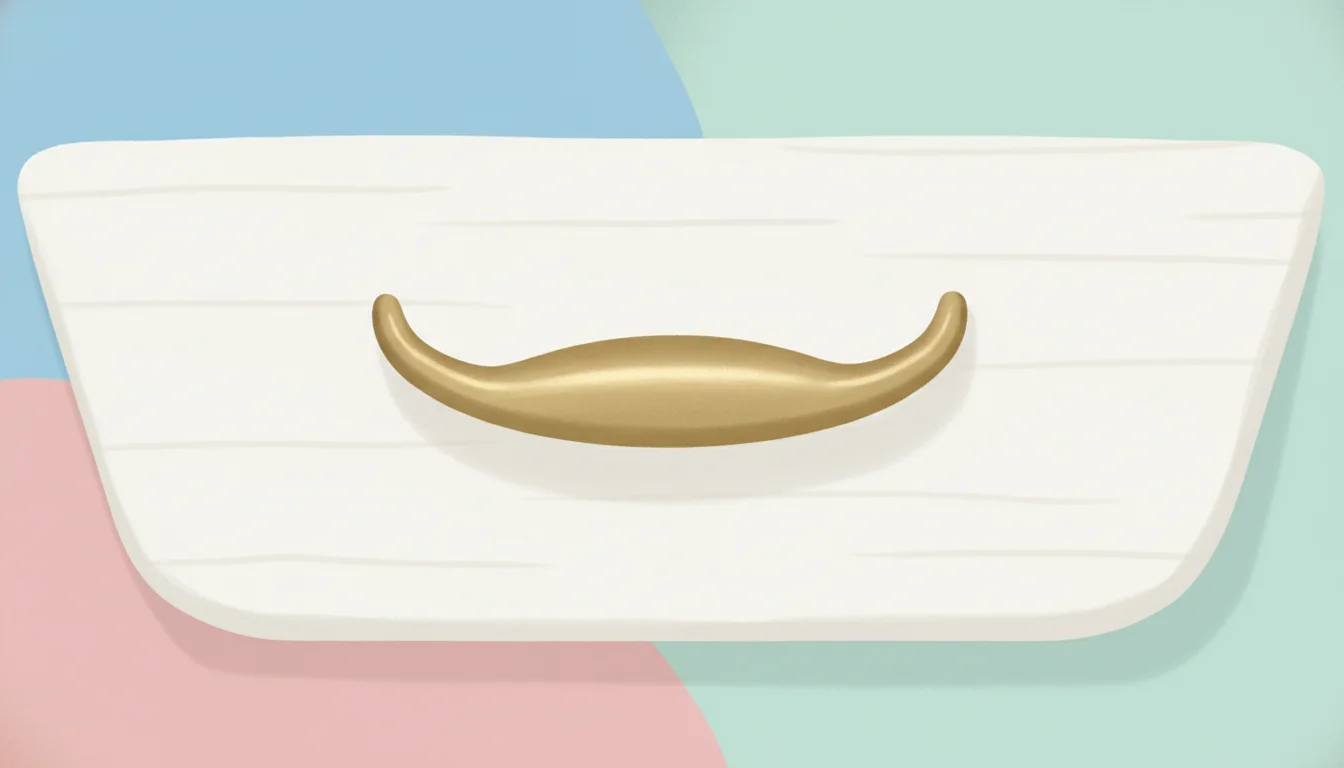
Knobs vs. Pulls: Which Is Better for a Curved Surface?
Generally, knobs are the easiest and most forgiving option for curved drawers. Because a knob attaches with a single screw, its base is typically very small. This minimal point of contact drastically reduces the likelihood of a visible gap.
Pulls, on the other hand, have two contact points. If you choose a pull, opt for one where the “legs” or mounting posts have the smallest possible footprint. This minimizes the flat surface area that needs to sit flush against the curve.
The Critical Role of the Hardware’s Base
Inspect the base of any potential hardware. A pull with two individual, small, round posts will conform much better to a curve than a long, solid bar handle with an integrated flat base. The smaller the contact point, the less the curve of the drawer will interfere with a flush fit.
Some high-end hardware is even designed with a slightly concave base to better fit standard curves. While harder to find, these options provide an elegant, built-in solution to the problem.
Considering Flexible Hardware as a Modern Solution
An emerging category in decorative hardware includes pieces made from flexible materials, like certain polymers or leather. These can be excellent choices for highly curved or unconventional surfaces. They naturally conform to the drawer’s shape, eliminating the gap issue entirely.
While the style may not suit all furniture types, it’s a practical and innovative solution worth considering for modern or transitional pieces. This choice prioritizes function without sacrificing unique design.
Essential Tools and Materials for a Professional Job
Gathering the right tools before you begin is crucial for a smooth and accurate installation. Working with curved surfaces demands more precision than flat-panel jobs, and a few specific tools can make all the difference. Having everything on hand prevents interruptions and helps you focus on the task.
For this project, you will need a flexible measuring tape, a self-centering punch or an awl, painter’s tape, a drill with a variety of bit sizes, and the hardware screws. For a truly professional finish, consider having some epoxy putty or a small wood block and sandpaper for creating custom shims. Protecting your workspace is also key, a detail often overlooked until it’s too late, much like considering how eco cork foam vs quietwalk performs under different flooring types can save a project.
The Step-by-Step Installation Guide for Flawless Results
With the right hardware selected and your tools at the ready, you can now approach the installation with confidence. This methodical process ensures precision at every stage, from marking your drill points to the final tightening of the screws. Follow these steps carefully to achieve a result that looks clean, centered, and secure.
Step 1: Precision Marking on a Curved Canvas
Do not use a rigid ruler. Instead, use a flexible tailor’s tape or a piece of string to find the true center of the drawer’s curved surface. Mark the horizontal center lightly with a pencil. For vertical placement, use painter’s tape to mark your desired height consistently across all drawers.
For pulls with two screws, place the hardware on the drawer front and gently rock it to see where the contact points will naturally rest. Mark these points carefully; they might not be at the exact center of the hardware’s posts due to the curve.
Step 2: The Importance of the Center Punch
Once your points are marked, use a self-centering punch or a simple awl and hammer to create a small indentation in the wood. This is a critical step. The divot prevents the drill bit from “walking” or skidding across the curved surface as it begins to spin.
A wandering drill bit is a primary cause of crooked hardware. This simple action guarantees that your hole will be exactly where you intended it to be.
Step 3: Drilling the Perfect Pilot Hole
Select a drill bit that is slightly smaller than the diameter of your hardware screw. The goal is to drill a pilot hole that is perpendicular to the tangent of the curve at your drill point. In simpler terms, aim the drill directly at the center of the drawer’s curve, not straight down towards the floor.
Drill slowly and steadily, only going as deep as necessary. Back the drill bit out slowly to avoid splintering the wood on the interior of the drawer front.
Step 4: The Secret Weapon – Creating a Custom Backplate or Shim
For a truly gap-free finish with pulls, creating a custom shim is the ultimate professional technique. You can form a small, pliable ball of two-part epoxy putty, place a piece of plastic wrap over it, and press the hardware base into the putty against the drawer front. Once cured, this putty forms a perfect, paintable shim that fills the gap.
Alternatively, a small piece of wood can be sanded with a curved profile to match the drawer. This custom backplate can then be painted or stained to match, creating an incredibly clean and intentional look. This level of detail elevates the entire piece of furniture.
Step 5: The Final Installation
Ensure your screws are the correct length. A screw that is too long will bottom out before the handle is tight, while one that is too short won’t engage securely. Insert the screws from the back and tighten them by hand with a screwdriver, not a drill.
Tighten each screw incrementally, alternating between them for a pull, to ensure even pressure. Snug is sufficient; overtightening will create stress and can damage the drawer front.
Advanced Techniques for a Truly Custom Look
For those seeking a higher level of craftsmanship, there are techniques that can integrate the hardware with the drawer front even more seamlessly. These methods require more skill and patience but deliver a result that is undeniably custom and high-end. They move beyond simple surface mounting to make the hardware a true feature of the design.
Applying these advanced techniques demonstrates a deep understanding of woodworking and design principles. They show a commitment to quality that is visible in the final product’s smallest details.
Insetting Hardware for a Flush Mount Finish
This technique involves carving a shallow recess into the drawer front that matches the footprint of the hardware’s base. Using a Forstner bit or a chisel, you can create a flat-bottomed mortise that allows the hardware to sit flush with the surrounding wood surface.
This method completely eliminates the gap problem by creating a flat mounting point directly on the curve. It is a meticulous process that results in a sleek, integrated appearance that is unmatched by simple surface mounting.
Working with Uniquely Shaped and Artisan Hardware
Artisan or hand-forged hardware often has irregular bases that add to its character. When applying these pieces to a curved drawer, you must treat each installation as a unique project. The custom shim or backplate method is often the best approach here.
Take time to study the hardware and the curve of the drawer to find the optimal placement. The goal is to honor both the craftsmanship of the hardware and the form of the furniture.
Troubleshooting Common Problems
Even with careful planning, issues can arise. Knowing how to identify and solve these common problems can save a project from frustration. The table below outlines frequent issues and their straightforward solutions.
| Problem | Likely Cause | Solution |
|---|---|---|
| Hardware has a visible gap behind it. | The flat base of the hardware does not match the curve of the drawer. | Use a custom shim or backplate. Alternatively, replace the hardware with knobs or pulls that have a smaller contact point. |
| The pull or knob looks crooked. | Inaccurate marking or the drill bit “walked” on the curved surface. | Remove the hardware, fill the holes with a wood filler stick, and allow it to dry. Re-measure using a flexible tape and use a center punch before re-drilling. |
| The screw won’t tighten fully. | The screw is too long and is bottoming out inside the hardware post. | Use a shorter screw. If one is not available, you can carefully cut the existing screw to the correct length with a pair of wire cutters or a small hacksaw. |
| Wood is splitting around the screw hole. | The pilot hole was too small or was drilled at an incorrect angle. | Use the correctly sized pilot bit. Ensure you are drilling perpendicular to the curve’s tangent to prevent stress on the wood fibers. |
Maintaining Your Hardware for Long-Lasting Beauty
Once your hardware is perfectly installed, proper maintenance will keep it looking its best. Regularly wipe down knobs and pulls with a soft, damp cloth to remove oils and dirt. Avoid harsh chemical cleaners that can damage the hardware’s finish or the surrounding wood.
Periodically check that the screws are still snug, as the daily forces of opening and closing drawers can cause them to loosen slightly over time. A proactive approach to care ensures lasting beauty and functionality, a principle that applies to all aspects of a home, from the furniture to the very fabrics you choose. Making informed choices, like those discussed in Pottery Barn performance fabric reviews, contributes to a cohesive and well-maintained living space.
The challenge of applying hardware is not limited to wood furniture; even modern appliances present unique hurdles. For instance, understanding how to approach different materials is crucial, which is a core theme in discussions about whether you can add handles to a fridge. By mastering these techniques, you ensure every fixture in your home is both beautiful and secure.