Angled Soffit Nightmares? Your Definitive Guide to a Flawless Finish
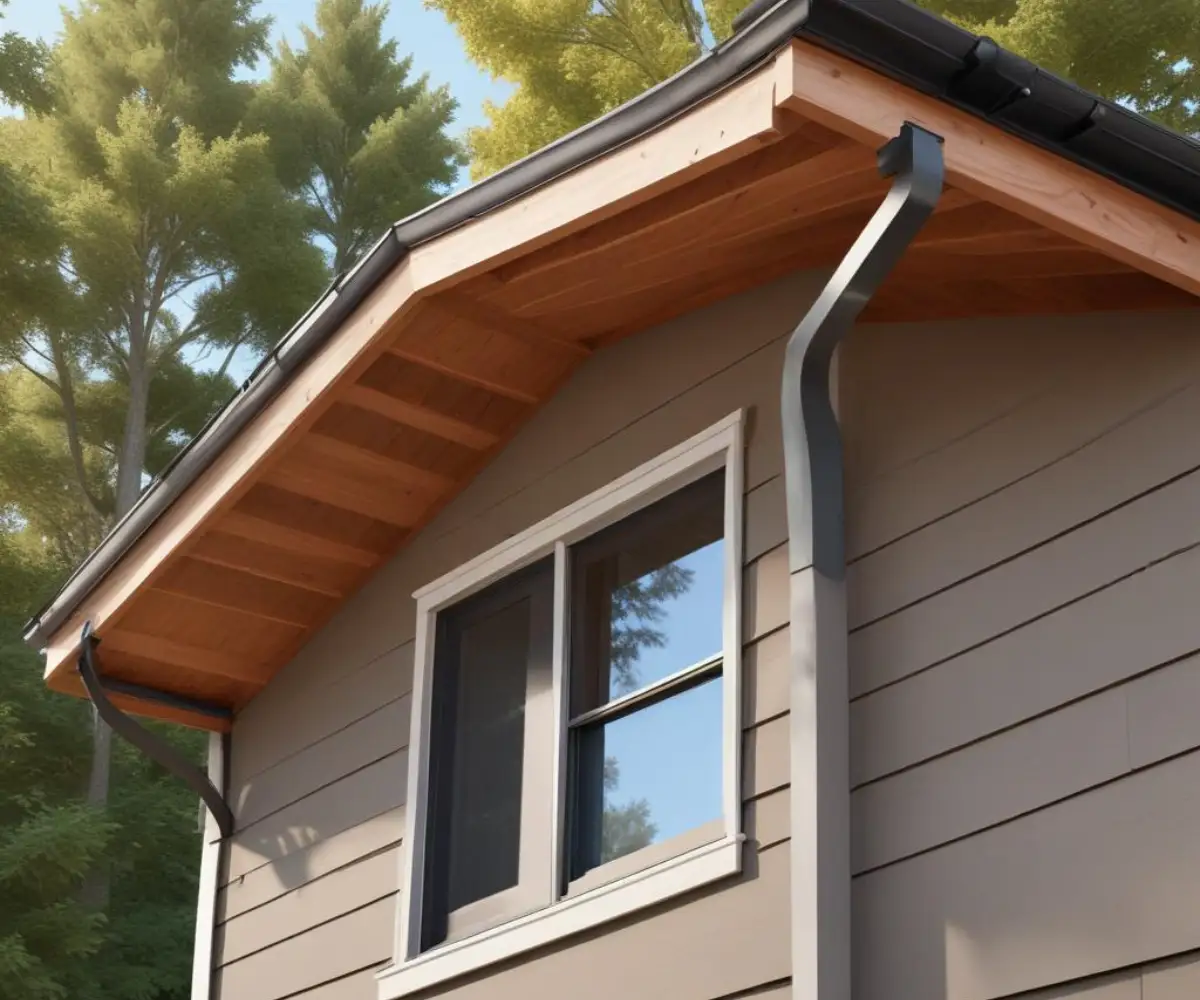
That sloped underside of your roof’s overhang, the angled soffit, is more than just a finishing touch. It’s a critical component of your home’s defense system, yet it’s often the source of frustrating and costly problems. From improper installation leading to water damage to poor ventilation causing attic issues, getting the angled soffit wrong can create a cascade of headaches for any homeowner.
Many homes feature beautiful, sloped rooflines, but this architectural choice introduces a unique challenge: finishing the eaves correctly. Unlike a standard flat soffit, an angled installation requires precise cuts and a deep understanding of how to manage airflow and moisture. When done incorrectly, the results can be disastrous, leading to rot, pests, and diminished curb appeal.
You'll Learn About
The Hidden Dangers Lurking in Your Eaves: Why Angled Soffits Fail
The core problem with angled soffits often boils down to two main culprits: water intrusion and inadequate ventilation. An angled surface can more easily catch wind-driven rain if not sealed perfectly. Gaps at the joints, improper flashing, or failing caulk can allow moisture to seep into the roof structure, leading to wood rot and creating an inviting environment for mold and mildew.
Furthermore, ventilation is a common point of failure. Soffits are essential for allowing fresh air into your attic, which helps to regulate temperature and moisture levels year-round. With angled soffits, ensuring proper airflow can be tricky. Vents can be installed incorrectly or omitted entirely, trapping hot, moist air in the attic and potentially leading to ice dams in the winter and higher cooling costs in the summer.
Common Issues Stemming from Poor Angled Soffit Installation
A poorly executed angled soffit installation can manifest in several ways, some more obvious than others. Keep an eye out for peeling paint, water stains on the soffit or your home’s siding, and visible gaps or cracks. These are clear indicators that water is getting in where it shouldn’t. You might also notice pests like insects or even small animals making their homes in the eaves, a sign that there are entry points that need to be sealed.
Inside your home, the signs can be more subtle. A musty smell in the attic or upper floors can point to a moisture problem originating from the soffits. You may also see your energy bills creeping up as your HVAC system works harder to compensate for a poorly ventilated attic. Addressing these issues promptly is key to preventing more extensive and expensive repairs down the line. If you are noticing other issues around your home’s exterior, it’s wise to investigate; for instance, understanding who do you call for a downed cable line can help you address different types of property maintenance challenges.
The Ultimate Solution: A Step-by-Step Guide to Perfect Angled Soffits
Achieving a durable and effective angled soffit installation is entirely possible with the right approach and materials. This process involves careful planning, precise measurements, and a commitment to quality workmanship. Following these steps will help ensure your soffits not only look great but also provide long-lasting protection for your home.
Whether you’re tackling this as a DIY project or hiring a professional, understanding the fundamentals of a proper installation is crucial. From selecting the right materials to the final finishing touches, each step plays a vital role in the overall success of the project.
Step 1: Choosing the Right Material for Your Angled Soffit
The material you choose for your angled soffit will have a significant impact on its durability, maintenance requirements, and appearance. While wood offers a classic look, it’s susceptible to rot and pests and requires regular painting or staining. Vinyl and aluminum are popular choices as they are low-maintenance and resistant to moisture. Fiber cement is another excellent option, offering superior durability and resistance to fire and insects.
When selecting a material, consider your local climate and the architectural style of your home. It’s also important to decide between vented and solid soffit panels. Vented panels are essential for proper attic ventilation, so be sure to incorporate them into your plan. Many homeowners opt for a combination of vented and solid panels to achieve the right balance of airflow and aesthetics.
Step 2: Meticulous Measurement and Precision Cutting
Accurate measurements are the foundation of a successful angled soffit installation. You’ll need to measure the width of the eave and the length of each section you’re covering. The most critical part of this step is determining the correct angle to cut the soffit panels so they fit snugly against the fascia and the house. A sliding T-bevel or an angle finder can be invaluable tools for this task.
When cutting the panels, a circular saw with a fine-tooth blade will provide the cleanest cuts for most materials. Always double-check your measurements before cutting to avoid wasting material. For corners where two angled sections meet, you will need to make precise miter cuts to ensure a tight, professional-looking joint.
Step 3: Installing Channels and Nailing Strips for a Secure Fit
To hold the soffit panels in place, you’ll need to install channels along the wall and the fascia board. J-channel is typically used against the house, while F-channel is often used on the fascia side. These channels create a groove for the soffit panels to slide into, ensuring a secure and finished look.
For wider eaves, you may need to install intermediate nailing strips to prevent the soffit panels from sagging over time. These strips should be installed perpendicular to the rafters and securely fastened. Proper support is crucial for the longevity of your angled soffit installation.
Step 4: The Art of Panel Installation and Proper Fastening
With the channels in place, you can begin installing the soffit panels. Start at one end and work your way across, ensuring each panel is fully seated in the channels. The panels should be installed perpendicular to the house. The tongue-and-groove design of most soffit panels allows them to lock together, creating a seamless appearance.
Fasten the panels to the nailing strips or fascia board using corrosion-resistant nails or screws. It’s important not to drive the fasteners too tight, as this can cause the panels to buckle with temperature changes. The fasteners should be placed in the center of the nailing slots to allow for expansion and contraction.
Step 5: Finishing Touches for a Watertight Seal and Polished Look
Once all the panels are installed, the final step is to apply caulk to all seams and joints. Use a high-quality exterior-grade caulk to create a watertight seal, preventing moisture from penetrating the soffit. This is especially important at corners and where the soffit meets the wall and fascia.
After the caulk has cured, you can paint or stain the soffit if you’ve chosen a material like wood or fiber cement. This not only enhances the appearance but also adds another layer of protection against the elements. A well-finished angled soffit will significantly boost your home’s curb appeal while providing essential protection. Similarly, focusing on other exterior details, such as correcting common Gable Peak Lighting mistakes, can further enhance your home’s overall aesthetic.
Material Showdown: What’s Best for Your Angled Soffit?
The market offers a variety of materials suitable for angled soffits, each with its own set of advantages and disadvantages. Making an informed decision is key to a long-lasting and low-maintenance installation. Consider factors like your budget, climate, and desired aesthetic when weighing your options.
Understanding the properties of each material will help you choose the one that best meets the specific needs of your home. Below is a comparison of the most common soffit materials.
| Material | Pros | Cons |
|---|---|---|
| Vinyl | Affordable, low-maintenance, moisture-resistant, available in many colors. | Can become brittle in extreme cold, colors may fade over time, can look less premium than other materials. |
| Aluminum | Durable, water-resistant, won’t rot or warp, lightweight. | Can be dented easily, paint can chip or fade, can be more expensive than vinyl. |
| Wood | Classic, high-end appearance, can be painted or stained. | Requires regular maintenance, susceptible to rot and pests, can be more expensive. |
| Fiber Cement | Extremely durable, resistant to fire, insects, and rot, holds paint well. | Heavier and more difficult to install, can be more expensive than other options. |
Cost Considerations for Angled Soffit Installation
The cost of installing angled soffits can vary widely depending on several factors. The material you choose will be a major determinant of the price, with vinyl being the most budget-friendly and fiber cement or wood being on the higher end. The complexity of your roofline, the height of your home, and local labor rates will also play a significant role in the overall cost.
On average, you can expect to pay between $6 and $20 per linear foot for professional installation. For a typical home, this can translate to a total cost ranging from a few thousand dollars to several thousand. While it may be tempting to opt for the cheapest option, investing in quality materials and professional installation can save you money in the long run by preventing costly repairs. It is also worth considering other home improvement projects that can be done at the same time, such as exploring options for insulating Keter shed spaces for better year-round use.
DIY vs. Professional Installation: A Cost-Benefit Analysis
For experienced DIYers, installing angled soffits can be a rewarding project that saves on labor costs. However, it’s a job that requires precision, the right tools, and a comfort level with working at heights. Mistakes can lead to improper sealing and ventilation, potentially causing more significant problems down the road.
Hiring a professional ensures the job is done correctly and often comes with a warranty on the workmanship. While the upfront cost is higher, the peace of mind and long-term performance can make it a worthwhile investment. Be sure to get multiple quotes from reputable contractors and check their references before making a decision.
Maintaining Your Angled Soffit for Longevity
Once your angled soffit is installed, regular maintenance is key to ensuring its longevity and performance. At least once a year, inspect your soffits for any signs of damage, such as cracks, gaps, or pest intrusion. Clean the soffits with a mild detergent and water to remove dirt and mildew buildup, which is especially important for vented soffits to ensure proper airflow.
If you have wood soffits, be sure to check for any peeling paint or signs of rot and address these issues promptly. For all types of soffits, check the caulk joints and reapply as needed to maintain a watertight seal. A little preventative maintenance can go a long way in protecting your investment and your home.
Seasonal Maintenance Checklist
To keep your angled soffits in top condition, follow this simple seasonal checklist. In the spring, inspect for any damage that may have occurred over the winter and clean out any debris from the vents. In the summer, check for signs of pest activity, as this is when insects and animals are most active.
In the fall, clean your gutters to prevent water overflow that can damage your soffits and fascia, and ensure vents are clear of leaves and debris. In the winter, keep an eye out for ice dams, as these can be a sign of inadequate attic ventilation that needs to be addressed.
Frequently Asked Questions About Angled Soffits
Homeowners often have questions about angled soffits, from installation specifics to maintenance concerns. Here are answers to some of the most common inquiries to help you better understand this important home component.
Can I install vented panels on my entire angled soffit?
While you can install vented panels across the entire length of your soffit, it’s often not necessary. A common practice is to alternate between vented and solid panels or to place vented panels at regular intervals. The goal is to achieve balanced airflow in your attic, and the amount of ventilation needed will depend on the size of your attic and your local climate. A professional can help you determine the optimal amount of ventilation for your home.
What is the best way to clean angled soffits?
The best way to clean your soffits depends on the material. For vinyl and aluminum soffits, a soft brush or cloth with a mixture of mild detergent and water is usually sufficient. For stubborn stains or mildew, a solution of water and vinegar can be effective. For wood soffits, use a cleaner specifically designed for wood and avoid using a pressure washer, as it can damage the wood and paint.
How do I know if my angled soffit is properly ventilated?
Signs of poor attic ventilation include moisture or frost on the underside of your roof sheathing, a musty smell in the attic, or ice dams forming in the winter. You can also visually inspect your soffit vents to ensure they are not blocked by insulation or debris. If you’re unsure, it’s best to have a professional roofing or insulation contractor assess your attic ventilation.
Is it possible to switch from a flat soffit to an angled one?
Yes, it is possible to convert a flat, or boxed, soffit to an angled soffit. This would involve removing the existing soffit and framing and then installing new nailing surfaces that follow the angle of the rafters. This is a more involved project that may require structural changes to the eaves, so it is typically best left to experienced professionals.