Alcove Tub Without Apron: Your Guide to a Custom Bathroom
The standard, one-piece alcove bathtub is a common sight in many homes. While functional, its integrated front panel, or “apron,” often limits design creativity, leading to a generic look. Homeowners planning a remodel are frequently stuck with this uninspired fixture, believing it’s the only option for a three-wall bathroom layout.
This common design problem leads to a desire for something more—a bathtub that feels intentional, luxurious, and seamlessly integrated into the bathroom’s design. The solution lies in understanding the concept of an alcove tub without an apron, a method that opens up a world of custom possibilities.
You'll Learn About
What Exactly Is an Alcove Tub Without an Apron?
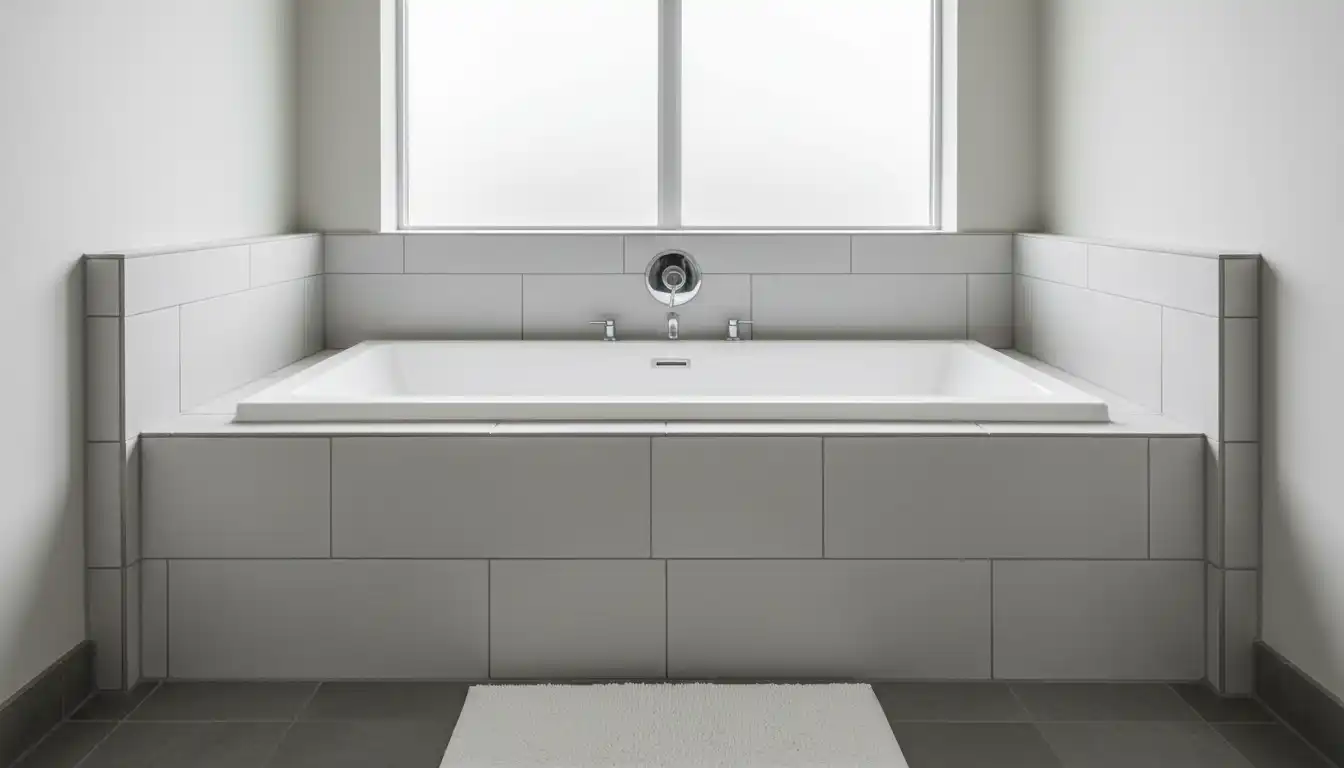
The term “alcove tub without an apron” can be slightly misleading. It doesn’t typically refer to a single, specific product you can buy off the shelf. Instead, it describes a popular and sophisticated installation method: placing a drop-in style bathtub into a three-wall alcove. A standard alcove tub has a finished front skirt, while a drop-in tub is essentially a shell with a rim, designed to be lowered into a custom-built surround or deck.
By using a drop-in tub in an alcove, you eliminate the pre-fabricated apron. This allows you to build a custom front facade, or apron, from scratch. This custom front is then finished with a material of your choice—such as tile, wood, or stone—to perfectly match your bathroom’s aesthetic.
The Design Revolution: Why Go Apron-Free?
Opting for a custom-fronted alcove tub is more than just a style choice; it’s a fundamental upgrade to your bathroom’s form and function. This approach moves the bathtub from a mere utility to a central design feature.
The primary benefit is unlimited design freedom. You are no longer restricted to the plain white fiberglass or acrylic front of a standard tub. Instead, you can create a cohesive look by continuing your floor or wall tile onto the tub front, creating a stunning, seamless visual. This built-in appearance gives the entire room a more high-end and thoughtfully designed feel, which can significantly increase your home’s value.
Drop-In vs. Skirted Alcove Tubs: A Head-to-Head Comparison
Understanding the key differences between these two tub types is crucial for planning your project. While both are installed in three-wall alcoves, their installation, cost, and final appearance vary significantly.
| Feature | Standard Skirted Alcove Tub | Drop-In Tub (in an Alcove) |
|---|---|---|
| Installation Complexity | Simpler; slides into place and is secured to studs. | More complex; requires building a support frame and custom apron. |
| Cost | Generally lower initial cost for the tub unit. | Higher overall cost due to the tub, framing materials, and finishing materials (tile, etc.). |
| Design Flexibility | Very limited; the apron is integrated and cannot be changed. | Nearly limitless; the front can be finished with tile, wood, stone, or other materials. |
| Appearance | Standard, functional look. | High-end, custom, “built-in” appearance. |
| Maintenance | Easy to clean the single-piece apron. | Maintenance depends on the apron material (e.g., grout lines for tile). |
The Foundation: Building the Perfect Frame for Your Tub
The success of an apron-free alcove tub installation hinges on the quality of its support structure. A sturdy, level frame is non-negotiable, as it will bear the weight of the tub, water, and the person bathing. This frame typically consists of a pony wall at the front and ledger boards secured to the wall studs on the other three sides.
Use 2×4 lumber to construct the frame, ensuring it is perfectly level and square. The top of the frame should be positioned so that the rim of the drop-in tub sits flush with or slightly above the finished deck material. Crucially, you must incorporate an access panel into the front apron. This panel, often held in place by magnets or clips and then tiled over, is essential for future access to the plumbing, drain, and faucet connections. Skipping this step can turn a minor leak repair into a major demolition project.
Choosing Your Custom Front: Materials That Make a Statement
With the frame in place, the creative part begins. The material you choose for the custom apron will define the tub’s character and its relationship with the rest of the bathroom.
Tile: The Versatile Classic
Tile is the most popular choice for a reason. It’s durable, water-resistant, and offers endless design options. You can use large-format tiles for a modern, minimalist look with fewer grout lines, or intricate mosaic tiles to create a stunning focal point. For a cohesive design, consider using the same tile on the tub front as on the surrounding walls or floor.
Wood Paneling: Warm and Organic
For a warmer, more spa-like feel, wood paneling is an excellent option. Materials like teak, cedar, or specially treated moisture-resistant woods can be used. Beadboard or shiplap can create a charming, rustic look, while smooth, flat panels offer a more modern aesthetic. Proper sealing with a marine-grade varnish is essential to protect the wood from moisture and prevent warping or rot.
Stone Slabs: The Ultimate Luxury
For a truly seamless and luxurious finish, a solid slab of stone like marble, quartz, or granite is unmatched. This creates a continuous surface with no grout lines, offering a clean, high-end look. However, this is the most expensive option and requires professional fabrication and installation due to the weight and precision required.
Acrylic Panels: Modern and Low-Maintenance
For a modern, grout-free alternative, consider custom-cut panels. If you’re wondering about the cheapest place to buy acrylic sheets, some specialty plastic suppliers offer better rates than big-box stores. These panels provide a sleek, contemporary finish and are very easy to clean.
Step-by-Step Installation Guide: From Bare Alcove to Beautiful Tub
Installing a drop-in tub with a custom apron is a multi-step process that requires precision. While a confident DIYer can tackle it, hiring a professional is recommended if you are unsure about the framing or plumbing.
Step 1: Preparation and Framing. Measure your alcove and tub precisely. Build the 2×4 support frame and install ledger boards on the studs to support the tub rim. Remember to frame out an opening for the plumbing access panel.
Step 2: Set the Tub. The most critical part of this step is creating a mortar bed on the subfloor beneath the tub. This is not optional. A bed of mortar provides solid, continuous support for the bottom of the tub, preventing it from flexing, squeaking, or cracking over time. After applying the mortar, carefully lower the tub into place, pressing it down firmly and ensuring it is perfectly level.
Step 3: Connect Plumbing. With the tub in place, install the drain and overflow assembly. This is where your access panel will prove invaluable. It’s best to have a plumber handle these connections to ensure they are secure and leak-free.
Step 4: Build and Waterproof the Apron. Attach cement backer board to the front frame. This is the substrate for your tile or other finish. Waterproofing this surface is critical. Apply a liquid-applied waterproofing membrane or a sheet membrane over the entire surface of the cement board, paying close attention to seams and corners.
Step 5: Finish the Surface. Apply your chosen finish material, such as tile, to the waterproofed apron. Use a high-quality, polymer-modified thin-set mortar for tile applications.
Step 6: Grout and Seal. After the tile adhesive has cured, grout the joints. The final, crucial step is to seal all the seams. Use 100% silicone caulk where the tub rim meets the tile, where the apron meets the floor, and in the vertical corners of the wall surround. This flexible seal accommodates slight movements and prevents water intrusion.
Common Mistakes to Avoid for a Flawless Finish
A successful project is often about avoiding common pitfalls. Pay close attention to these details to prevent future headaches.
Skipping the Mortar Bed: Setting the tub directly on the subfloor or shims is a recipe for disaster. A mortar bed provides essential support and prevents the tub from flexing, which can lead to cracks in the tub itself or the surrounding tile grout.
Inadequate Waterproofing: Cement board is water-resistant, not waterproof. Failing to apply a waterproofing membrane over the apron and wall surrounds will eventually lead to water damage, mold, and rot. Hidden moisture can be a silent destroyer, much like discovering you have mice in walls but not in house; the damage is hidden until it becomes a major problem.
Forgetting the Access Panel: The temptation to create a perfectly seamless front is strong, but without an access panel, any future plumbing issue will require demolition. Plan for access from the beginning.
Using the Wrong Sealant: Do not use acrylic caulk or grout in the joints where planes meet (like tub-to-tile or wall corners). These areas require a flexible, waterproof sealant. Only 100% silicone caulk should be used.
A Note on Seasonal Projects
Planning a major renovation like this is a perfect indoor project for colder months. It allows you to transform your space while avoiding outdoor chores. Of course, some winter tasks are unavoidable, and for those, being prepared with the right gear, like the best winter gloves for snowblowing, makes all the difference.
Frequently Asked Questions (FAQ)
Can I use any drop-in tub in an alcove setting?
Yes, most drop-in tubs can be used. However, for a shower/tub combination, it’s highly recommended to use a tub with an integral tile flange on the three wall-facing sides. This flange gets tucked behind the wall backer board and provides a crucial barrier against water intrusion.
Is this a good DIY project?
For an experienced DIYer with framing, plumbing, and tiling skills, this is a manageable project. For beginners, the combination of critical structural support and waterproofing makes it risky. If you are not completely confident, hiring a professional is the wisest investment.
How much more does a custom apron cost than a standard alcove tub?
The cost can vary dramatically. You must factor in the price of the drop-in tub, lumber for the frame, cement board, waterproofing materials, tile, and setting materials. It will almost always be more expensive than a basic, all-in-one alcove unit, but the aesthetic payoff is substantial.
The Final Verdict: Is an Apron-Free Alcove Tub Right for You?
If you are looking to break free from the constraints of standard bathroom fixtures and create a space with a truly custom, high-end feel, the apron-free alcove tub is an outstanding choice. It transforms the bathtub from a simple utility into a deliberate and beautiful design element.
While the installation is more complex and the cost is higher, the result is a durable, waterproof, and visually stunning centerpiece that elevates the entire bathroom. By prioritizing a solid frame, meticulous waterproofing, and careful finishing, you can achieve a luxurious result that you will enjoy for years to come.