Don’t Replace It! How to Add a Shower to Your Jacuzzi Tub
You have a luxurious jacuzzi tub, a centerpiece of relaxation in your bathroom. Yet, its singular function feels limiting. The absence of a quick, refreshing shower option is an inconvenience that disrupts the flow of your daily routine, forcing you to choose between a lengthy soak or using a different bathroom altogether. This common dilemma leaves many homeowners feeling that their bathroom isn’t living up to its full potential.
The problem often stems from the original design of the bathroom, where the jetted tub was seen purely as a luxury item rather than a practical daily fixture. The thought of a full remodel—tearing out the tub, reconfiguring plumbing, and enduring weeks of construction—is financially and logistically daunting. Fortunately, there is a highly effective solution: you can add a shower to your existing jacuzzi tub, creating a versatile, spa-like combination that serves every need.
You'll Learn About
Why Add a Shower to Your Jacuzzi Tub? The Overlooked Benefits
Transforming your jetted tub into a tub-and-shower combination offers more than just convenience. It’s a strategic upgrade that enhances your home’s functionality, value, and even hygiene. This project is a cost-effective alternative to a massive bathroom overhaul, providing a dual-purpose fixture in the space you already have.
Beyond the obvious space-saving advantages, consider the significant boost to your home’s resale value. A full bathroom with both bathing and showering options is far more appealing to potential buyers. Furthermore, this upgrade introduces an often-overlooked hygienic benefit. A quick rinse-off in the new shower before taking a long soak helps keep the jacuzzi’s water and complex jet system cleaner, reducing the buildup of oils and soaps in the piping. This simple practice can lead to less frequent deep cleanings and a more sanitary bathing experience.
Before You Begin: A Critical Pre-Installation Assessment
Before any tools are picked up, a thorough assessment of your existing setup is crucial for a successful and leak-free installation. Rushing this step can lead to costly water damage and structural issues down the line. A careful evaluation will determine the scope of the project and the materials required.
First and foremost, examine the walls surrounding your jacuzzi tub. Standard drywall is not waterproof and is wholly unsuitable for a shower environment. The walls must be covered in a water-impermeable material like ceramic tile, stone, or a solid waterproof panel system built upon a proper backer like cement board. If your tub is surrounded by painted drywall, you will need to plan for a complete wall renovation in the tub alcove.
Next, assess your plumbing. Locate your hot and cold water supply lines. Are they accessible through an adjacent closet wall or from a crawlspace or basement below? Access is key to installing the new shower valve. Also, consider your tub’s material—acrylic, fiberglass, and cast iron have different properties that may affect how and where fixtures can be mounted. Finally, confirm you have adequate ceiling height for someone to stand comfortably under a shower head, typically a minimum of 80 inches from the shower floor.
Choosing Your Ideal Shower System: A Breakdown of Options
Selecting the right hardware is essential for both functionality and aesthetics. Your choice will depend on your budget, your DIY comfort level, and the existing plumbing configuration. There are several excellent paths to converting your tub into a shower.
1. The All-in-One Tub and Shower Faucet Kit
This is the most common and integrated solution. It includes a new tub spout (often with a diverter), a single handle valve trim to control temperature and flow, and a matching shower head and arm. This approach provides a cohesive, factory-matched look and is designed for this exact purpose.
The main challenge is that it almost always requires you to open the wall to replace the existing tub-only valve with a new tub-and-shower valve. This is the most professional and reliable method, ensuring proper water diversion and pressure.
2. The Simple Diverter Spout
For a less invasive and more budget-friendly option, you can replace your existing tub spout with a diverter spout. This type of spout has a built-in mechanism (usually a pull-up knob) that redirects water upward through an attached hose to a handheld shower head mounted on the wall. This can sometimes be done without opening up the wall, making it a popular choice for quick upgrades.
However, this method may not provide the same water pressure as a dedicated shower valve and offers a less streamlined appearance. It’s a functional solution when major plumbing work is not feasible.
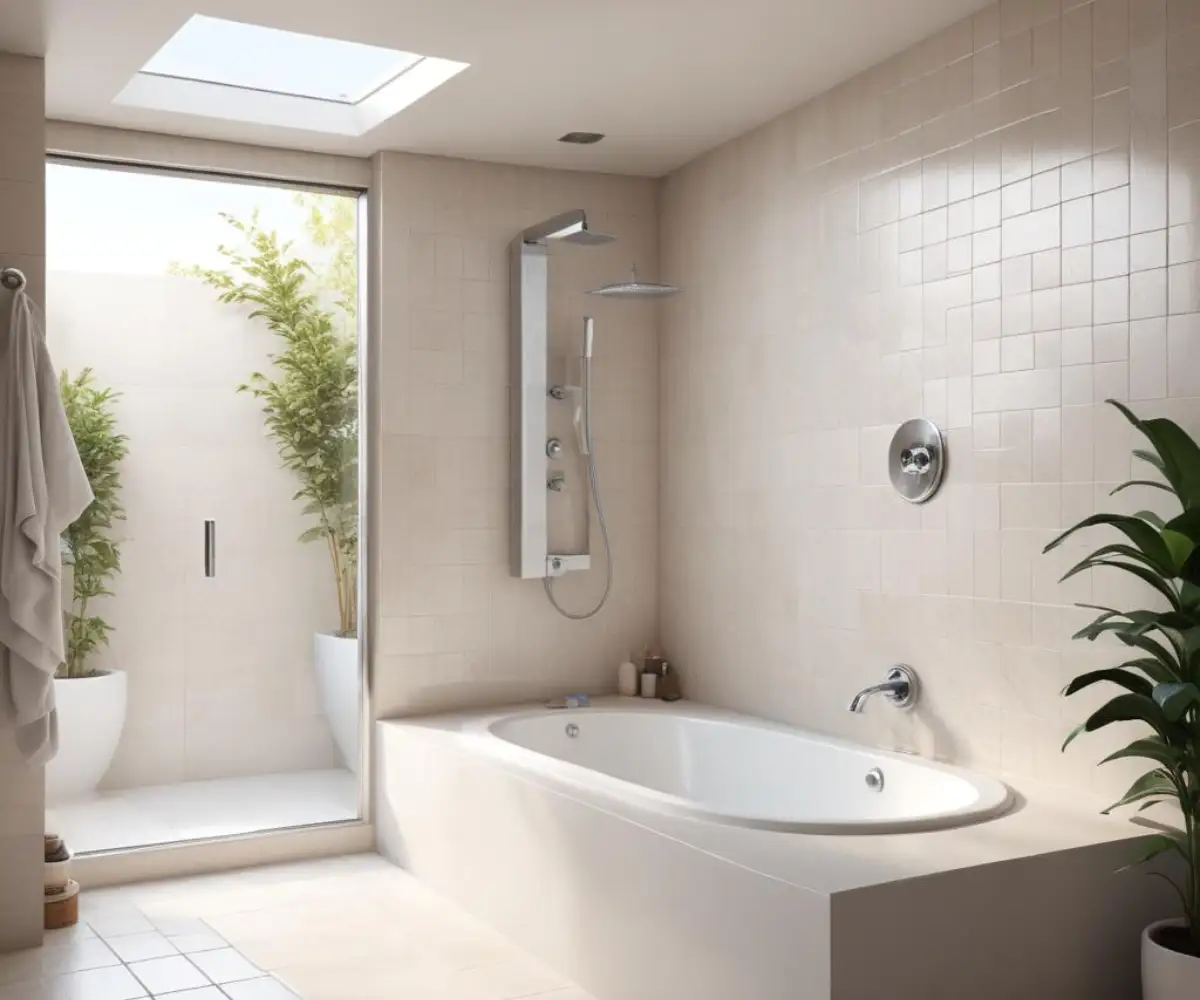
3. The Wall-Mounted Shower Panel System
For those seeking a true spa experience, a shower panel is a fantastic upgrade. These all-in-one towers often include a rainfall shower head, a handheld sprayer, and multiple body jets. They are designed to connect to your new shower valve, offering a luxurious and modern aesthetic.
Installation is more complex and these systems come at a higher price point. They are an excellent choice for a high-end bathroom renovation where comfort and style are top priorities.
| Feature | All-in-One Faucet Kit | Diverter Spout Only | Shower Panel System |
|---|---|---|---|
| Installation Complexity | Moderate to High (Requires Wall Access) | Low to Moderate | High (Requires Significant Plumbing) |
| Average Cost | $150 – $500 | $50 – $150 | $300 – $1,000+ |
| Best For | A professional, integrated look and optimal performance. | Budget-conscious projects with minimal wall alteration. | Luxury remodels seeking a spa-like experience. |
| Key Consideration | Requires replacing the in-wall valve. | May offer lower water pressure to the shower head. | Requires robust plumbing and wall support. |
Step-by-Step Installation Guide: From Jetted Tub to Shower Combo
This guide outlines the general steps for installing a standard all-in-one shower faucet kit, the most common type of conversion. Always turn off the main water supply to your home before beginning any plumbing work. For those not experienced in plumbing, hiring a licensed professional is strongly recommended to prevent leaks.
Step 1: Preparation and Access
Begin by protecting your jacuzzi tub’s delicate acrylic or fiberglass surface. Lay down a thick blanket or heavy-duty drop cloth to prevent scratches from tools or debris. Next, you will need to access the plumbing in the wall. This is typically done by cutting a clean, rectangular access panel in the drywall behind the faucet from an adjoining room or closet.
Step 2: Upgrading the Plumbing Valve
With the plumbing exposed, carefully remove the old tub-only faucet and valve body. This will involve cutting the old hot and cold supply lines. Install the new tub-and-shower valve, following the manufacturer’s instructions precisely. This is the most critical step and requires soldering copper pipes or using modern PEX fittings to connect the new valve to the water supply and run a new pipe up to the shower head location.
Step 3: Wall Repair and Waterproofing
Once the new valve is securely installed and the shower arm stub-out is in place, you must repair the wall. Do not use standard drywall in this area. Cut a piece of cement backer board to fit the opening around the plumbing. Secure it to the studs and then apply a liquid waterproofing membrane over the entire backer board surface and seams. This step is absolutely essential to prevent water from ever reaching your wall studs.
Step 4: Installing Fixtures and Finishing Touches
After the waterproofing membrane has cured, you can install your tile or wall surround. Once the tile and grout are complete and sealed, you can install the new faucet trim, handle, tub spout, and the shower arm and head. Use plumber’s tape on all threaded connections to ensure a watertight seal. The final step is to install a high-quality shower curtain rod and curtain or, for a more permanent solution, glass shower doors.
The Forgotten Factors: Drainage and Ventilation
Many guides focus solely on the water supply, but managing the water you’ve used is just as important. Adding a shower introduces two new challenges that are often overlooked until they become problems: increased drainage load and massive amounts of humidity.
The drain in a tub-only setup isn’t always prepared for the hair and soap scum that a daily shower sends its way. Before you begin, ensure your tub’s drain is flowing freely. It’s wise to snake the drain proactively as part of the project. A shower also introduces far more steam into the bathroom than a bath. Evaluate your existing ventilation fan. If it’s old, noisy, or undersized, now is the perfect time to upgrade to a quieter, more powerful model to prevent future issues with mold and mildew. While upgrading electrical components, you might also consider a timer switch or even a stylish shallow dimmer switch to control new, spa-like ambient lighting.
Common Mistakes to Avoid at All Costs
A successful project is as much about avoiding errors as it is about following the correct steps. Here are some critical mistakes that can compromise your new shower and lead to significant damage:
- Skimping on Waterproofing: This is the most catastrophic error. Never tile directly onto drywall or green board in a shower. Use a proper system like cement board with a waterproofing membrane.
- Mismatching Valve and Trim: The in-wall valve and the exterior trim kit must be from the same manufacturer and compatible series. They are not universal.
- Not Protecting the Tub: An accidental drop of a wrench can easily chip or crack the surface of your expensive jacuzzi tub, turning a rewarding project into a costly repair.
- Ignoring Local Codes: Major plumbing alterations often require a permit and inspection. Check with your local building authority to ensure your project is compliant.
While this project involves careful planning, it’s a fantastic way to improve your home. Tackling upgrades like this can sometimes make you reconsider other aspects of your space. If your renovation plans expand, remember to hire specialists for specific jobs, whether it’s a plumber for this project or professional deck movers near me for an outdoor overhaul. Just as you might be evaluating the durability of wall materials, it’s also a good time to think about flooring. Many homeowners wonder, is Shaw engineered flooring good? Considering all elements of the room ensures a cohesive and lasting design.
Frequently Asked Questions (FAQ)
How much does it cost to add a shower to a jacuzzi tub?
The cost varies widely based on whether you DIY or hire a professional. A DIY project using a budget-friendly kit could cost a few hundred dollars. A professional installation, including plumbing, tile work, and fixtures, can range from $2,000 to $5,000 or more.
Can I add a shower to a freestanding jetted tub?
Yes, it’s possible but requires specialized hardware. You’ll typically need a freestanding tub faucet with a handheld shower diverter and a circular or oval shower curtain rod that mounts to the ceiling or walls to enclose the tub.
How do I keep my jacuzzi jets clean now that I’m showering in it?
Regularly circulate a specialized jetted tub cleaner through the system according to the manufacturer’s instructions. The pre-soak rinse from your new shower will help reduce the amount of soap and oil entering the jets, but periodic cleaning is still essential.
By carefully planning and executing this project, you can successfully merge the luxury of a jacuzzi with the practicality of a shower. This single upgrade delivers a powerful return by enhancing your daily routine, increasing your home’s value, and creating a more versatile and functional bathroom for everyone to enjoy.