Acceptable Quartz Seam? The Tiny Detail That Can Ruin Your Kitchen
You have spent months planning your dream kitchen. You selected the perfect cabinets, the ideal flooring, and after agonizing over dozens of samples, you chose the perfect quartz countertop—a significant investment you expect to love for decades.
Then comes installation day, and your heart sinks. A dark, wide, or uneven line runs across your pristine new surface, screaming for attention. Suddenly, that tiny detail—the seam—has become the focal point of the entire room, and not in a good way.
This is the nightmare scenario for any homeowner. A poorly executed quartz seam can undermine the entire aesthetic of your space, turning a massive investment into a source of daily frustration. Understanding what constitutes an acceptable quartz seam is not just about aesthetics; it’s about ensuring you receive the quality and craftsmanship you paid for.
You'll Learn About
Why Your Quartz Seam Location is a Critical First Step
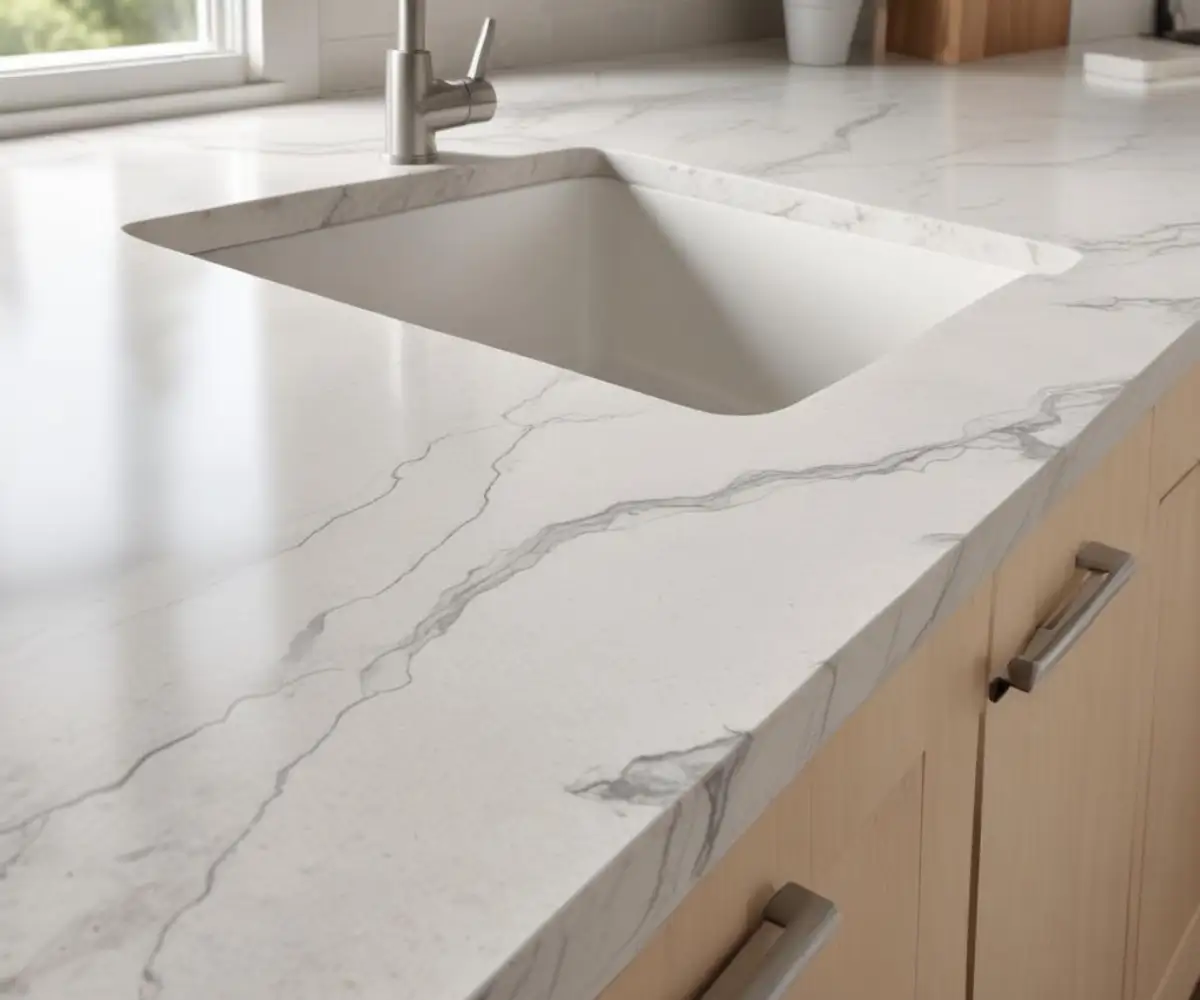
Before a single cut is made, the most crucial phase for ensuring an inconspicuous seam is the templating and layout process. A quartz seam is the joint where two separate pieces of stone are bonded together. This is often necessary because quartz slabs have size limitations, and many kitchen layouts, especially L-shaped or U-shaped designs, exceed the length of a single slab.
The goal is to place these necessary joints in the least noticeable locations. Work closely with your fabricator during the layout phase to strategically position seams away from high-visibility areas and major focal points. For instance, a seam is often better placed in a corner or over a cabinet support rather than in the middle of a long, uninterrupted stretch of countertop.
In some cases, thoughtful planning can minimize or even eliminate the need for seams. For especially large islands or long countertop runs, exploring options like jumbo slabs may be a worthwhile investment, a concept detailed further in discussions around achieving a flawless 14 foot countertop. Your involvement in this planning stage is the first and most powerful step toward a result you’ll love.
The Anatomy of an Acceptable Quartz Seam: A Visual Checklist
A high-quality quartz seam should be inconspicuous, but it will never be completely invisible. The key is to know the specific, measurable standards that separate professional-grade work from a shoddy installation. Here is a detailed checklist to assess the quality of your quartz seam.
Width: The Industry Standard for Tightness
An acceptable quartz seam should be incredibly tight and consistent. The industry standard, set by organizations like the Natural Stone Institute, dictates that a seam should be no wider than 1/16 of an inch. Anything wider can trap dirt and bacteria and will be much more noticeable.
A truly skilled fabricator often achieves a “hairline” seam, which is even tighter and appears as a fine, subtle line rather than a distinct gap. This precision is typically accomplished using advanced tools like seam setters, which use vacuum suction to pull the two pieces of quartz together with immense force while the adhesive cures.
Levelness: A Seamless, Smooth Transition
When you run your hand across the seam, it should feel perfectly smooth and level. There should be absolutely no “lippage,” which is an unevenness where one side of the seam is higher than the other. Even a minuscule height difference, as small as 1/32 of an inch, can be felt and can cast a shadow, making the seam more visible.
Installers prevent lippage by ensuring the cabinets underneath are perfectly level and by using shims where necessary. During the installation, they use seam setters not only to pull the slabs together but also to level the surfaces, ensuring a flawless, flat transition between the two pieces.
Color Match: The Art of Invisible Epoxy
The gap in a seam is filled with a specialized, high-strength epoxy resin. For the seam to blend in, this epoxy must be perfectly color-matched to the quartz. A professional fabricator will custom-tint the epoxy on-site, carefully mixing pigments to match the dominant background color of your countertop.
Poor color matching is an instant red flag. An epoxy that is too dark, too light, or the wrong hue will make the seam stand out like a sore thumb. For quartz with multiple colors, the fabricator should match the most neutral, predominant color to ensure the best blend.
Pattern & Vein Matching: The Ultimate Test of Craftsmanship
For quartz with dynamic patterns or veins, achieving a good flow across the seam is a hallmark of a master craftsman. While a perfect, uninterrupted continuation of a vein is rare and often requires purchasing sequential slabs for “bookmatching,” a skilled fabricator will still aim for a pleasing and logical transition.
They should cut the slabs in a way that the pattern flows in the same direction and the veining appears to continue naturally. The same principles that apply to achieving a perfect flow in heavily patterned stones are also relevant here; the goal is to create a cohesive look, much like the challenge of granite matching. A disjointed pattern where veins abruptly stop or change direction is a sign of poor planning during the layout phase.
Red Flags: Signs of a BAD Quartz Seam You Must Not Ignore
Now that you know what to look for in a good seam, it’s equally important to recognize the signs of an unacceptable one. If you notice any of the following issues, you should address them with your fabricator immediately, before making your final payment.
Key warning signs include visible chips or jagged edges along the seam line, a noticeable height difference (lippage) between the two pieces, and wide or uneven gaps. Additionally, mismatched epoxy color that starkly contrasts with the countertop is a clear defect. Another red flag is a hazy or dull area surrounding the seam, which indicates improper cleaning of adhesive residue.
| Characteristic | Acceptable Seam (Good) | Unacceptable Seam (Bad) |
|---|---|---|
| Width | 1/16″ or less; consistently tight. | Wider than 1/16″; uneven or gaps present. |
| Feel | Perfectly smooth and level; no lippage. | One side is higher than the other; you can feel a “lip”. |
| Epoxy Color | Custom-tinted to closely match the quartz color. | Wrong color, too dark, or too light; stands out. |
| Pattern Flow | Veins and pattern flow logically across the seam. | Patterns are mismatched; veins end abruptly. |
| Edges | Clean, sharp, and free of chips. | Chipped or jagged edges along the seam line. |
| Finish | Finish is consistent with the rest of the countertop. | Hazy or dull spot around the seam from epoxy residue. |
Your Pre-Installation Playbook: How to Guarantee a Perfect Seam
The best way to deal with a bad seam is to prevent it from ever happening. Being a proactive and informed customer is your greatest asset. Arm yourself with the right knowledge and take these crucial steps before and during the fabrication process to ensure a high-quality result.
Ask the Right Questions Before You Sign
When vetting fabricators, don’t just focus on the price. A cheaper quote can sometimes lead to subpar workmanship. Ask specific questions about their seaming process and treat it like an interview for a critical job—because it is.
Inquire directly, “Can I see photos of your recent seam work, specifically with a quartz color similar to mine?” Also ask, “What is your standard seam width, and what tools do you use to ensure it’s level and tight?” For veined quartz, ask how they approach pattern matching and if you can participate in the layout approval.
The Templating Appointment is Non-Negotiable
Insist on being present when the fabricator comes to create the template for your countertops. This is your single best opportunity to influence the final outcome. Use this time to have a detailed discussion about where the seams will be placed.
A reputable fabricator will bring physical or digital layout tools to show you exactly where the seams are planned. This allows you to approve the locations, ensuring they are not in a high-traffic or highly visible area. This is the moment to voice your preferences and concerns, not after the stone has been cut.
Get It In Writing
Once you and the fabricator have agreed on the seam locations, ensure that this plan is documented on the official drawings or contract. This written agreement serves as your proof of what was decided.
If the final installation deviates from this approved plan without your consent, you have clear grounds to request a correction. This simple step can save you from a major headache and provides crucial leverage if a dispute arises.
What to Do If Your Seam is Unacceptable
Despite your best efforts, you might end up with a seam that doesn’t meet quality standards. If this happens, it’s important to act calmly, quickly, and professionally. Do not let the installers leave or make the final payment until you have a clear resolution plan.
First, document everything immediately. Take clear, well-lit photos and videos of the seam from multiple angles. Next, contact the project manager or owner of the fabrication company right away. Clearly and calmly explain the specific issues—referencing the standards of width, levelness, and color match—and provide your photographic evidence. Refer back to your contract and the approved template drawings. If the seam placement or quality violates what was agreed upon, you are in a strong position to demand a fix.
Beyond the Basics: Advanced Seam Considerations
Achieving a truly superior seam involves more than just the fundamentals. Several nuanced factors, often overlooked in standard guides, can dramatically influence how a seam is perceived in your finished kitchen. Understanding these details can elevate your project from merely “acceptable” to truly exceptional.
The interplay between seams and lighting is one of the most critical yet frequently ignored aspects. A seam that looks fine in ambient light can become glaringly obvious under direct under-cabinet lighting or when hit by low-angle sunlight from a nearby window. These light sources can cast small shadows across the seam, highlighting any minor imperfections in levelness or width. Discuss your lighting plan with your fabricator so they understand which areas will be under the most intense scrutiny.
Furthermore, your choice of material significantly impacts seam visibility. Quartz styles with fine, consistent, and non-directional patterns are far more forgiving. Products like those you might find in Manor House quartz reviews often feature subtle designs that help camouflage seams effectively. In contrast, dramatic, large-veined patterns require much more skill and slab material to achieve a pleasing flow, making the fabricator’s expertise paramount.
Finally, inquire about the fabricator’s technology. Top-tier workshops invest in advanced equipment like CNC (Computer Numerical Control) cutting machines and automated vacuum seam setters. This technology produces cleaner, more precise edges and applies perfectly consistent pressure during bonding, resulting in tighter, more level seams that are simply unattainable through manual methods alone. The use of such equipment is often a reliable indicator of a fabricator’s commitment to quality.
A quartz seam might seem like a small detail, but it has a huge impact on the final look and feel of your kitchen. By understanding what defines an acceptable seam, you can ensure your countertop investment is a source of pride for years to come.
An acceptable seam is tight, level, and expertly blended. Armed with this knowledge, you are now equipped to confidently oversee your project, ask the right questions, and advocate for the high-quality craftsmanship your home deserves.
Conclusion
While a visible seam can feel like a devastating flaw, it is often a solvable challenge rather than a permanent disaster. High-quality quartz installation relies on color-matched epoxy and precision suction tools to make joins nearly invisible. If your seam stands out, it may be due to poor adhesive leveling or a lack of “bookmatching” in the stone’s pattern.
Rather than settling for a marred finish, address the issue with your installer immediately. With professional resin tinting and buffing, that distracting line can be minimized, shifting the focus back to the beauty of your investment and restoring the seamless elegance your dream kitchen deserves.