Paint for Snowblower: Stop Clogs & Rust With This One Trick
That once-bright snowblower, a proud warrior of winter, now sits defeated in the corner of the garage. Its body is scarred with rust, and the paint is peeling away in sad, tired flakes. This isn’t just a cosmetic issue; it’s a critical failure that cripples your machine’s performance and shortens its lifespan.
When the original paint inside the auger housing and discharge chute wears away, the bare, rough metal creates immense friction. Wet, heavy snow clings to these surfaces, causing constant, frustrating clogs. This forces you to stop, clear the chute, and puts a tremendous strain on the engine, leading to premature wear and potential failure.
The solution is not just a simple touch-up. It’s about applying a new, superior coating that not only restores the machine’s appearance but fundamentally enhances its function. By choosing the right type of paint and following a precise application process, you can create a surface far slicker and more durable than the original factory finish, ensuring years of trouble-free, powerful snow-clearing performance.
You'll Learn About
Why Factory Paint Fails: The Hidden Enemy of Your Snowblower
Snowblower paint endures one of the harshest environments imaginable. It’s a constant battle against moisture from melting snow, corrosive salt and de-icing chemicals kicked up from the driveway, and severe abrasion from ice, rocks, and debris. The standard-issue enamel or powder coat applied at the factory simply isn’t designed for such a relentless assault.
Over time, this constant abuse wears down the protective layer, exposing the raw steel underneath. Rust quickly takes hold, creating a pitted, rough surface. It’s this increased surface friction that is the true performance killer, grabbing onto wet snow and causing the machine to clog, strain, and ultimately underperform when you need it most.
The Unbeatable Paint Types Almost No One Talks About
While a fresh coat of high-gloss enamel is a good step up, true long-term performance and durability come from specialized coatings. These advanced paints create a hard, slick barrier that stands up to abuse and makes snow ejection effortless. For a truly professional and lasting result, consider these top-tier options.
Epoxy paint is a two-part coating that creates an incredibly hard and durable shell. Its primary advantage is its exceptional resistance to chemicals, including the corrosive salts and brines used on winter roads. A high-quality epoxy finish provides a thick, protective barrier that is highly resistant to chipping and impacts.
For the ultimate in non-stick performance, ceramic-reinforced paint is the superior choice. These paints are infused with microscopic ceramic particles that create an extremely low-friction, slick surface. This “hydrophobic” quality actively repels water and prevents wet snow from bonding to the metal, making it ideal for the inside of the auger housing and chute.
Another highly effective option is graphite paint, often sold under brand names like Slip Plate. This coating dries to a dark gray, slick finish that acts as a dry lubricant. It’s specifically designed to reduce sliding friction on agricultural and industrial equipment, making it a perfect, battle-tested solution for preventing clogs in your snowblower.
Choosing Your Weapon: A Head-to-Head Paint Comparison
Selecting the right paint is the most critical decision in this project. Each type offers a unique balance of durability, slickness, ease of application, and cost. This table breaks down the most common and effective options to help you choose the best coating for your needs and budget.
| Paint Type | Best For | Pros | Cons | Average Cost (per can) |
|---|---|---|---|---|
| Standard Enamel | Exterior body panels, handles | Inexpensive, wide color selection | Lowest durability, prone to chipping | $6 – $10 |
| High-Gloss Hard Enamel | Overall use, good for chutes | Good gloss, improved hardness | Requires thorough prep, can still chip | $8 – $15 |
| Appliance Epoxy Spray | Auger housing, chute interior | Very hard, durable, chemical resistant | Longer cure time, limited colors | $12 – $20 |
| Ceramic Engine Enamel | Auger housing, chute interior | Excellent abrasion resistance, slick finish | Higher cost, requires careful prep | $15 – $25 |
| Graphite Slip Plate | Chute interior, auger blades | Extremely low friction, prevents sticking | Only available in gray/black, not for exterior aesthetics | $18 – $30 |
The 7-Step Pro Painting Process for a Flawless Finish
A professional-quality paint job is 90% preparation. Rushing these steps will guarantee a finish that peels, chips, and fails within a single season. Follow this process carefully to ensure your new coating adheres properly and provides maximum protection and performance.
Step 1: Dismantle Key Components
For the best results, you must take key parts off the machine. At a minimum, remove the discharge chute and its directional controls. If you are comfortable with it, removing the auger housing from the main tractor body will allow for much easier and more thorough prep and painting.
Step 2: The Critical Degreasing Stage
Years of grease, oil, and grime will kill paint adhesion. Simply washing with soap and water is not enough. Use a dedicated heavy-duty degreaser or acetone and scrub all surfaces to be painted. Ensure the surface is squeaky clean and completely dry before moving to the next step.
Step 3: Eradicate Rust Like a Pro
You cannot paint over rust. For heavy rust and flaking paint, an angle grinder with a wire wheel or a flap disc is most effective. For lighter surface rust, a drill with a wire wheel attachment or aggressive sanding will work. The goal is to get down to clean, bare metal in all rusted areas.
Step 4: Create Mechanical Adhesion
New paint needs a rough surface to grip onto. Sand all surfaces—both the bare metal and any remaining original paint—with 80 to 120-grit sandpaper. The goal is to scuff the entire surface, removing all gloss. This step is absolutely essential for proper paint adhesion and cannot be skipped.
Step 5: The Primer Foundation
Primer is the glue that holds your top coat to the metal. For any bare metal areas, you must use a self-etching or epoxy primer. This type of primer chemically bonds to the steel for a tenacious grip. Apply two light coats of primer over the entire surface, allowing it to dry completely as directed by the manufacturer.
Step 6: Applying Your Top Coat
Work in a well-ventilated area with temperatures between 50°F and 90°F. Shake the spray can for at least one full minute. Apply the paint in several light, sweeping coats rather than one heavy coat. This prevents runs and ensures a more even, durable finish. Allow adequate drying time between coats as specified on the can.
Step 7: Curing is Not Just Drying
Paint may feel dry to the touch in a few hours, but it is not fully hardened. Full curing, where the paint reaches its maximum hardness and chemical resistance, can take up to 7 days. Do not reassemble or use the snowblower until the paint has fully cured to avoid damaging the new finish.
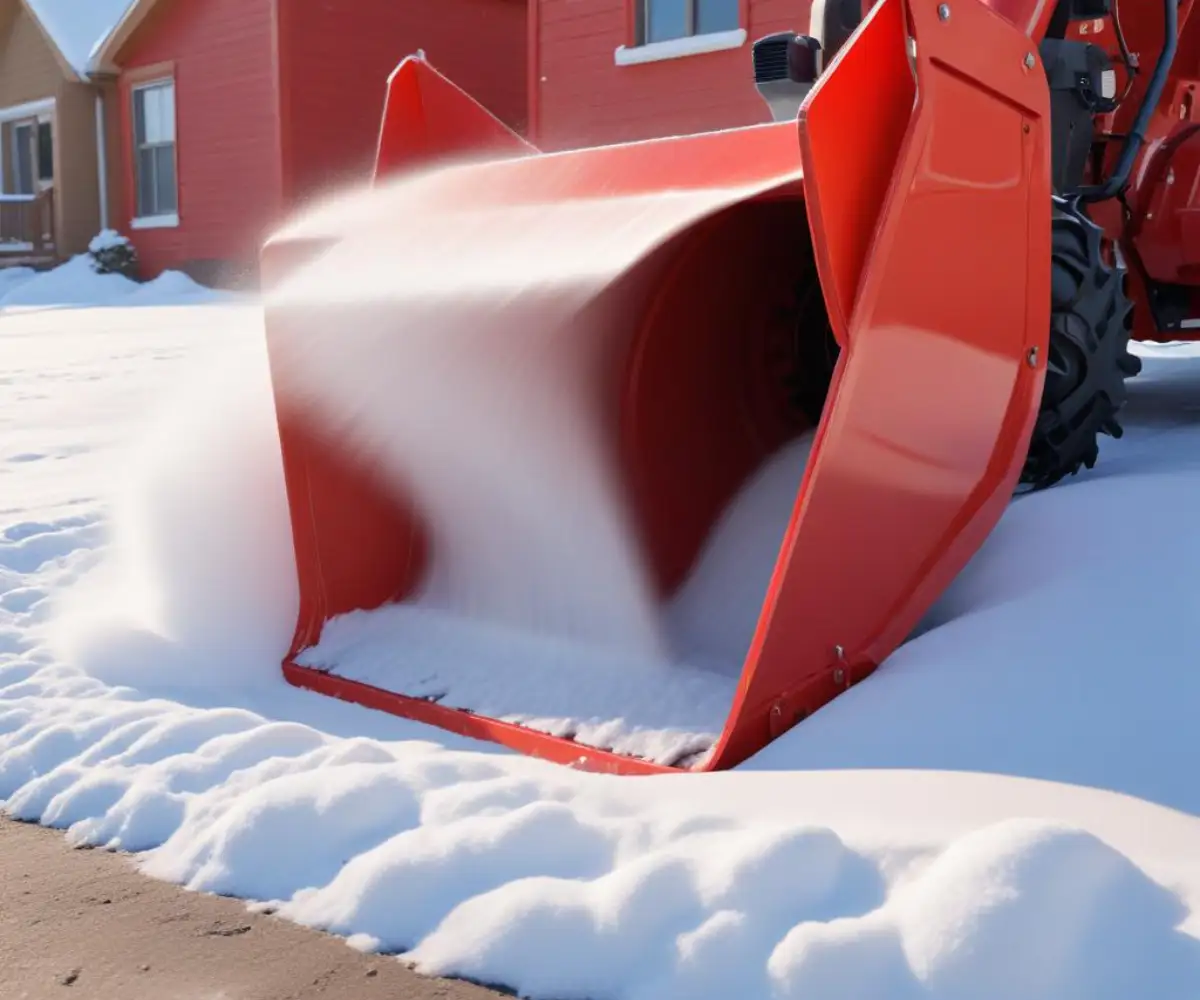
The Chute & Auger: A Special Case for Ultimate Performance
The inside of the auger housing and the discharge chute are the most critical areas for performance. While a good quality hard enamel will work, applying a specialized coating here will yield the best results. This is the perfect application for a ceramic-reinforced enamel or a graphite slip-plate coating.
The ultra-slick surface these products create does more than just prevent clogs. It reduces the energy the engine needs to expend to eject the snow. This can translate directly into increased throwing distance and less strain on the motor, belts, and pulleys, especially when dealing with heavy, wet snow.
Common Mistakes That Guarantee a Peeling, Chipped Mess
Many well-intentioned paint jobs fail quickly due to a few common, avoidable errors. Understanding these pitfalls ahead of time will save you the frustration of having to do the job all over again.
Mistake 1: Skipping the Prep. The single biggest error is failing to properly clean, degrease, and sand the surface. Remember, your new paint is only as good as the foundation it is applied to. Any remaining rust, grease, or glossy surface will cause the new paint to flake off.
Mistake 2: Using the Wrong Primer. Applying regular primer to bare metal is a recipe for failure. You must use a self-etching or epoxy primer on bare steel to ensure a permanent bond. This is a critical detail for long-term durability.
Mistake 3: Painting in a Cold or Humid Environment. Paint needs a specific temperature and humidity range to adhere and cure properly. Painting in a cold, damp garage will trap moisture under the paint, leading to poor adhesion and bubbling. Always follow the temperature guidelines on the paint can.
Mistake 4: Applying Coats Too Thickly. It can be tempting to lay on a thick coat of paint to get the job done faster. However, this traps solvents underneath, leading to a soft finish that takes an extremely long time to cure and is prone to runs and sags. Multiple light coats are always better than one heavy coat.
Beyond Paint: Long-Term Protection Strategies
Once your new paint job is fully cured, a few simple steps can help maintain the finish and your snowblower’s overall condition. Before each season, consider applying a coat of automotive wax or a quality silicone spray to the inside of the chute for an extra layer of non-stick protection.
Regular maintenance complements your new paint. Ensure all moving parts are lubricated and check the condition of your scraper bar. Protecting the bottom of the auger housing with a fresh set of skids is also crucial; consider upgrading to quick-adjust snowblower skids for easier maintenance and better protection of the housing’s new finish. This holistic approach is perfect for revitalizing classic machines, such as giving a new lease on life to a dependable 2005 Craftsman snowblower.
Final Thoughts: A Weekend Project That Pays Off All Winter
Repainting your snowblower is more than just a cosmetic upgrade; it’s a strategic investment in performance and longevity. By transforming rusty, high-friction surfaces into a slick, durable shield, you solve the frustrating problem of constant clogging and reduce wear on your machine’s engine.
This is an achievable weekend project that pays huge dividends throughout the winter. Taking the time to properly prepare and paint your machine will reward you with a snowblower that not only looks like new but performs better than ever, ready to tackle the heaviest snowfalls with ease and reliability.