Oliverio Peppers Copycat Recipe: Your Garden-to-Table Guide
There’s a certain magic to a jar of perfectly preserved peppers. For enthusiasts of Italian-style condiments, Oliverio peppers represent a gold standard of flavor—a delightful mix of sweet, savory, and spicy notes packed in a rich sauce. The problem? You can’t always find them, or perhaps you dream of capturing that same incredible taste using peppers grown in your very own garden.
This desire to replicate a beloved flavor with homegrown ingredients is a common challenge for many home cooks and gardeners. The solution lies not just in a simple recipe, but in understanding the entire process, from selecting the right pepper varieties to mastering the art of safe preservation. This comprehensive guide will walk you through every step to create a stunning Oliverio peppers copycat that might just taste better than the original.
You'll Learn About
Why Make a Copycat Recipe at Home?
Creating your own version of Oliverio peppers offers numerous advantages beyond simply satisfying a craving. When you control the ingredients, you control the final product. You can adjust the heat level to your exact preference, reduce the sodium content, or use a specific type of high-quality olive oil.
Furthermore, there is immense satisfaction in transforming a garden harvest into a shelf-stable pantry staple. It’s a sustainable practice that honors the effort put into growing your produce. A homemade jar of these peppers also makes for a thoughtful and impressive gift for friends and family.
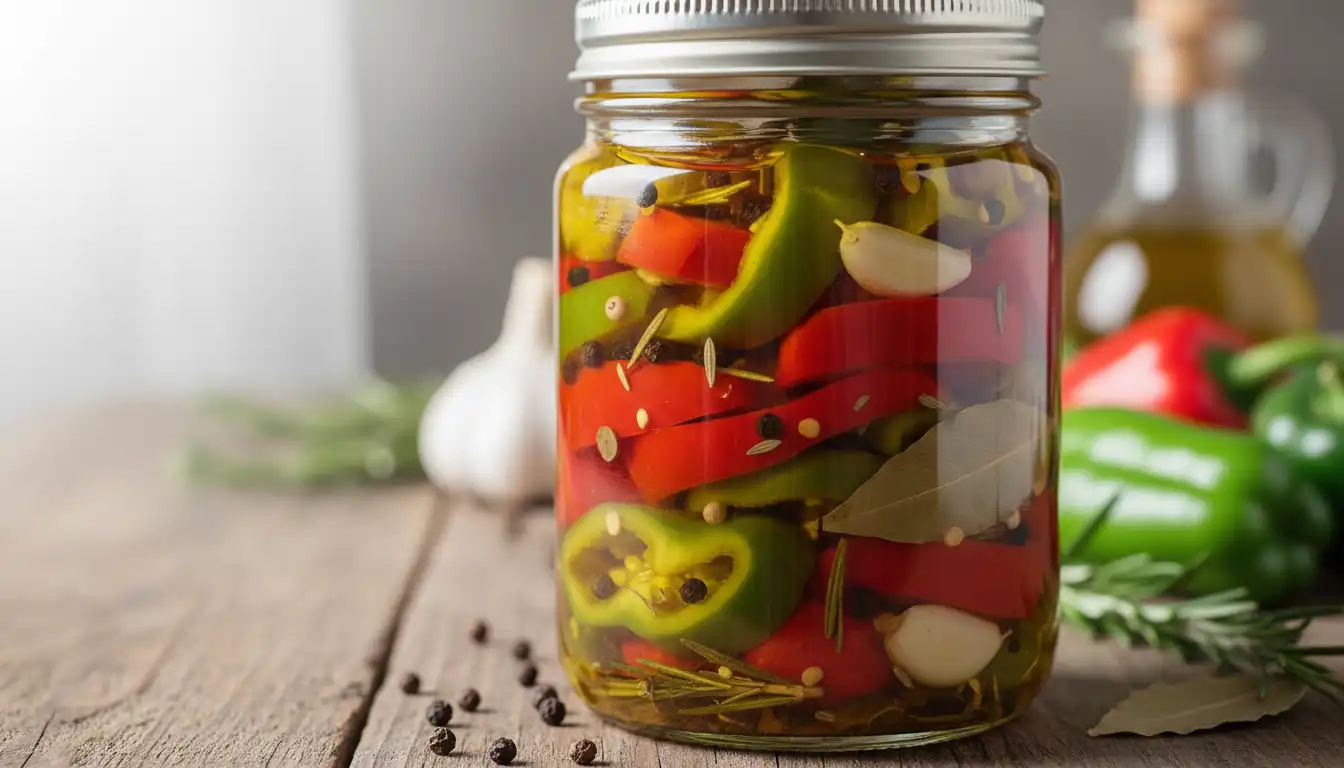
Choosing Your Peppers: The Foundation of Authentic Flavor
The first and most critical step is selecting the right peppers. Oliverio-style peppers typically use a blend of sweet and mildly hot peppers to achieve their signature taste. Combining different varieties will create a more complex and interesting final product. This is where your home garden can give you a distinct advantage.
Growing your own peppers allows you to experiment with varieties not commonly found in grocery stores, tailoring the flavor profile from the very beginning. Success starts with healthy soil and consistent care, ensuring your plants produce a bountiful and flavorful harvest.
Best Pepper Varieties to Grow or Buy
For the sweet component, classic bell peppers (red, yellow, or orange) are an excellent base. They provide a fleshy, sweet foundation. For a more authentic Italian flavor, consider growing Marconi or Corno di Toro peppers, which are sweeter and have a thinner skin, making them ideal for sauces.
For the heat, you have several options. Banana peppers or Hungarian Wax peppers offer a mild to medium heat that is flavorful without being overwhelming. For a touch more spice, jalapeños can be used sparingly. The goal is a balanced heat that complements, rather than overpowers, the other ingredients.
The Ultimate Oliverio Peppers Copycat Recipe
This recipe is designed to replicate the classic taste and texture of Oliverio peppers. It emphasizes a rich, savory sauce and tender, flavorful pepper strips. Remember that precision, especially with canning, is key to a safe and delicious result.
Before you begin, ensure your kitchen workspace is clean and organized. A clutter-free environment makes the cooking and canning process much more efficient. Even small details, like having well-maintained appliances, can make a difference. Unexpected equipment failures can be costly and disruptive, similar to the surprise of figuring out how much does Sears charge for a service call.
Essential Ingredients
This recipe yields approximately 4-5 pint jars.
- 3 lbs mixed sweet peppers (e.g., red bell peppers, Corno di Toro)
- 1 lb mixed mild-to-medium hot peppers (e.g., Hungarian Wax, banana peppers)
- 2 (28-ounce) cans of crushed tomatoes
- 1 cup high-quality olive oil, plus more for topping
- 1 cup white vinegar (5% acidity)
- 1 large yellow onion, finely chopped
- 8-10 cloves garlic, minced
- 3 tablespoons dried oregano
- 2 tablespoons dried basil
- 1 tablespoon salt
- 1 teaspoon black pepper
- 1 teaspoon red pepper flakes (optional, for extra heat)
Kitchen Equipment You’ll Need
- Large, heavy-bottomed pot or Dutch oven
- Canning jars with new lids and bands (pint-sized are ideal)
- Water bath canner or a large stockpot with a rack
- Jar lifter, funnel, and lid wand
- Cutting board and sharp knife
Step-by-Step Instructions
1. Prepare the Peppers: Wash all peppers thoroughly. Remove the stems, seeds, and membranes. Slice the peppers into uniform strips, about 1/2-inch wide.
2. Sauté Aromatics: In your large pot, heat 1 cup of olive oil over medium heat. Add the chopped onion and sauté until softened and translucent, about 5-7 minutes. Add the minced garlic and cook for another minute until fragrant, being careful not to let it burn.
3. Build the Sauce: Stir in the crushed tomatoes, white vinegar, dried oregano, dried basil, salt, black pepper, and optional red pepper flakes. Bring the mixture to a gentle simmer.
4. Cook the Peppers: Add the prepared pepper strips to the simmering sauce. Stir well to ensure all the peppers are coated. Let the mixture return to a simmer, then reduce the heat to low, cover, and let it cook for 20-25 minutes, or until the peppers are tender but not mushy. Stir occasionally to prevent sticking.
5. Prepare for Canning: While the peppers are cooking, prepare your water bath canner. Fill it with water, place the rack in the bottom, and bring it to a boil. Wash your jars, lids, and bands in hot, soapy water. Keep the jars hot until you are ready to fill them.
6. Fill the Jars: Using a canning funnel, carefully ladle the hot pepper mixture into the hot jars, leaving 1/2-inch of headspace at the top. Use a clean cloth or paper towel dipped in vinegar to wipe the rims of the jars to ensure a clean seal.
7. Seal and Process: Center the new lids on the jars and screw on the bands until they are “fingertip tight.” Do not overtighten. Using the jar lifter, carefully place the jars into the boiling water bath canner. Ensure the jars are covered by at least 1-2 inches of water. Process the pint jars for 15 minutes. Adjust processing time based on your altitude if necessary.
8. Cool and Store: After processing, turn off the heat and let the jars sit in the canner for 5 minutes before removing them with the jar lifter. Place them on a towel-lined counter and let them cool, undisturbed, for 12-24 hours. You will hear the lids “ping” as they seal. Check the seals; if a jar did not seal properly, refrigerate it and use it within a week. Store sealed jars in a cool, dark place.
Mastering the Technique for Authentic Results
Achieving a truly exceptional copycat recipe goes beyond just following the steps. It requires attention to detail and an understanding of the culinary science at play. Certain techniques will elevate your peppers from good to great.
The Importance of High-Quality Ingredients
The final flavor is a direct result of the quality of your ingredients. Use fresh, firm peppers, ideally from your garden or a local farmers’ market. The choice of olive oil is also crucial; a good quality, flavorful olive oil will make a noticeable difference. Canned tomatoes can vary in quality, so opt for a reputable brand known for its rich flavor.
Achieving the Perfect Texture
The goal is to have peppers that are tender yet still retain a slight bite. Overcooking them will result in a mushy, unappealing texture. The 20-25 minute cooking time in the recipe is a guideline; start checking for tenderness around the 20-minute mark. The peppers will soften slightly more during the canning process.
| Common Problem | Cause | Solution |
|---|---|---|
| Peppers are too mushy. | Overcooking before canning. | Reduce the initial simmer time by 5 minutes. Peppers should be tender-crisp before going into jars. |
| Sauce is too thin. | Excess water from peppers or not enough simmering. | Allow the sauce to simmer and reduce for 10-15 minutes before adding the peppers to thicken it. |
| Flavor is bland. | Under-seasoning or low-quality ingredients. | Taste and adjust seasoning before canning. Use fresh dried herbs and good quality oil and tomatoes. |
| Jar didn’t seal. | Improper headspace, dirty rim, or faulty lid. | Always leave 1/2-inch headspace, wipe the rim clean with vinegar, and use new lids for every batch. |
Beyond the Jar: How to Use Your Homemade Peppers
Once you have a pantry stocked with your delicious homemade Oliverio-style peppers, the possibilities are endless. Their versatile flavor profile makes them a fantastic addition to a wide variety of dishes, adding a touch of Italian flair to everyday meals.
Elevating Everyday Meals
These peppers are a game-changer for sandwiches and wraps. Layer them on an Italian sausage sandwich, a steak hoagie, or a simple turkey and provolone panini. They also shine on a charcuterie board, providing a zesty counterpoint to rich cheeses and cured meats.
For a quick weeknight dinner, stir the peppers and their sauce into cooked pasta for an instant, flavorful meal. They can also be used as a vibrant topping for homemade pizza or mixed into scrambled eggs for a zesty breakfast. Their robust flavor can even enhance simple projects around the home; a satisfying meal after a day of DIY projects is always a treat, especially after tackling a tricky vinyl plank flooring transition to carpet on concrete.
Safe Preservation: A Non-Negotiable Priority
When preserving food, especially low-acid vegetables like peppers in oil, safety is paramount. The risk of botulism, a serious foodborne illness, is real if proper canning procedures are not followed. The combination of oil and low-acid vegetables creates an anaerobic (oxygen-free) environment where Clostridium botulinum can thrive if not handled correctly.
The key to safety in this recipe is the addition of vinegar, which increases the acidity of the mixture, making it inhospitable to botulism spores. It is crucial to use vinegar with at least 5% acidity and to follow the recipe’s measurements precisely. Do not alter the ratio of peppers to acidic ingredients. Water bath canning is only safe for high-acid foods; this recipe is formulated to be safely processed this way. Always follow tested and approved canning guidelines.
From Seed to Jar: A Gardener’s Guide
For the avid gardener, the journey of creating these peppers begins long before stepping into the kitchen. Growing your own peppers provides ultimate control over flavor and quality. Peppers thrive in warm weather and need a long growing season.
Planting and Care
Start seeds indoors 8-10 weeks before the last expected frost. Pepper plants require full sun—at least 6-8 hours a day—and well-draining soil rich in organic matter. Consistent watering is key, especially once the plants begin to fruit. Mulching can help retain soil moisture and suppress weeds.
To encourage a larger harvest, pick peppers regularly once they reach a usable size. This signals the plant to produce more flowers and, consequently, more fruit. When it comes to long-term planning for your garden and home, a preservation mindset is key. This same forward-thinking approach applies to home maintenance, where many consider if protective measures are worth the investment, often asking does sealcoating really work for driveways.
Frequently Asked Questions
Can I use different types of peppers?
Absolutely. This recipe is very flexible. Feel free to experiment with different sweet and hot pepper varieties from your garden. Just maintain the overall weight ratio to ensure the recipe’s safety and consistency.
Can I freeze the peppers instead of canning them?
Yes. If you prefer not to can, the cooked pepper mixture can be cooled and stored in freezer-safe containers for up to six months. The texture may be slightly softer upon thawing, but the flavor will remain excellent.
How long will the sealed jars last?
When properly sealed and stored in a cool, dark place like a pantry or cellar, the canned peppers will last for at least one year. Once a jar is opened, it should be refrigerated and consumed within two to three weeks.
My sauce seems oily. Is that normal?
Yes, a layer of oil on top is normal and intentional. The olive oil helps to preserve the peppers and contributes to the rich flavor and mouthfeel of the final product. When you open a jar, you can stir the oil back into the sauce before serving.
A Tradition Worth Preserving
Creating your own Oliverio peppers copycat recipe is more than just a cooking project; it’s a celebration of flavor, gardening, and self-sufficiency. It connects you to the food you eat in a meaningful way, from nurturing a tiny seed in the garden to sealing the final jar that will grace your pantry.
By following these guidelines for both cultivation and safe preservation, you can confidently craft a product that rivals—and perhaps even surpasses—the store-bought version. Enjoy the process, savor the results, and share the incredible taste of your homegrown and homemade Italian-style peppers.