3×6 Shower Tile Guide: Modern Layouts, Grout Hacks, and Installation Secrets
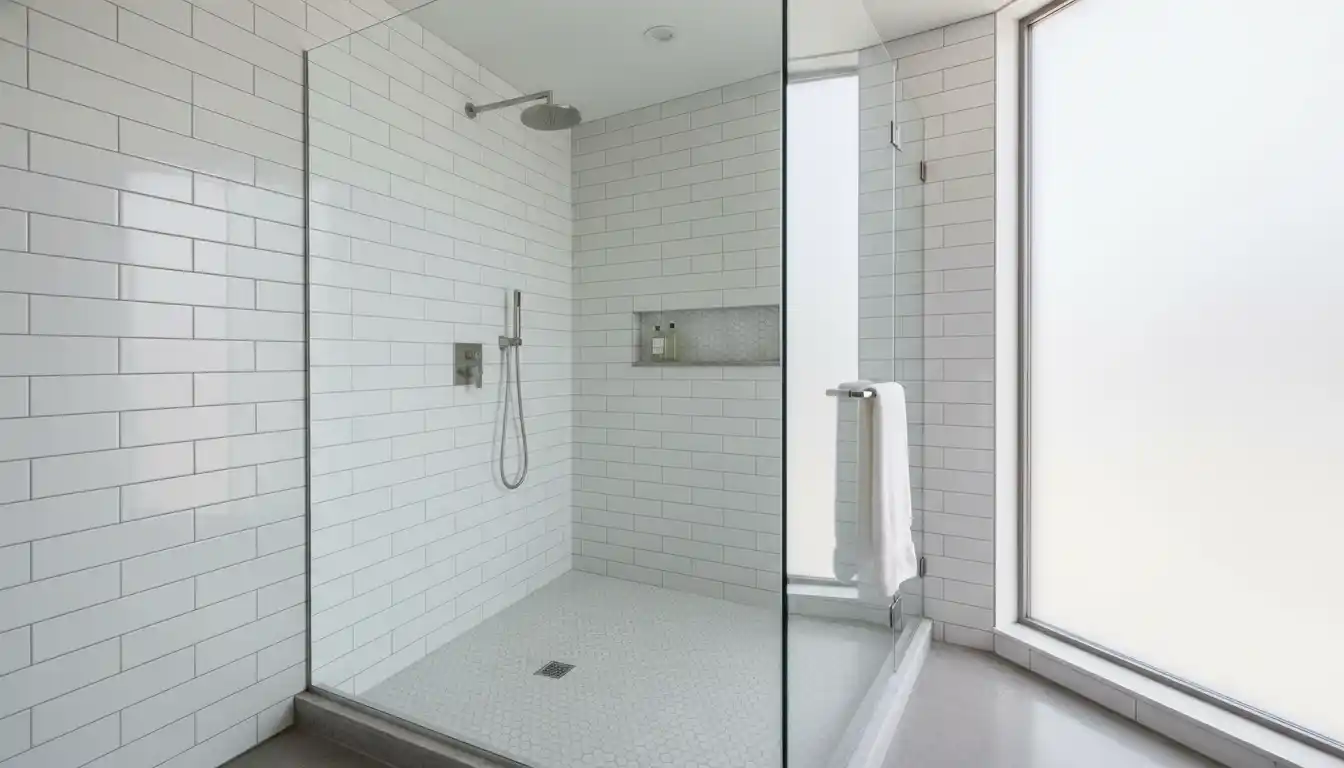
The humble 3×6 subway tile is the denim jean of the home improvement world: classic, durable, and ubiquitous. However, without careful planning, a 3×6 shower can easily veer from “timeless elegance” to “public restroom” sterility. Homeowners often struggle with making this affordable material look high-end, or they underestimate the technical precision required to layout small tiles in a large wet area. The secret to elevating a standard 3×6 shower lies in disrupting the expected running bond pattern with vertical stacking or herringbone layouts, and utilizing contrasting grout to turn simple ceramic rectangles into a geometric statement piece.
Whether you are tiling a standard tub surround or designing a massive 3-foot by 6-foot walk-in enclosure, the principles of layout, grout selection, and waterproofing remain the great equalizers. This guide delves into the structural and aesthetic strategies that separate a DIY disaster from a professional-grade finish.
You'll Learn About
Reinventing the 3×6 Shower: Beyond the Brick Pattern
The “running bond” (like a brick wall) is the default for a reason—it hides wavy walls better than stacked patterns. However, it is also the safest, most predictable choice. To add value to your bathroom renovation, you must consider how the orientation of the tile manipulates the perceived size of the room.
The Vertical Stack: Height and Modernity
If your bathroom ceilings are standard 8-foot height, a vertical stack bond is a powerful visual trick. By rotating the 3×6 tile 90 degrees and stacking them directly on top of one another (grid style) or staggering them vertically, you draw the eye upward. This creates an optical illusion of higher ceilings. This layout is particularly popular in mid-century modern and contemporary styling, offering a cleaner, more regimented look than the traditional offset.
Herringbone: The Luxury Upgrade
Herringbone patterns instantly signal “luxury” because they imply higher labor costs. Installing a 3×6 tile in a herringbone pattern at a 45-degree angle requires significantly more cuts and generates more waste (typically 15-20% waste vs. 10% for standard layouts). However, the result is a dynamic, woven texture that makes a shower feel wider. This is an excellent choice for a feature wall behind the shower valve or in a niche.
The “Soldier” Course Border
If you prefer the classic horizontal running bond, you can still modernize it by using a “soldier course.” This involves laying a row of tiles standing vertically (like soldiers) to create a border. This is often done at eye level or to frame a mosaic accent strip. It breaks up the monotony of the horizontal lines without requiring a complex layout change for the entire wall.
The “Size” Confusion: Tiling a 3ft x 6ft Shower Enclosure
Sometimes, homeowners search for “3×6 shower” referring to the footprint of the shower itself (3 feet deep by 6 feet wide), rather than the tile size. This is a common footprint when replacing a standard 5-foot bathtub and stealing a foot from a closet, or simply building a luxurious walk-in.
Scaling Small Tiles for Large Spaces
Using small 3×6 tiles in a massive 3×6-foot shower (which has roughly 100+ square feet of wall space) can be visually busy. To combat the “grid fatigue,” pros recommend breaking up the visual field. You might tile the side walls in 3×6 subway tile but use a large format porcelain slab on the back wall. Alternatively, use the 3×6 tiles on the walls but switch to a hexagon mosaic on the floor to disrupt the rectangular repetition.
Utility and Durability Considerations
Large walk-in showers are often used for more than just bathing; they are utility spaces. For homeowners who require a heavy-duty utility shower—perhaps located in a mudroom for use after operating a bobcat walk behind snowblower or gardening—the 3×6 ceramic tile is a superior choice over fiberglass inserts. Ceramic resists dog claws and heavy boots far better than acrylic, and individual tiles can be replaced if chipped, whereas a cracked fiberglass pan often requires total replacement.
Installation Critical Failures: What Pros Know
The difference between a shower that lasts 20 years and one that leaks in 2 years is rarely the tile itself—it is the preparation and the layout math. Small tiles like the 3×6 are unforgiving when it comes to “slivers” (tiny cuts of tile) in the corners.
The Built-in Lug Trap
Many inexpensive 3×6 subway tiles come with “self-spacing lugs”—tiny bumps on the side of the tile intended to create a 1/16-inch grout joint without plastic spacers. Do not trust these blindly. If your walls are not perfectly plumb, these lugs will force your grout lines to drift. Professional installers often ignore the lugs and use 1/8-inch horseshoe spacers to allow for slight adjustments, keeping the rows level even if the walls are slightly bowed.
The Corner Sliver Math
Before mixing a single drop of thin-set, you must calculate your layout. If your wall is 65 inches wide and you start with a full 6-inch tile on the left, you might end up with a 1-inch sliver on the right. This looks amateurish. The solution is to center the layout. Measure the wall, mark the center, and start tiling from the center out. This ensures that the cut tiles on both the left and right corners are equal in size and substantial enough (ideally larger than half a tile) to look intentional.
Niche Alignment Nightmares
A shower niche creates a disruption in the grid. A common failure is creating a niche where the grout lines of the surrounding wall do not align with the niche shelf or sides. This creates jagged cuts around the opening.
Pro Tip: Plan the niche location after you have determined your tile layout. Adjust the framing of the niche up or down an inch so that the bottom shelf lands exactly on a horizontal grout line. This seamless integration is a hallmark of high-end craftsmanship.
Grout: The Make-or-Break Design Element
With 3×6 tiles, you have more grout lines per square foot than with large format tiles. Consequently, the grout color defines the aesthetic. White grout on white tile creates a monolithic, texture-focused look that is forgiving of cleaning errors. Dark grey or black grout on white tile (“high contrast”) highlights the geometric pattern but demands perfection; every slightly crooked tile will be visible.
The following table outlines how grout choices impact the maintenance and visual perception of your shower:
| Grout Strategy | Visual Effect | Installation Difficulty | Maintenance Level |
|---|---|---|---|
| Tone-on-Tone (White/White) | Subtle texture, expands space, clean look | Forgiving (hides mistakes) | High (shows mold/mildew easily) |
| Soft Contrast (Light Grey) | Classic vintage look, defines edges gently | Moderate | Medium (hides light dirt well) |
| High Contrast (Black/Dark Grey) | Industrial, bold, emphasizes pattern | Unforgiving (highlights lippage) | Low (hides soap scum/stains) |
| Warm Neutral (Beige/Greige) | Softer, traditional, less sterile | Forgiving | Medium (hides mineral deposits) |
Preventing the “Picture Frame” Haze
A specific issue with 3×6 tiles, especially beveled subway tiles, is grout haze. Because the edges slope down, grout tends to get trapped in the corners during the float process. If you do not wipe this meticulously while wet, it cures into a hard haze that frames every single tile, making them look dirty forever. Use a microfiber cloth for the final haze removal, not just a sponge.
Design Cohesion: Linking the Shower to the Home
A bathroom does not exist in a vacuum. The choice of a 3×6 shower tile should converse with the rest of your home’s architecture. Flow is critical in home design. If you have kitchen island cabinets on both sides featuring a subway tile backsplash, mirroring that element in your bathroom creates a subconscious sense of unity throughout the home. It tells a story of intentional design rather than piecemeal renovation.
Lighting and Reflectivity
Glossy 3×6 tiles are excellent at bouncing light, which is crucial in small bathrooms. When planning your bathroom renovation, consider the lighting sources. Are old windows worth anything in terms of energy efficiency for a steamy bathroom? Perhaps not, but if you preserve their original trim or size for aesthetic reasons, a bright white subway tile shower can maximize the limited natural light they admit, making an old window feel like a deliberate skylight feature.
Waterproofing: The Invisible Shield
Finally, never assume tile is waterproof. Grout is porous, and water will get behind your 3×6 tiles. The longevity of your shower depends on what is behind the tile. Do not tile directly over drywall (even green board) in a wet zone.
The Gold Standard: Use a cement board backer and coat it with a liquid waterproofing membrane (like RedGard) or use a modern foam board system (like Kerdi or Wedi). These systems ensure that the moisture which penetrates the grout hits a waterproof barrier and drains down to the pan, rather than rotting your studs. With small tiles, there are more points of entry for water (more grout lines), making this step non-negotiable.
By respecting the technical requirements of the layout and waterproofing, and being bold with your pattern or grout choices, a 3×6 shower can transcend its “basic” reputation to become the highlight of your home.