3M Lead Check Orange Alert: Is Your Home Hiding a Toxic Secret?
You glance around your home, a place of comfort and safety. But for millions of homes built before 1978, a hidden danger lurks just beneath the surface of the paint: lead. This toxic heavy metal, once a common ingredient in residential paint, poses a severe health risk, especially to children and pregnant women.
The problem is that you can’t see, taste, or smell lead. It can be in the paint on your walls, doors, window sills, and trim, silently waiting to be disturbed. A simple home renovation project, or even the natural friction of opening and closing a window, can release invisible, poisonous lead dust into the air you and your family breathe.
You'll Learn About
Why You Can’t Afford to Ignore Lead Paint
Ignoring the possibility of lead paint is a gamble no one should take. The consequences of lead exposure are severe and often irreversible, turning your dream home into a source of long-term health problems.
The Health Risks Are Real and Devastating
For children, there is no safe level of lead exposure. Their developing bodies absorb lead more readily than adults, and it can cause devastating harm to their brain and nervous system. The effects can include learning disabilities, behavioral problems, lowered IQ, and slowed growth.
Adults are not immune. Lead exposure can lead to high blood pressure, joint and muscle pain, reproductive problems, and damage to the kidneys and nervous system. The insidious nature of lead poisoning is that symptoms often don’t appear until dangerous levels have accumulated in the body.
Where Is Lead Hiding in Your Home?
If your home was built before 1978, it’s highly likely to contain lead-based paint. Common hotspots include areas with older layers of paint that experience friction or impact.
Look for it on:
– Windows and window sills
– Doors and door frames
– Stairs, railings, and banisters
– Porches and fences
– Exterior siding and trim
The Renovation Risk: How DIY Projects Can Unleash a Toxic Storm
The greatest danger arises when lead-based paint is disturbed. Activities like sanding, scraping, or demolition can create vast amounts of lead-contaminated dust that spreads throughout your home, settling on floors, furniture, and toys.
This is why testing for lead before you begin any project is not just a recommendation—it is an absolute necessity for your family’s safety. Understanding every aspect of your project, down to small details like whether your painter’s tape is heat resistant for certain applications, is part of a holistic approach to safe and successful home improvement.
Your First Line of Defense: The 3M LeadCheck Swab Explained
Fortunately, you don’t have to live in uncertainty. The 3M LeadCheck Swab is a simple, affordable, and instant testing tool that empowers you to identify lead hazards in minutes. It’s a critical first step in creating a safe environment.
What Makes 3M LeadCheck the Gold Standard?
3M LeadCheck Swabs are EPA-recognized, meaning they have been evaluated by the Environmental Protection Agency and found to be reliable for determining the absence of lead-based paint on wood, plaster, drywall, and ferrous metals. This recognition provides peace of mind that you are using a trusted tool.
Their ease of use and instant results make them a favorite among homeowners and certified professionals alike. Within 30 seconds, you can get a clear answer to a critically important question.
How the “Orange” and “Red” Chemistry Works
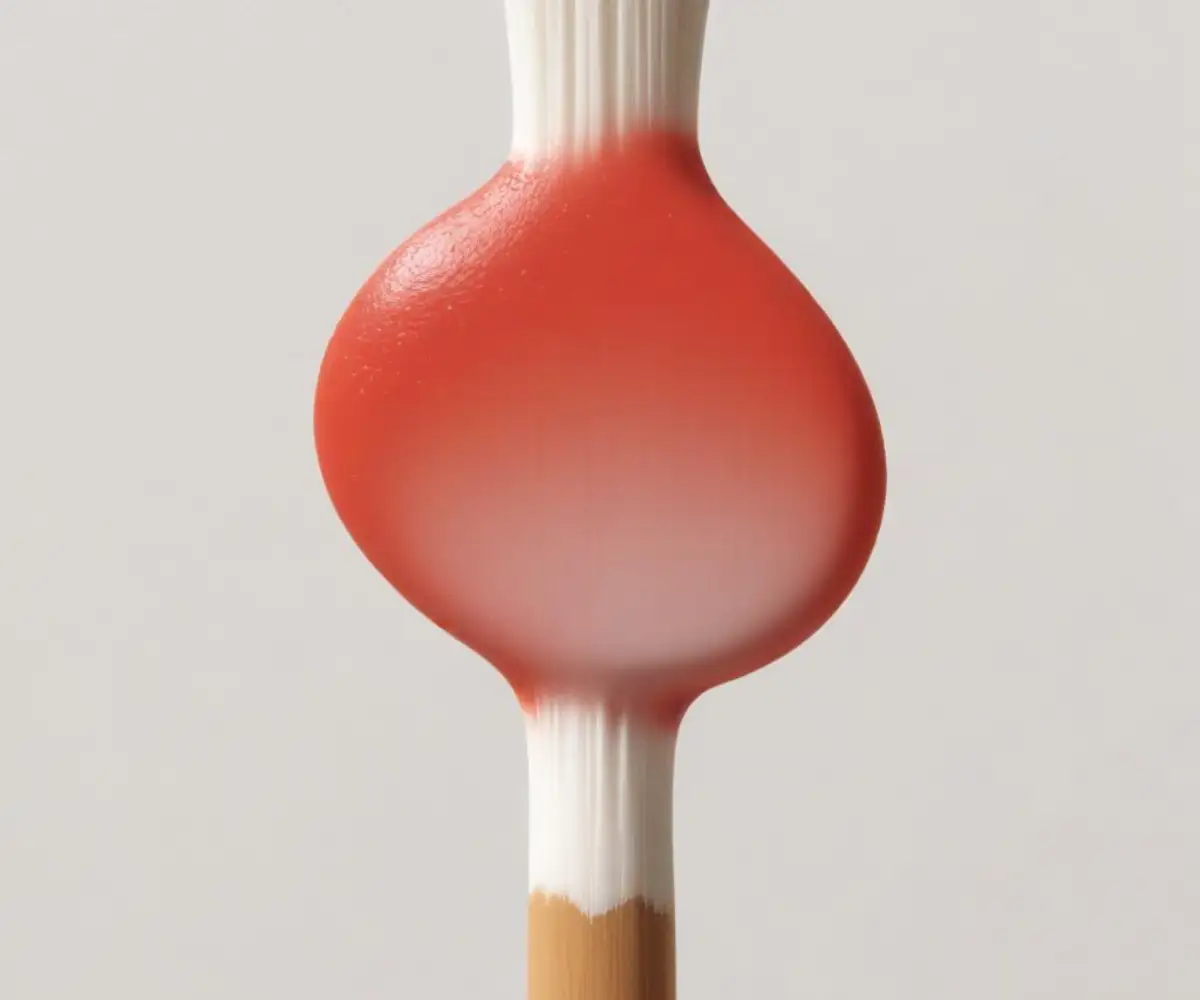
The genius of the 3M LeadCheck Swab is its simple, color-based chemistry. The swab contains two chemical vials that, when crushed and mixed, create a testing reagent. This liquid is naturally a yellow or orange color.
When this reagent comes into contact with lead, a chemical reaction occurs, causing the swab tip and/or the tested surface to turn pink or bright red. This unmistakable color change is your signal that lead is present. The rule is simple: RED MEANS LEAD™.
Before You Test: Essential Preparation Steps
For an accurate result, proper preparation is key. First, ensure the surface you want to test is clean and free of dust or grime. A simple wipe-down is usually sufficient.
If you are testing a painted surface, you must test all layers of paint. Use a clean utility knife to carefully cut a small, deep crosshatch or notch through the paint until you reach the bare wood, plaster, or drywall underneath. This ensures your test will detect lead even if it’s buried under newer, lead-free layers.
A Step-by-Step Guide to Using 3M LeadCheck Swabs Correctly
Using the 3M LeadCheck Swab is incredibly simple. Follow these steps precisely to ensure you get an accurate result every time.
- Activate the Swab: Hold the swab’s barrel and firmly squeeze and crush the points marked “A” and “B”. You should hear and feel the vials inside breaking.
- Shake and Squeeze: With the swab tip pointing down, shake it twice. Gently squeeze the barrel until you see the yellow/orange testing liquid saturate the fiber tip.
- Rub the Surface: While continuing to gently squeeze, rub the activated tip on the prepared test area for 30 seconds. Make sure the liquid makes good contact with all the exposed layers of paint.
- Read the Results: Immediately check for a color change. If the swab tip or the tested area turns pink or red, lead is present.
- Confirm Your Results: Every 3M LeadCheck kit comes with a confirmation card. If your test result is negative (no color change), immediately touch the swab to one of the dots on the card. The swab should turn red, confirming the test was working correctly.
Interpreting Your Results: What a “Red” or “Orange” Result Really Means
The results are instant, but understanding what they mean is crucial for deciding your next steps. The color of the swab tells you everything you need to know.
It’s Positive (Red/Pink): Now What?
A pink or red result is a definitive positive for lead. If you get this result, your first action should be to stop all work immediately. Do not proceed with any sanding, scraping, or demolition that could disturb the paint further.
Isolate the area to prevent the spread of dust. If the positive test is related to a planned renovation, you should now consult a certified lead abatement professional to discuss safe removal or encapsulation options.
The Ambiguity of “Orange”: Is It Negative?
The testing liquid itself is yellow or orange. If the swab remains this color after the 30-second test, it indicates a negative result—no lead was detected. However, you must always verify a negative result using the included confirmation card to ensure the swab was not faulty.
Some users report confusion between a true orange and a reddish-orange. When in doubt, compare the color to the bright, unmistakable red that appears when you use the confirmation card. If it’s not that color, it is considered negative.
False Negatives and When to Be Skeptical
While the tests are EPA-recognized and highly reliable when used correctly, no test is 100% foolproof. The biggest cause of a false negative is improper preparation. If you don’t expose all the layers of paint down to the substrate, you might be testing a top layer of lead-free paint while older, lead-based layers remain hidden underneath.
For ultimate peace of mind, especially in high-risk areas or homes with young children, you may consider sending a paint chip sample to a certified lab for professional analysis, even after a negative swab test.
| Swab Color | Surface Result | What It Means | Recommended Next Step |
|---|---|---|---|
| Yellow / Orange | No color change | Negative (No lead detected at hazardous levels) | Proceed with your project using standard dust-safe practices. Always verify the negative result with the confirmation card. |
| Pink / Red | Pink / Red color appears on surface or swab | Positive (Lead has been detected) | STOP WORK IMMEDIATELY. Isolate the area and consult a certified lead abatement professional for guidance. |
| No color change on swab or confirmation card | N/A | Invalid Test (The swab is faulty) | Discard the swab and re-test the area with a new one. |
Beyond the Swab: Professional Lead Abatement and Safe Practices
A positive lead test is not the end of your project, but it is a critical turning point. How you proceed will determine the safety of your home for years to come.
When to Call in the Professionals
While some minor lead-related tasks can be handled with extreme care by a knowledgeable DIYer, large-scale lead paint disturbance is a job for certified professionals. You should always hire a certified lead abatement contractor if you are planning major renovations, have large areas of peeling lead paint, or if young children or pregnant women are in the home.
These professionals are trained in containment, removal, and disposal procedures that ensure the lead is handled safely without contaminating your entire home. Their expertise is an investment in your family’s health.
Safe DIY Practices if Lead is NOT Detected
Even with a negative lead test, it’s always wise to practice dust-safe work habits. After confirming the absence of lead, you can confidently move forward with other project decisions, like determining the correct grout line size for your new shower tiles, knowing you’ve addressed the biggest potential hazard first.
Always use dust masks, seal off the work area from the rest of the house with plastic sheeting, and clean up thoroughly with a HEPA vacuum at the end of each day.
Containment and Cleanup: The Unskippable Steps
Proper containment and cleanup are just as important as the removal process itself. This focus on meticulous removal is a principle that applies to many home projects, whether you’re dealing with lead paint or figuring out how to remove acoustic foam from a wall without leaving residue behind.
Always seal HVAC vents in the work area, use wet-sanding techniques to minimize dust, and never use a standard household vacuum, which will only spread fine particles through the air.
Frequently Asked Questions About 3M LeadCheck
Here are answers to some of the most common questions homeowners have about using 3M LeadCheck swabs.
Do the swabs expire?
No, 3M LeadCheck Swabs do not have a shelf life as long as the vials inside remain uncrushed and intact.
Can they test on surfaces other than paint?
Yes, they are effective on wood, metal, drywall, and plaster. They can also be used to test for lead in dust, soil, and on other surfaces, though the EPA recognition specifically applies to painted surfaces.
What if the test turns orange and then red hours later?
The results are only valid for the immediate 30-60 second testing window. A color change that occurs hours or days later is not a valid result and is likely due to the chemicals oxidizing.
Don’t Guess When Your Family’s Health Is on the Line
The threat of lead poisoning is serious, but it is also manageable. The first and most important step is to be informed. You cannot solve a problem you don’t know you have.
The 3M LeadCheck Swab is an empowering, easy-to-use tool that replaces fear and uncertainty with clear, actionable answers. For the cost of a few dollars and 30 seconds of your time, you can uncover a hidden danger and take the necessary steps to protect the ones you love most. Don’t guess, test.