36-Inch Cabinets With an 8-Foot Ceiling: Your Guide to a Perfect Fit
One of the most common design challenges in a kitchen renovation is figuring out the perfect upper cabinet height for a standard 8-foot ceiling. It’s a decision that dramatically impacts not just storage, but the entire look and feel of your space. Make the wrong choice, and the room can feel cramped or unfinished.
The core problem is achieving a high-end, built-in look while maintaining functional space and avoiding a top-heavy aesthetic. This is where the debate between different cabinet sizes often begins, but one particular combination stands out as a versatile and visually appealing solution: pairing 36-inch upper cabinets with an 8-foot ceiling.
You'll Learn About
Why This Combination is a Kitchen Design Staple
Choosing 36-inch upper cabinets for a room with 8-foot (or 96-inch) ceilings is a popular and effective strategy. It strikes a balance between maximizing vertical storage and leaving just enough room for decorative crown molding. This finishing touch is what separates a standard installation from a custom, polished look.
Without molding, the gap between the cabinets and the ceiling can become a notorious dust trap and make the installation feel incomplete. The 36-inch cabinet allows for this crucial detail, making it a go-to choice for designers and savvy homeowners alike.
The Standard Kitchen Layout: A Numbers Game
To understand why this pairing works so well, it helps to break down the standard vertical measurements of a kitchen. These dimensions are designed for ergonomic comfort and to accommodate standard appliance sizes.
Breaking Down the Vertical Space
A standard 8-foot ceiling is 96 inches tall. Kitchen design follows a simple formula starting from the floor up:
1. Base Cabinets: Standard base cabinets are 34.5 inches tall.
2. Countertop: The countertop adds another 1.5 inches, bringing the total height to 36 inches from the floor.
3. Backsplash/Clearance: The industry standard for the space between the countertop and the bottom of the upper cabinets is 18 inches. This leaves ample room for small appliances like coffee makers and stand mixers.
The Critical Role of Countertop Clearance
That 18-inch clearance is more than just a random number. It ensures your countertop workspace is usable and doesn’t feel cramped. Sticking to this dimension means that when you install a 36-inch upper cabinet, its top will sit at 90 inches off the floor (36″ base + 18″ clearance + 36″ upper).
This leaves a 6-inch space between the top of the cabinets and the 96-inch ceiling. This gap is the perfect canvas for adding beautiful crown molding, creating a seamless transition to the ceiling.
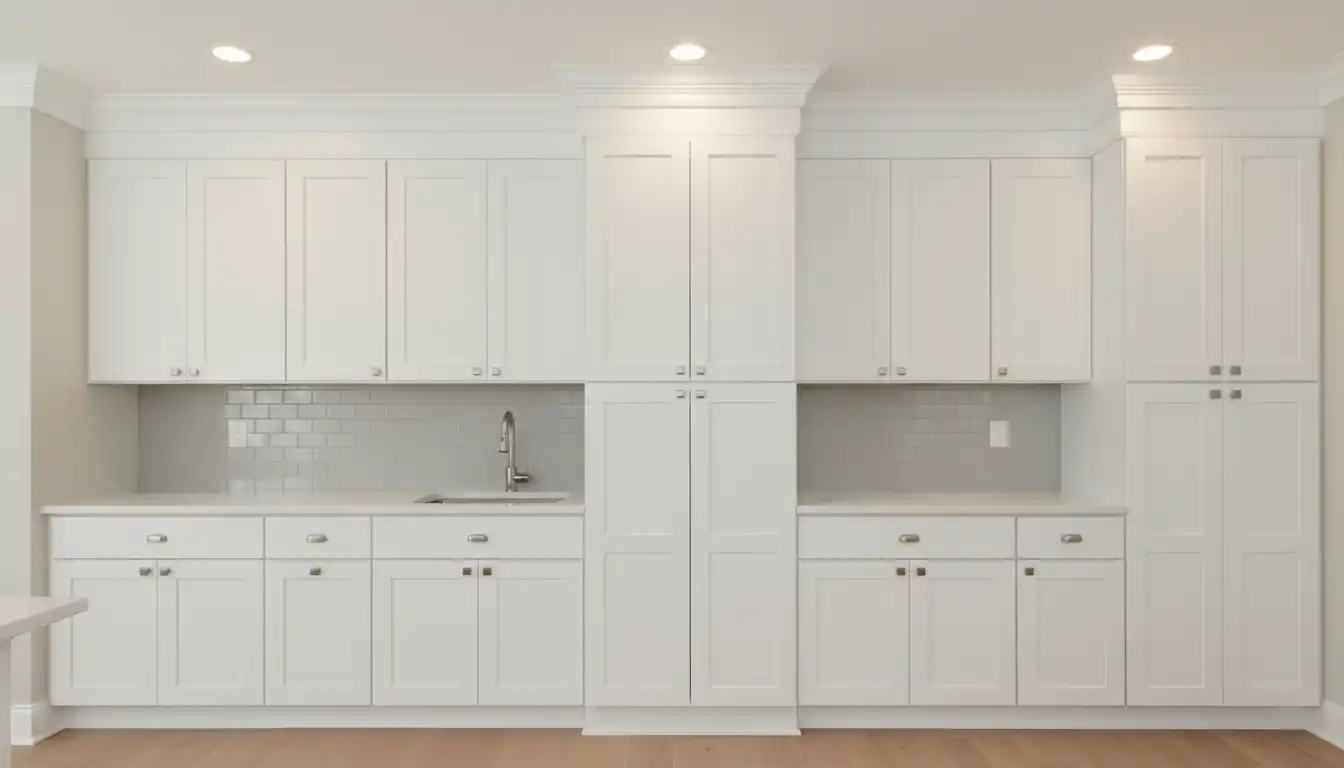
The Crown Molding Dilemma: Filling the Gap with Style
That 6-inch gap is your opportunity to elevate the entire kitchen’s design. Simply leaving it open is an option, but it often looks unfinished. Instead, using molding provides a polished, intentional look that makes the cabinets appear custom-built for the space.
Option 1: Stacked or Multi-Piece Molding
To fill a 6-inch space, you can’t just use a single piece of large crown molding, as it would overpower the cabinets. A more sophisticated approach is to use a “stacked” or multi-piece molding. This typically involves a combination of:
• A flat filler or riser piece: This is a simple, flat piece of trim installed directly on top of the cabinet to cover the initial few inches.
• Crown Molding: A more decorative crown molding piece is then installed on top of the filler, meeting the ceiling.
This technique gives the illusion of taller cabinets and provides a grand, finished appearance. It’s a detail that adds significant visual value.
Option 2: Using a Soffit or Bulkhead
Another method is to build a drywall soffit that extends from the ceiling down to the top of the cabinets. This can be painted to match the ceiling or the walls. While this was a very popular trend in older homes, it can sometimes make the ceiling feel lower.
A modern take on this is to create a soffit that matches the cabinet material, giving the appearance of one continuous piece from the cabinet to the ceiling.
Visual Tricks to Make Your 8-Foot Ceilings Look Taller
Even with the perfect cabinet height, an 8-foot ceiling can sometimes feel low. Fortunately, there are several design strategies you can use to create the illusion of more height and space.
Vertical Lines and Hardware Choices
Draw the eye upward to create a sense of height. Using long, vertical cabinet pulls instead of horizontal ones or knobs can make the cabinets feel taller. Similarly, a backsplash with vertically oriented tiles, like a stacked subway tile, can enhance this effect.
The goal is to encourage the eye to move up and down rather than side to side, which visually stretches the walls.
The Power of Color and Light
Painting your cabinets a light color can make the entire kitchen feel more open and airy. Shades like classic white, soft gray, or even a subtle, light tone like the beautiful shade from Farrow & Ball Pigeon can work wonders. Matching the cabinet color to the wall color can further blur the lines and make the space feel larger.
Good lighting is also crucial. Under-cabinet lighting not only illuminates your workspace but also makes the area feel brighter and more open. Recessed ceiling lights or flush mounts are better choices than low-hanging pendants, which can visually lower the ceiling.
Comparing Alternatives: Are 36-Inch Cabinets Always the Best Choice?
While 36-inch cabinets are an excellent option for 8-foot ceilings, it’s worth knowing the alternatives to be sure you’re making the best decision for your specific needs and aesthetic goals.
The table below compares common upper cabinet heights for a standard 8-foot ceiling, assuming a 36-inch counter height and an 18-inch backsplash.
| Cabinet Height | Space Left for Molding | Pros | Cons |
|---|---|---|---|
| 30 Inches | 12 Inches | Leaves significant room for very elaborate crown molding or an open display shelf. More accessible top shelf. | Less storage space. Can sometimes look undersized, creating a large, empty soffit area. |
| 36 Inches | 6 Inches | The “sweet spot.” Offers great storage and the perfect amount of space for stylish crown molding. Creates a high-end, balanced look. | Top shelf may be difficult for some to reach without a step stool. |
| 42 Inches | 0 Inches | Maximizes every inch of storage. Can make the ceiling feel taller by drawing the eye all the way up. | Leaves no room for crown molding. Can be very difficult to install if the ceiling isn’t perfectly level. May look too imposing in a small kitchen. |
The Case for Taller Cabinets
In some specific situations, you might consider different options. For instance, if you have ceilings that are slightly higher than 8 feet, or if maximizing storage is your absolute top priority, exploring options like 48-inch tall upper kitchen cabinets might be worthwhile, though they are generally better suited for ceilings 9 feet or higher.
Installation Best Practices for a Flawless Finish
Proper installation is key to achieving a professional look. A perfect design can be ruined by crooked cabinets or uneven gaps.
Precise Measurements are Non-Negotiable
Before you even order your cabinets, measure your ceiling height in multiple spots. Floors and ceilings are rarely perfectly level, and a half-inch difference from one end of the wall to the other can cause major headaches during installation.
Finding the highest point of the floor (or the lowest point of the ceiling) and using that as your baseline for installation will ensure a level line for your cabinets. A small gap can always be hidden with trim, but a crooked cabinet is much harder to disguise.
Leveling and Securing Your Cabinets
Always use a level to draw a guideline for the bottom of your upper cabinets (typically 54 inches from the floor). Securely screw the cabinets into the wall studs for safety and stability. For a truly professional finish, ensure that even the smallest details, like the trim work, are perfectly executed. This includes not just crown molding but also details like the trim along the floor, as a well-installed baseboard under kitchen cabinets contributes to the overall polished look.
Conclusion: Achieving a High-End Look is in the Details
Choosing 36-inch upper cabinets for your 8-foot ceiling is a smart and stylish decision that provides an excellent foundation for a beautiful kitchen. It is the perfect compromise between storage, function, and high-end aesthetics.
By pairing this cabinet size with well-chosen crown molding and paying close attention to installation details, you can create a kitchen that feels both custom-designed and perfectly proportioned. This popular combination proves that you don’t need soaring ceilings to achieve a grand and timeless look.